DROPS Muskat uni colour 100% Cotton |
2.80 $ /50g |
Order |
Clicking the ORDER button will redirect you to Wool Warehouse Direct Ltd website
The yarn cost is calculated from the pattern’s smallest size and the yarn’s cheapest product type. Looking for an even better price? You might find it on the DROPS Deals!
-------------------------------------------------------
Alternative Yarn – See how to change yarns here
Yarn Groups A to F – Use the same pattern and change the yarn here
Yarn usage using an alternative yarn – Use our yarn converter here
-------------------------------------------------------
DROPS Muskat uni colour 100% Cotton 2.80 $ /50g Order |
Clicking the ORDER button will redirect you to Wool Warehouse Direct Ltd website
The yarn cost is calculated from the pattern’s smallest size and the yarn’s cheapest product type. Looking for an even better price? You might find it on the DROPS Deals!
All measurements in charts are in cm.
= K from RS, P from WS | |
= 1 YO between 2 sts | |
= K 2 tog | |
= slip 1 st as if to K, K 1, psso | |
= slip 1 st as if to K, K 2 tog, psso |
Each of our patterns has specific tutorial videos to help you.
These step-by-step tutorials might also help you:
Why is the knitting/crochet tension so important?
Knitting tension is what determines the final measurements of your work, and is usually measured per 10 x 10 cm. It is provided like so: number of stitches in width x number of rows in height - eg: 19 stitches x 26 rows = 10 x 10 cm.
The knitting tension is very individual; some people knit/crochet loosely while others work tightly. You adjust the knitting tension with the needle size, which is why the suggested needle size only serve as a guide! You need to adjust this (up or down) to ensure that YOUR knitting tension matches the knitting tension provided in the pattern. If you work with a different knitting tension than provided you will have a different yarn consumption, and your work will have different measurements than what the pattern suggests.
The knitting tension also determines which yarns can replace each other. As long as you achieve the same knitting tension you can replace one yarn with another.
See DROPS lesson: How to measure your tension/gauge
See DROPS video: How to make a gauge tension swatch
How do I know how many balls of yarn I need?
The required amount of yarn is provided in grams, eg: 450 g. To calculate how many balls you’ll need you first need to know how many grams are in 1 ball (25g, 50g or 100g). This information is available if you click on the individual yarn quality on our pages. Divide the amount required with the amount of each ball. For example, if each ball is 50g (the most common amount), the calculation will be as follows: 450 / 50 = 9 balls.
Can I use a different yarn than what the pattern suggests?
The important thing when changing from one yarn to another is that the knitting/crochet tension remains the same. This is so that the measurements of the finished piece will be the same as on the sketch provided. It is easier to achieve the same knitting tension using yarns from the same yarn group. It is also possible to work with multiple strands of a thinner yarn to achieve the knitting tension of a thicker one. Please try our yarn converter. We recommend you to always work a test swatch.
Please NOTE: when changing yarn the garment might have a different look and feel to the garment in the photo, due to individual properties and qualities of each yarn.
See DROPS lesson: Can I use a different yarn than the one mentioned in the pattern?
What are the yarn groups?
All our yarns are categorised into yarn groups (from A to F) according to thickness and knitting tension – group A contains the thinnest yarns and group F the thickest. This makes it easier for you to find alternative yarns to our patterns, should you wish to switch yarn. All yarns within the same group have a similar knitting tension and can easily replace each other. However, different yarn qualities have different structures and properties which will give the finished work a unique look and feel.
How do I use the yarn converter?
At the top of all our patterns you’ll find a link to our yarn converter, which is a helpful tool should you wish to use a different yarn than suggested. By filling in the yarn quality you wish to replace, the amount (in your size) and number of strands, the converter will present good alternative yarns with the same knitting tension. Additionally it will tell you how much you’ll require in the new qualities and whether you’ll need to work with multiple strands. Most skeins are 50g (some are 25g or 100g).
If the pattern is worked with multiple colours, every colour will have to be converted separately. Similarly, if the pattern is worked with several strands of different yarns (for example 1 strand Alpaca and 1 strand Kid-Silk) you will have to find alternatives for each, individually.
Why do you show discontinued yarns in the patterns?
Since different yarns have different qualities and textures we have chosen to keep the original yarn in our patterns. However, you can easily find options among our available qualities by using our yarn converter, or simply pick a yarn from the same yarn group.
It is possible that some retailers still have discontinued yarns in stock, or that someone has a few skeins at home that they would like to find patterns for.
The yarn converter will provide both alternative yarn as well as required amount in the new quality.
What size should I knit?
If you think it's hard to decide what size to make, it can be a good idea to measure a garment you own already and like the size of. Then you can pick the size by comparing those measures with the ones available in the pattern's size chart.
You'll find the size chart at the bottom of the pattern.
See DROPS lesson: How to read size chart
Why do I get the wrong knitting tension with the suggested needle size?
The needle size provided in the pattern serves only as a guide, the important thing is to follow the knitting tension. And since knitting tension is very individual, you will have to adjust the needle size to ensure that YOUR tension is the same as in the pattern – maybe you’ll have to adjust 1, or even 2 needle sizes, up or down to achieve the correct tension. For this, we recommend that you work test swatches.
Should you work with a different knitting tension than the one provided, the measurements of the finished garment might deviate from the measurement sketch.
See DROPS lesson: How to measure your tension/gauge
See DROPS video: How to make a gauge tension swatch
Why is the pattern worked top-down?
Working a garment top-down provides more flexibility and room for personal adjustment. For example it is easier to try the garment on while working, as well as making adjustments to length of yoke and shoulder caps.
The instructions are carefully explaining every step, in the correct order. Diagrams are adjusted to the knitting direction and are worked as usual.
How do I work according to a knitting diagram?
The diagram depicts all rows/rounds, and every stitch seen from the right side. It is read from bottom to top, from right to left. 1 square = 1 stitch.
When working back and forth, every other row is worked from the right side and every other row is worked from the wrong side. When working from the wrong side, the diagram will have to be worked reversed: from left to right, knit stitches are purled, purl stitches are knit etc.
When working in the round every round is worked from the right side and the diagram are worked from right to left on all rounds.
See DROPS lesson: How to read knitting diagrams
How do I work according to a crochet diagram?
The diagram depicts all rows/rounds, and every stitch seen from the right side. It is worked from bottom to top, from right to left.
When working back and forth every other row is worked from the right side: from right to left and every other row is worked from the wrong side: from left to right.
When working in the round, every row in the diagram are worked from the right side, from right to left.
When working a circular diagram you start in the middle and work your way outwards, counter clockwise, row by row.
The rows usually start with a given number of chain stitches (equivalent to the height of the following stitch), this will either be depicted in the diagram or explained in the pattern.
See DROPS lesson: How to read crochet diagrams
How do I work several diagrams simultaneously on the same row/round?
Instructions for working several diagrams after each other on the same row/round, will often be written like so: “work A.1, A.2, A.3 a total of 0-0-2-3-4 times". This means you work A.1 once, then A.2 is worked once, and A.3 is repeated (in width) the number of times provided for your size – in this case like so: S = 0 times, M = 0 times, L=2 times, XL= 3 times and XXL = 4 times.
The diagrams are worked as usual: begin with the first row in A.1, then work the first row in A.2 etc.
See DROPS lesson: How to read knitting diagrams
See DROPS lesson: How to read crochet diagrams
Why are the sleeves shorter in larger sizes?
The total width of the garment (from wrist-to-wrist) will be larger in the larger sizes, despite the actual sleeves being shorter. The larger sizes have longer sleeve caps and wider shoulders, so there will be a good fit in all sizes.
Where on the garment is the length measured?
The measurement sketch/schematic drawing provides information regarding the full length of the garment. If it’s a jumper or a jacket the length is measured from the highest point on the shoulder (usually closest to the neckline), and straight down to the bottom of the garment. It is NOT measured from the tip of shoulder. Similarly, the length of yoke is measured from the highest point on the shoulder and down to where yoke is split into body and sleeves.
See DROPS lesson: How to read a schematic drawing
What is a repeat?
Diagrams are often repeated on the round or in height. 1 repeat is the diagram the way it appears in the pattern. If it says to work 5 repeats of A.1 in the round, then you work A.1 a total of 5 times after/next to each other in the round. If it says to work 2 repeats of A.1 vertically/in height you work the entire diagram once, then begin again at the start and work the entire diagram one more time.
Why does the piece start with more chain stitches than it’s worked with?
Chain stitches are slightly narrower than other stitches and to avoid working the cast-on edge too tight, we simply chain more stitches to begin with. The stitch count will be adjusted on the following row to fit the pattern and measurement sketch.
Why increase before the rib edge when the piece is worked top-down?
The rib edge is more elastic and will contract slightly compared to, for example, stocking stitch. By increasing before the rib edge, you avoid a visible difference in width between the rib edge and the rest of the body.
Why increase in the cast-off edge?
It’s very easy to cast off too tightly, and by making yarn overs while casting off (and simultaneously casting these off) you avoid a too tight cast off edge.
See DROPS video: How to bind off with yarn overs (yo)
How do I increase/decrease on every 3rd and 4th row/round alternately?
To achieve an even increase (or decrease) you can increase on, for example: every 3rd and 4th row alternately, like so: work 2 rows and increase on the 3rd row, work 3 rows and increase on the 4th. Repeat this until the increase is complete.
See DROPS lesson: Increase or decrease 1 st on every 3rd and 4th row alternately
How can I work a jacket in the round instead of back and forth?
Should you prefer to work in the round instead of back and forth, you may of course adjust the pattern. You’ll need to add steeks mid-front (usually 5 stitches), and follow the instructions. When you would normally turn and work from the wrong side, simply work across the steek and continue in the round. At the end you’ll cut the piece open, pick up stitches to work bands, and cover the cut edges.
See DROPS video: How to knit steeks and cut open
Can I work a jumper back and forth instead of in the round?
Should you prefer to work back and forth instead of in the round, you may of course adjust the pattern so you work the pieces separately and then assemble them at the end. Divide the stitches for the body in 2, add 1 edge stitch in each side (for sewing) and work the front and back pieces separately.
See DROPS lesson: Can I adapt a pattern for circular needles into straight needles?
Why is the pattern slightly different than what I see in the photo?
Pattern repeats can vary slightly in the different sizes, in order to get the correct proportions. If you’re not working the exact same size as the garment in the photo, yours might deviate slightly. This has been carefully developed and adjusted so that the complete impression of the garment is the same in all sizes.
Make sure to follow instructions and diagrams for your size!
How do I make a women’s size garment into a men’s size one?
If you have found a pattern you like which is available in women’s size it’s not very difficult to convert it to men’s size. The biggest difference will be the length of sleeves and body. Start working on the women size that you think would fit across the chest. The additional length will be worked right before you cast off for the armhole/sleeve cap. If the pattern is worked top-down you can add the length right after the armhole or before the first decrease on sleeve.
Regarding additional yarn amount, this will depend on how much length you add, but it is better with a skein too many than too few.
How do I prevent a hairy garment from shedding?
All yarns will have excess fibres (from production) that might come off as lint or shedding. Brushed yarns (ie hairier yarns) have more of these loose, excess fibres, causing more shedding.
Shedding also depends on what is worn under or over the garment, and whether this pulls at the yarn fibres. It’s therefore not possible to guarantee that there will be no shedding
Below are some tips on how to get the best result when working with hairier yarns:
1. When the garment is finished (before you wash it) shake it vigorously so the looser hairs come off. NOTE: do NOT use a lint roller, brush or any method that pulls at the yarn.
2. Place the garment in a plastic bag and put it in your freezer - the temperature will cause the fibres to become less attached to each other, and excess fibres will come off easier.
3. Leave in the freezer for a few hours before taking it out and shaking it again.
4. Wash the garment according to the instructions on the yarn label.
Why does my garment pill?
Pilling is a natural process that happens to even the most exclusive of fibers. It's a natural sign of wear and tear that is hard to avoid, and that is most visible in high friction areas of your garment like a sweater's arms and cuffs.
You can make your garment look as new by removing the pilling, using a fabric comb or a pill/lint remover.
Lemon Cross |
||||||||||||||||
|
|
|||||||||||||||
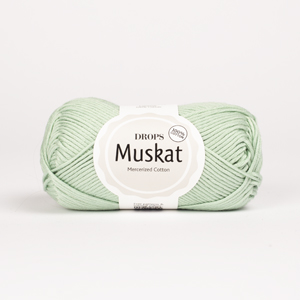
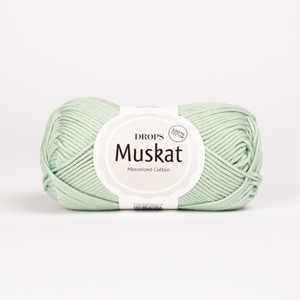
Knitted DROPS bolero worked as a square with lace pattern in ”Muskat”. Size: S - XXXL.
DROPS 170-5 |
||||||||||||||||
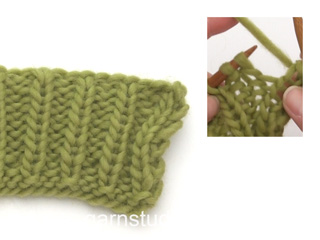
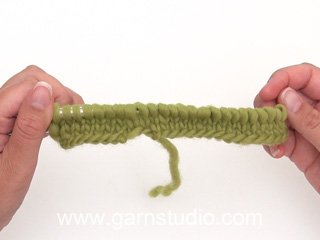
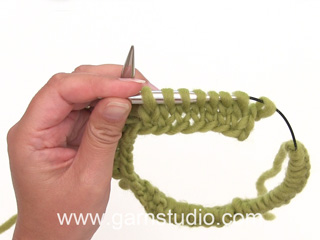
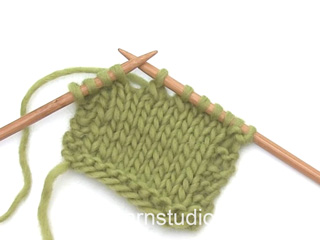
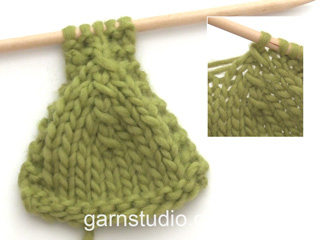
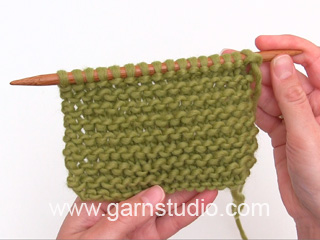
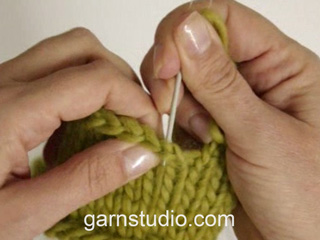
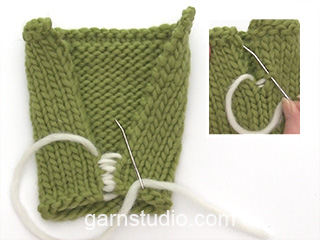
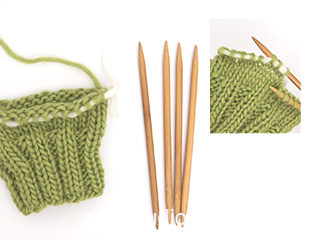
MAGIC CIRCLE: To avoid hole in the middle beg with this technique: Hold yarn end in the left hand and make a loop around left index finger (from left to right). Hold the loop with left thumb and index finger. Insert needle through loop, get yarn from ball (i.e. place yarn 1 time over needle from you), pull yarn back through loop, 1 YO (now place yarn from the back and towards you) and pull YO through sts on needle, * insert needle through loop, 1 YO (place yarn from the back and towards you), pull YO through loop, 1 YO (from the back and towards you) and pull YO through outermost st on right needle (i.e. the last st made) *, repeat from *-* until there are 12 sts on needle. Distribute sts on 4 double pointed needles size 3.5 mm / US 4 as explained in pattern. Then work as explained in pattern – AT THE SAME TIME pull yarn end so that loop is tighten tog and the hole disappears. GARTER ST (back and forth): K all rows. 1 ridge = K2 rows. PATTERN: See diagrams A.1 to A.4. The diagrams show all rows in pattern seen from RS. DECREASE TIP: Dec inside 1 edge sts in garter st. All dec are done from RS! Dec as follows after 1 edge sts: Slip 1 st as if to K, K 1, psso. Dec as follows before 1 edge st: K 2 tog. INCREASE TIP: Inc 1 st by making 1 YO. On next round P YO twisted to avoid holes - P inc sts (seen from RS). ---------------------------------------------------------- BOLERO: Work back piece as a square from mid back. Beg on double pointed needles, switch to circular needle when needed. Work sleeves back and forth on circular needle from two of the sides on square. Then work an edge around the opening on bolero. BACK PIECE: Beg with MAGIC CIRCLE – see explanation above and Muskat = 12 sts distributed on 4 double pointed needles size 3.5 mm / US 4. Work pattern in the round according to diagram A.1, i.e. repeat A.1 4 times in total on round (1 repetition per needle) and inc as shown in diagram. REMEMBER THE KNITTING GAUGE When A.1 has been worked, there are 236 sts on needle (i.e. 59 sts in every repetition). Work next round as follows: * Work A.2A (= 29 sts), A.2C (= 30 sts) *, repeat from *-* 3 more times. Continue pattern like this and inc as shown in diagram. When A.2A/A.2C have been worked 1 time vertically, there are 268 sts on needle (i.e. 67 sts in every repetition). Work next round as follows: * Work A.2B (= 30 sts), A.3 (= 7 sts), work A.2D (= 30 sts) *, repeat from *-* 3 more times. Continue the pattern like this outwards until there are 300-316-332-356-372-388 sts on needle (i.e. 75-79-83-89-93-97 sts in every repetition) - NOTE: A.3 will get bigger and bigger between A.2B/A.2D. Now keep sts along side 1 on needle - see chart (= left sleeve). Slip sts along side 2 on a stitch holder (= bottom of back piece). Slip sts along side 3 on a stitch holder (= right sleeve). Slip sts along side 4 on a stitch holder (= at the top of back piece towards the neck). LEFT SLEEVE: = 75-79-83-89-93-97 sts. READ ALL OF THE FOLLOWING SECTION BEFORE CONTINUING! Insert 1 marker in each side – NOW MEASURE PIECE FROM HERE! Continue pattern back and forth on circular needle size 3.5 mm / US 4 according to diagram A.2B/A.2D and A.3 as before with 1 edge st in GARTER ST in each side – see explanation above (arrow in A.3 shows where pattern continues in the different sizes in A.3). NOTE: Inc in each side is now finished (do not make YO outermost in A.2B/A.2D anymore -i.e. no of sts will be the same on every row. A.3 will continue to get bigger and bigger and therefore A.2B/A.2D will now get smaller and smaller in each side). AT THE SAME TIME when piece measures 3-3-3-2-2-2 cm / 1"-1"-1"-¾"-¾"-¾", dec 1 st in each side - READ DECREASE TIP. Repeat dec in each side every 6th-6th-4th-4th-4th-4th row a total of 9-10-11-13-14-15 times in each side = 57-59-61-63-65-67 sts remain on needle - NOTE: When there are no sts left in A.2B/A.2D in each side, work A.3 over all sts with 1 edge st in garter st in each side - work the sts that do not the pattern in stockinette st when dec. When piece measures 26 cm / 10¼" from markers (or desired length), switch to circular needle size 3 mm / US 2.5. Work 2 ridges back and forth (1st row = RS) and then loosely bind off with K from RS. Sleeve measures approx. 27 cm / 10½" from markers. RIGHT SLEEVE: Slip the 75-79-83-89-93-97 sts from stitch holder along side 3 back on circular needle size 3.5 mm / US 4 and work back and forth on circular needle the same way as on left sleeve. ASSEMBLY: Fold the piece double along so that sts from stitch holder 2 and 4 on back piece (and markers on each sleeve) are place against each other. Sew sleeve seams inside 1 edge st - beg at the bottom of each sleeve and sew up to markers. EDGE: Slip sts from stitch holder 2 and 4 on circular needle size 3 mm / US 2.5 = 150-158-166-178-186-194 sts on needle. K 1 round while inc 50-52-54-62-64-66 sts evenly (inc approx. every 3rd st) = 200-210-220-240-250-260 sts. P 1 round and K 1 round. Then continue pattern in the round according to diagram A.4. When edge measures 2 cm / ¾", inc 1 st after every repetition - READ INCREASE TIP = 240-252-264-288-300-312 sts. Repeat inc when edge measures 4 and 6 cm / 1½" and 2⅜" = 320-336-352-384-400-416 sts (there are now 3 P between every repetition the entire round). When edge measures 7 cm / 2¾", bind off with K over K and P over P. |
||||||||||||||||
Diagram explanations |
||||||||||||||||
|
||||||||||||||||
Have you made this or any other of our designs? Tag your pictures in social media with #dropsdesign so we can see them! Do you need help with this pattern?You'll find tutorial videos, a Comments/Questions area and more by visiting the pattern on garnstudio.com. © 1982-2024 DROPS Design A/S. We reserve all rights. This document, including all its sub-sections, has copyrights. Read more about what you can do with our patterns at the bottom of each pattern on our site. |
With over 40 years in knitting and crochet design, DROPS Design offers one of the most extensive collections of free patterns on the internet - translated to 17 languages. As of today we count 304 catalogs and 11422 patterns - 11417 of which are translated into English (US/in).
We work hard to bring you the best knitting and crochet have to offer, inspiration and advice as well as great quality yarns at incredible prices! Would you like to use our patterns for other than personal use? You can read what you are allowed to do in the Copyright text at the bottom of all our patterns. Happy crafting!
Comments / Questions (29)
Allison wrote:
I'm afraid I'm lost when it comes to knitting the sleeves. Th instructions say to not do the outermost YO on A.2B and A 2D, is that the YO that is at the end of these sections (left end for A.2B and right end for A 2D)? If I don't do those YOs, how can A3 continue to increase in stitches? How do I make sure A3 increases to get bigger if the stitches in B and D stay the same? Grateful for help 😊
28.04.2024 - 17:37DROPS Design answered:
Dear Allison, the number of stitches in the row is maintained. However, the stitches that previously should have been worked in A.2B and D will now slowly start to be worked in A.3, to compensate for the missing increases. So the charts will be slowly displaced. Happy knitting!
29.04.2024 - 00:35Bernice Nicholl wrote:
Hi, Love your patterns. I'm a little confused with the sizing on chart A.3.If I need to knit an XL, do I knit until the XL arrow? Sorry I'm new to charts and still trying understand how they work.
29.01.2023 - 21:54DROPS Design answered:
Dear Bernice, for size XL, you start working A.3 from the arrow marked with XL upwards. Happy knitting!
29.01.2023 - 22:26Elfrieda wrote:
Ik snap niet hoe ik de armen moet maken in patroon. Ik kom elke keer niet uit hoe kan dit?
20.09.2022 - 16:33DROPS Design answered:
Dag Elfrieda,
Nadat je de steken van de hulpdraad op de naald hebt gezet brei je verder in patroon heen en weer volgens de telpatronen. Kan je aangeven wat er precies niet ui komt? Welke maat brei je? Misschien kunnen we je dan beter helpen?
21.09.2022 - 19:33Carmen-Gabriela wrote:
Hallo, ist es möglich auch "kleine" Vorderteile zu stricken, so dass es etwas besser zur vorderen Mitte "schließt"? Ja, man könnte die Blende/Schalkragen breiter stricken, aber so würde man am VT das schöne Muster nicht sehen. Gleiches für Mod. 160-25. Beide so schön, aber eher Shrug:(
28.04.2022 - 18:44DROPS Design answered:
Liebe Carmen-Gabriela, solche Modellen werden meistens nicht wie bei Jacken "geschlossen", aber einigen andere Modellen für Boleros haben wir schon, vielleicht kann Ihnen ein davon inspirieren. Viel Spaß beim stricken!
29.04.2022 - 08:12Stephanie wrote:
How do continue in A2B and A2D for the sizes for the back piece? (A3 shows 4 rows to become Medium but A2B and A2D are 8 rows) Thanks
21.08.2020 - 17:18DROPS Design answered:
Dear Stephanie, work A.2B/A.2D and A.3 at the same time, butwhen you reach the correct number of sts = 316 in size M, then slip the stitches on different strands/stitch holders and work first left sleeve then right sleeve then knit the edge around whole piece after you have sewn sleeves. Happy knitting!
24.08.2020 - 07:48Silke wrote:
Ist es denkbar, die Ärmel auch in Runden auf einem Nadelspiel zu stricken? Zusammennähen gehört nicht zu meiner Lieblingsbeschäftigung ;-)
21.04.2019 - 21:56DROPS Design answered:
Liebe Silke, wahrscheinlich können Sie die Ärmel in Runden stricken, die Anleitungen der Ärmel sollen Sie aber so anpassen, denn Sie dann keine Randmasche habe, aber trozdem 2 Maschen abnehmen sollen. Viel Spaß beim stricken!
23.04.2019 - 12:55Solfrid wrote:
Jeg skal begynne på armen og forstår ikke hvordan a2b og d blir mindre? " kutter" jeg 2masker på hver runde fra ytterkantene? Og hva med dia. A3. Skal jeg begynne på nytt eller fortsette over str.M.? Klarer ikke å se for meg hvordan jeg kan klare armene.
26.10.2018 - 19:07DROPS Design answered:
Hei Solfrid. Maskeantallet i A.2b og A.2d skal forbli det samme, så du lager ikke lenger kastene ytterst (mot venstre i A.2d og mot høyre i A.2b). Mønsteret fortsetter å forskyves til hver sin side. Du fortsetter A.3 på samme måte som tidligere (se for deg at diagrammet fortsetter oppover og utover). A.3 vil øke utover, mens A.2b og A.2d vil forsvinne utover til hver side og tilslutt opphøre. God fornøyelse.
06.11.2018 - 09:27Svanhild Jenssen wrote:
Jeg har strikket bakstykket etter mønsteret og har strikket hele A.2B pga.2D. Det gjenstår en omgang rett. Under Venstre ermet står det at en skal strikke etter diagram A.2B/A.2D osv. Hvor skal jeg begynne på dette diagrammet. Noen har stilt samme spørsmål tidligere, svaret var en skulle fortsette der en stoppet. Dette forstår jeg ikke fordi jeg har strikket hele diagrammet på slutten av bakstykket.
10.07.2018 - 23:30DROPS Design answered:
Hei Svanhild. Du fortsetter bare A.2B og A.2D på samme måte som tidligere (se for deg at diagrammet fortsetter på samme måte oppover). Men når du begynner på ermet økes det ikke i ytterkantene (= masketallet forblir det samme). Altså: du fortsetter å strikker A.2B, A.3 A.2D som før, og etter hvert som A.3 øker utover «spiser den opp» A.2B og A.2D i hver side. Tilslutt strikkes kun A.3 over maskene på ermet. God fornøyelse.
13.07.2018 - 13:38Svanhild Jenssen wrote:
Hvorfor strikkes ermet fram og tilbake og ikke rundt på rundpinne
10.07.2018 - 23:09DROPS Design answered:
Ermene strikkes frem og tilbake da dette gjør det enklere å fortsette mønsteret fra bakstykket. God fornøyelse
13.07.2018 - 13:36Marlen wrote:
Hallo, ich bin gerade dabei, den linken Ärmel anzufangen und die Anleitung verwirrt mich ein bisschen. Es heißt, die Umschläge AUßEN in A2B/A2D nicht mehr zu machen. Heißt das, die beiden Umschläge am rechten Rand bei A2B und am linken Rand bei A2D nicht mehr gemacht werden? Oder werden die Umschläge links außen und rechts außen im Diagramm nicht gemacht, was allerdings die Musterfolge in der Mitte stören würde. Vielen lieben Dank im Voraus.
17.06.2018 - 20:49DROPS Design answered:
Liebe Marlen, nur der 1. Umschlag in A.2B (= Zunahme) und der letzte Umschlag in A.2D (= Zunahme) werden nicht mehr gestrickt. Alle anderen Umschlage (mit Abnahmen) sollen wie zuvor gestrickt sein. Viel Spaß beim stricken!
18.06.2018 - 09:04