The yarn cost is calculated from the pattern’s smallest size and the yarn’s cheapest product type. Looking for an even better price? You might find it on the DROPS Deals!
-------------------------------------------------------
Alternative Yarn – See how to change yarns here
Yarn Groups A to F – Use the same pattern and change the yarn here
Yarn usage using an alternative yarn – Use our yarn converter here
-------------------------------------------------------
The yarn cost is calculated from the pattern’s smallest size and the yarn’s cheapest product type. Looking for an even better price? You might find it on the DROPS Deals!
This pattern has been corrected. Click here to see the correction/s.
All measurements in charts are in cm.
= K from RS, P from WS | |
= P from RS, K from WS | |
= slip 4 sts on cable needle in front of piece, P 1, K 4 from cable needle | |
= slip 1 st on cable needle behind piece, K 4, P 1 from cable needle | |
= slip 4 sts on cable needle in front of piece, K 4, K 4 from cable needle | |
= slip 4 sts on cable needle behind piece, K 4, K 4 from cable needle |
Each of our patterns has specific tutorial videos to help you.
These step-by-step tutorials might also help you:
Why is the knitting/crochet tension so important?
Knitting tension is what determines the final measurements of your work, and is usually measured per 10 x 10 cm. It is provided like so: number of stitches in width x number of rows in height - eg: 19 stitches x 26 rows = 10 x 10 cm.
The knitting tension is very individual; some people knit/crochet loosely while others work tightly. You adjust the knitting tension with the needle size, which is why the suggested needle size only serve as a guide! You need to adjust this (up or down) to ensure that YOUR knitting tension matches the knitting tension provided in the pattern. If you work with a different knitting tension than provided you will have a different yarn consumption, and your work will have different measurements than what the pattern suggests.
The knitting tension also determines which yarns can replace each other. As long as you achieve the same knitting tension you can replace one yarn with another.
See DROPS lesson: How to measure your tension/gauge
See DROPS video: How to make a gauge tension swatch
How do I know how many balls of yarn I need?
The required amount of yarn is provided in grams, eg: 450 g. To calculate how many balls you’ll need you first need to know how many grams are in 1 ball (25g, 50g or 100g). This information is available if you click on the individual yarn quality on our pages. Divide the amount required with the amount of each ball. For example, if each ball is 50g (the most common amount), the calculation will be as follows: 450 / 50 = 9 balls.
Can I use a different yarn than what the pattern suggests?
The important thing when changing from one yarn to another is that the knitting/crochet tension remains the same. This is so that the measurements of the finished piece will be the same as on the sketch provided. It is easier to achieve the same knitting tension using yarns from the same yarn group. It is also possible to work with multiple strands of a thinner yarn to achieve the knitting tension of a thicker one. Please try our yarn converter. We recommend you to always work a test swatch.
Please NOTE: when changing yarn the garment might have a different look and feel to the garment in the photo, due to individual properties and qualities of each yarn.
See DROPS lesson: Can I use a different yarn than the one mentioned in the pattern?
What are the yarn groups?
All our yarns are categorised into yarn groups (from A to F) according to thickness and knitting tension – group A contains the thinnest yarns and group F the thickest. This makes it easier for you to find alternative yarns to our patterns, should you wish to switch yarn. All yarns within the same group have a similar knitting tension and can easily replace each other. However, different yarn qualities have different structures and properties which will give the finished work a unique look and feel.
How do I use the yarn converter?
At the top of all our patterns you’ll find a link to our yarn converter, which is a helpful tool should you wish to use a different yarn than suggested. By filling in the yarn quality you wish to replace, the amount (in your size) and number of strands, the converter will present good alternative yarns with the same knitting tension. Additionally it will tell you how much you’ll require in the new qualities and whether you’ll need to work with multiple strands. Most skeins are 50g (some are 25g or 100g).
If the pattern is worked with multiple colours, every colour will have to be converted separately. Similarly, if the pattern is worked with several strands of different yarns (for example 1 strand Alpaca and 1 strand Kid-Silk) you will have to find alternatives for each, individually.
Why do you show discontinued yarns in the patterns?
Since different yarns have different qualities and textures we have chosen to keep the original yarn in our patterns. However, you can easily find options among our available qualities by using our yarn converter, or simply pick a yarn from the same yarn group.
It is possible that some retailers still have discontinued yarns in stock, or that someone has a few skeins at home that they would like to find patterns for.
The yarn converter will provide both alternative yarn as well as required amount in the new quality.
What size should I knit?
If you think it's hard to decide what size to make, it can be a good idea to measure a garment you own already and like the size of. Then you can pick the size by comparing those measures with the ones available in the pattern's size chart.
You'll find the size chart at the bottom of the pattern.
See DROPS lesson: How to read size chart
Why do I get the wrong knitting tension with the suggested needle size?
The needle size provided in the pattern serves only as a guide, the important thing is to follow the knitting tension. And since knitting tension is very individual, you will have to adjust the needle size to ensure that YOUR tension is the same as in the pattern – maybe you’ll have to adjust 1, or even 2 needle sizes, up or down to achieve the correct tension. For this, we recommend that you work test swatches.
Should you work with a different knitting tension than the one provided, the measurements of the finished garment might deviate from the measurement sketch.
See DROPS lesson: How to measure your tension/gauge
See DROPS video: How to make a gauge tension swatch
Why is the pattern worked top-down?
Working a garment top-down provides more flexibility and room for personal adjustment. For example it is easier to try the garment on while working, as well as making adjustments to length of yoke and shoulder caps.
The instructions are carefully explaining every step, in the correct order. Diagrams are adjusted to the knitting direction and are worked as usual.
How do I work according to a knitting diagram?
The diagram depicts all rows/rounds, and every stitch seen from the right side. It is read from bottom to top, from right to left. 1 square = 1 stitch.
When working back and forth, every other row is worked from the right side and every other row is worked from the wrong side. When working from the wrong side, the diagram will have to be worked reversed: from left to right, knit stitches are purled, purl stitches are knit etc.
When working in the round every round is worked from the right side and the diagram are worked from right to left on all rounds.
See DROPS lesson: How to read knitting diagrams
How do I work according to a crochet diagram?
The diagram depicts all rows/rounds, and every stitch seen from the right side. It is worked from bottom to top, from right to left.
When working back and forth every other row is worked from the right side: from right to left and every other row is worked from the wrong side: from left to right.
When working in the round, every row in the diagram are worked from the right side, from right to left.
When working a circular diagram you start in the middle and work your way outwards, counter clockwise, row by row.
The rows usually start with a given number of chain stitches (equivalent to the height of the following stitch), this will either be depicted in the diagram or explained in the pattern.
See DROPS lesson: How to read crochet diagrams
How do I work several diagrams simultaneously on the same row/round?
Instructions for working several diagrams after each other on the same row/round, will often be written like so: “work A.1, A.2, A.3 a total of 0-0-2-3-4 times". This means you work A.1 once, then A.2 is worked once, and A.3 is repeated (in width) the number of times provided for your size – in this case like so: S = 0 times, M = 0 times, L=2 times, XL= 3 times and XXL = 4 times.
The diagrams are worked as usual: begin with the first row in A.1, then work the first row in A.2 etc.
See DROPS lesson: How to read knitting diagrams
See DROPS lesson: How to read crochet diagrams
Why are the sleeves shorter in larger sizes?
The total width of the garment (from wrist-to-wrist) will be larger in the larger sizes, despite the actual sleeves being shorter. The larger sizes have longer sleeve caps and wider shoulders, so there will be a good fit in all sizes.
Where on the garment is the length measured?
The measurement sketch/schematic drawing provides information regarding the full length of the garment. If it’s a jumper or a jacket the length is measured from the highest point on the shoulder (usually closest to the neckline), and straight down to the bottom of the garment. It is NOT measured from the tip of shoulder. Similarly, the length of yoke is measured from the highest point on the shoulder and down to where yoke is split into body and sleeves.
See DROPS lesson: How to read a schematic drawing
What is a repeat?
Diagrams are often repeated on the round or in height. 1 repeat is the diagram the way it appears in the pattern. If it says to work 5 repeats of A.1 in the round, then you work A.1 a total of 5 times after/next to each other in the round. If it says to work 2 repeats of A.1 vertically/in height you work the entire diagram once, then begin again at the start and work the entire diagram one more time.
Why does the piece start with more chain stitches than it’s worked with?
Chain stitches are slightly narrower than other stitches and to avoid working the cast-on edge too tight, we simply chain more stitches to begin with. The stitch count will be adjusted on the following row to fit the pattern and measurement sketch.
Why increase before the rib edge when the piece is worked top-down?
The rib edge is more elastic and will contract slightly compared to, for example, stocking stitch. By increasing before the rib edge, you avoid a visible difference in width between the rib edge and the rest of the body.
Why increase in the cast-off edge?
It’s very easy to cast off too tightly, and by making yarn overs while casting off (and simultaneously casting these off) you avoid a too tight cast off edge.
See DROPS video: How to bind off with yarn overs (yo)
How do I increase/decrease on every 3rd and 4th row/round alternately?
To achieve an even increase (or decrease) you can increase on, for example: every 3rd and 4th row alternately, like so: work 2 rows and increase on the 3rd row, work 3 rows and increase on the 4th. Repeat this until the increase is complete.
See DROPS lesson: Increase or decrease 1 st on every 3rd and 4th row alternately
How can I work a jacket in the round instead of back and forth?
Should you prefer to work in the round instead of back and forth, you may of course adjust the pattern. You’ll need to add steeks mid-front (usually 5 stitches), and follow the instructions. When you would normally turn and work from the wrong side, simply work across the steek and continue in the round. At the end you’ll cut the piece open, pick up stitches to work bands, and cover the cut edges.
See DROPS video: How to knit steeks and cut open
Can I work a jumper back and forth instead of in the round?
Should you prefer to work back and forth instead of in the round, you may of course adjust the pattern so you work the pieces separately and then assemble them at the end. Divide the stitches for the body in 2, add 1 edge stitch in each side (for sewing) and work the front and back pieces separately.
See DROPS lesson: Can I adapt a pattern for circular needles into straight needles?
Why is the pattern slightly different than what I see in the photo?
Pattern repeats can vary slightly in the different sizes, in order to get the correct proportions. If you’re not working the exact same size as the garment in the photo, yours might deviate slightly. This has been carefully developed and adjusted so that the complete impression of the garment is the same in all sizes.
Make sure to follow instructions and diagrams for your size!
How do I make a women’s size garment into a men’s size one?
If you have found a pattern you like which is available in women’s size it’s not very difficult to convert it to men’s size. The biggest difference will be the length of sleeves and body. Start working on the women size that you think would fit across the chest. The additional length will be worked right before you cast off for the armhole/sleeve cap. If the pattern is worked top-down you can add the length right after the armhole or before the first decrease on sleeve.
Regarding additional yarn amount, this will depend on how much length you add, but it is better with a skein too many than too few.
How do I prevent a hairy garment from shedding?
All yarns will have excess fibres (from production) that might come off as lint or shedding. Brushed yarns (ie hairier yarns) have more of these loose, excess fibres, causing more shedding.
Shedding also depends on what is worn under or over the garment, and whether this pulls at the yarn fibres. It’s therefore not possible to guarantee that there will be no shedding
Below are some tips on how to get the best result when working with hairier yarns:
1. When the garment is finished (before you wash it) shake it vigorously so the looser hairs come off. NOTE: do NOT use a lint roller, brush or any method that pulls at the yarn.
2. Place the garment in a plastic bag and put it in your freezer - the temperature will cause the fibres to become less attached to each other, and excess fibres will come off easier.
3. Leave in the freezer for a few hours before taking it out and shaking it again.
4. Wash the garment according to the instructions on the yarn label.
Why does my garment pill?
Pilling is a natural process that happens to even the most exclusive of fibers. It's a natural sign of wear and tear that is hard to avoid, and that is most visible in high friction areas of your garment like a sweater's arms and cuffs.
You can make your garment look as new by removing the pilling, using a fabric comb or a pill/lint remover.
Winter Flame |
|||||||||||||||||||
|
|
||||||||||||||||||
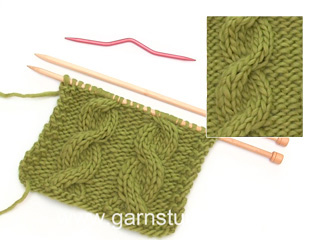
Knitted DROPS jumper with cables and high collar in ”Alaska”.
DROPS 164-46 |
|||||||||||||||||||
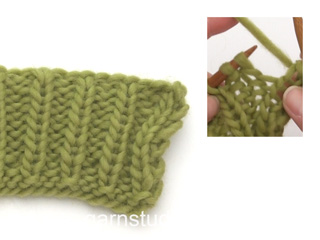
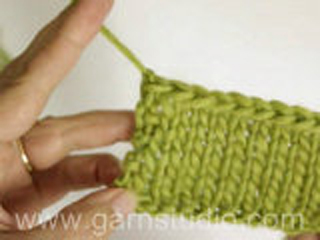
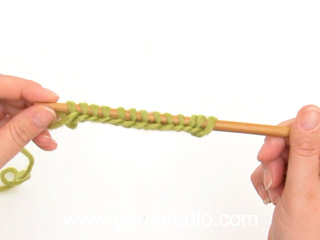
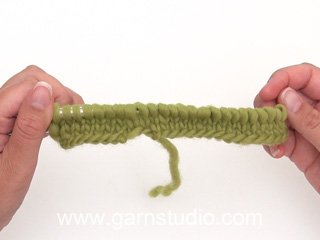
PATTERN: See diagrams A.1 to A.4. BODY: Worked in the round on circular needle. Cast on 180-196-212-228-252-268 sts on circular needle size 4.5 mm / US 7 with Alaska. Beg round = side. Work as follows: Size S-M-L-XL: P 1, * K 2, P 2 *, repeat from *-* over the next 16-20-24-28 sts, A.3 a (= 8 sts), A.2 a (= 40 sts), A.1 a (= 8 sts), * P 2, K 2 *, repeat from *-* over the next 32-40-48-56 sts, P 2, A.3 a, A.2 a, A.1 a, * P 2, K 2 * over the next 16-20-24-28 sts, finish with P 1. Size XXL-XXXL: K 1, P 2, * K 2, P 2 *, repeat from *-* over the next 32-36 sts, A.3 a (= 8 sts), A.2 a (= 40 sts), A.1 a (= 8 sts), * P 2, K 2 *, repeat from *-* over the next 68-76 sts, P 2, A.3 a, A.2 a, A.1 a, * P 2, K 2 * over the next 32-36 sts, finish with P 2, K 1. When A.3 a, A.2 a and A.1 a have been worked 1 time vertically, work as follows (switch to circular needle size 5 mm / US 8): Stockinette st over the first 17-21-25-29-35-39 sts, A.3 b, A.2 b, A.1 b, stockinette st over the next 34-42-50-58-70-78 sts, A.3 b, A.2 b, A.1 b, stockinette st over the last 17-21-25-29-35-39 sts. Continue pattern like this. REMEMBER THE KNITTING GAUGE Insert 1 marker in each side; 1 at the beg of round and one after 90-98-106-114-126-134 sts (= sides). When piece measures 43-44-45-46-47-48 cm / 17''-17¼''-17¾''-18''-18½''-19'', bind off 3 sts on each side of each marker in each side, then finish front and back piece separately. BACK PIECE: = 84-92-100-108-120-128 sts. Continue pattern as before. Bind off for armholes at beg of every row in each side as follows: 3 sts 0-0-0-1-1-1 time, 2 sts 1-2-3-3-5-6 times and 1 sts 1-2-3-3-4-5 times = 78-80-82-84-86-88 sts. When piece measures 60-62-64-66-68-70 cm / 23 5/8''-24 3/8''-25¼''-26''-26¾''-27½'', dec 8 sts evenly over A.2, on next row bind off the middle 30 sts for neck and finish each shoulder separately. Continue to dec 1 st on next row from neck = 19-20-21-22-23-24 sts remain on the shoulder. When piece measures 61-63-65-67-69-71 cm / 24''-24¾''-25½''-26 3/8''-27 1/8''-28'', dec 4 sts evenly over A.1/A.3 = 15-16-17-18-19-20 sts remain on shoulder. Bind off when piece measures 62-64-66-68-70-72 cm / 24 3/8''-25¼''-26''-26¾''-27½''-28 3/8''. FRONT PIECE: Continue bind off and bind off for armhole as on back piece = 78-80-82-84-86-88 sts. When piece measures 56-58-60-62-64-66 cm / 22''-22¾''-23 5/8''-24 3/8''-25¼''-26'', slip the middle 28 sts on a stitch holder for neck and finish each side separately. Continue dec towards the neck every other row: 2 sts 2 times and 1 st 2 times. After all dec are done, 19-20-21-22-23-24 sts remain on needle. When piece measures 61-63-65-67-69-71 cm / 24''-24¾''-25½''-26 3/8''-27 1/8''-28'', dec 4 sts evenly over A.1/A.3 = 15-16-17-18-19-20 sts remain on shoulder. Bind off when piece measures 62-64-66-68-70-72 cm / 24 3/8''-25¼''-26''-26¾''-27½''-28 3/8''. SLEEVE: Worked in the round on double pointed needles. Cast on 46-46-50-50-54-54 sts on double pointed needle size 4.5 mm / US 7 with Alaska. Insert 1 marker at beg of round = mid under sleeve. Work as follows: Size S-M-XXL-XXXL: K 1, * P 2/K 2 *, repeat from *-* 3-3-4-4 times, A.4 a (= 20 sts), * K 2/P 2 *, repeat from *-* 3-3-4-4 times, finish with K 1. Size L-XL: P 1, K 2, * P 2/K 2 *, repeat from *-* 3-3 times, A.4 a (= 20 sts), * K 2/P 2 *, repeat from *-* 3-3 times, finish with K 2, P 1. When the first 10 rounds of A.4 have been worked, switch to double pointed needles size 5 mm / US 8 and work as follows: 13-13-15-15-17-17 sts in stockinette st, A.4 a, 13-13-15-15-17-17 sts in stockinette st. When A.4 a has been worked one time vertically, work A.4 b over sts in A.4 a, continue with stockinette st over the remaining sts. Now repeat A.4 b vertically. AT THE SAME TIME when piece measures 8 cm / 3 1/8'', inc 1 st on each side of marker, repeat inc every 4-3-3-2½-2½-2 cm / 1½"-1 1/8"-1 1/8"-7/8"-7/8"-3/4" 8-11-11-13-13-16 more times (= inc 9-12-12-14-14-17 times in total) = 64-70-74-78-82-88 sts. When piece measures 47-46-46-45-44-42 cm / 18½"-18"-18"-17 3/4"-17 1/4"-16½" (shorter measurements in the larger sizes because of longer sleeve cap and wider shoulders), bind off 6 sts mid under sleeve (= 3 sts on each side of marker) and work sleeve back and forth on circular needle until finished measurements. Note! Bind off in row 2, 4 or 6 after last cable, to ensure that following cables will be on RS. Bind off for sleeve cap at beg of every row in each side: bind off 2 sts 3 times and 1 st 1-2-3-4-6-9 times, then bind off 2 sts in each side until piece measures 54-54-55-55-56-56 cm / 21 1/4"-21 1/4"-21½"-21½"-22"-22", then bind off 3 sts 1 time in each side and dec 8 sts evenly over sts in A.4. Bind off the remaining sts, piece measures approx. 55-55-56-56-57-57 cm / 21 5/8''-21 5/8''-22''-22''-22½''-22½''. Make another sleeve. ASSEMBLY: Sew the shoulder seams. Sew in sleeves. NECK: Pick up 92-92-96-96-100-100 sts around the neck (includes sts on stitch holder mid front) on circular needle size 4.5 mm/US 7. P 1 round while dec 8 sts evenly = 84-84-88-88-92-92 sts. Work rib K 2/P 2 in the round. When piece measures 10 cm / 4'', inc all K 2 to K 3 = 105-105-110-110-115-115 sts. When piece measures 20 cm / 8'', inc all K 3 to K 4 = 126-126-132-132-138-138 sts. When neck measures 26 cm / 10 1/4'', bind off K over K and P over P. |
|||||||||||||||||||
Diagram explanations |
|||||||||||||||||||
|
|||||||||||||||||||
Have you made this or any other of our designs? Tag your pictures in social media with #dropsdesign so we can see them! Do you need help with this pattern?You'll find tutorial videos, a Comments/Questions area and more by visiting the pattern on garnstudio.com. © 1982-2024 DROPS Design A/S. We reserve all rights. This document, including all its sub-sections, has copyrights. Read more about what you can do with our patterns at the bottom of each pattern on our site. |
With over 40 years in knitting and crochet design, DROPS Design offers one of the most extensive collections of free patterns on the internet - translated to 17 languages. As of today we count 304 catalogs and 11422 patterns - 11417 of which are translated into English (US/in).
We work hard to bring you the best knitting and crochet have to offer, inspiration and advice as well as great quality yarns at incredible prices! Would you like to use our patterns for other than personal use? You can read what you are allowed to do in the Copyright text at the bottom of all our patterns. Happy crafting!
Comments / Questions (50)
Celine wrote:
Hi! When working on each side of the front shoulders separately, it is told to dec towards the neck does it mean decrease where the neck is or where the sleeve is? Thanks!
06.02.2023 - 02:01DROPS Design answered:
Hi Celine, This means to decrease by the neck. Happy knitting!
06.02.2023 - 07:57Elia wrote:
Por favor con qué tamaño de agujas de hace el cuello, Gracias, muy lindo modelo ❤️
13.12.2021 - 03:32DROPS Design answered:
Hola Elia, con agujas circular tamaño 4.5 mm. Saludos!
13.12.2021 - 08:30Giusti wrote:
I lavori eseguiti con i ferri circolari si possono realizzare con i ferri dritti? Grazie e Buona notte !giusiguarino9
27.03.2021 - 00:23DROPS Design answered:
Buongiorno Giusti, per i modelli aperti come i cardigan, si possono utilizzare anche i ferri dritti. Per i modelli che prevedono la lavorazione in tondo, si deve riprogettare il modello. Buon lavoro!
27.03.2021 - 18:44Pernille Larsen wrote:
Så vidt jeg kan se, er der en fejl i den viste model på billedet. De to yderste snoninger i midterstykket er kun snoet en enkelt gang for neden , hvor der er to resten af vejen op
09.01.2021 - 12:47Nadège wrote:
Bonjour juste pour être sûre de bien comprendre, quand je suis en train de faire a3b-a2b-a1b, a3b et a1b sont plus petits en hauteur que a2b. Je dois les recommencer plusieurs fois pour arriver à la même hauteur que a2b ?
29.07.2020 - 21:30DROPS Design answered:
Bonjour Nadège, on répète les diagrammes en hauteur, mais effectivement, comme le nombre de mailles de chaque diagramme est différent, on va répéter A.1b et A.3b plusieurs fois en hauteur avant d'avoir terminé A.2b, assurez-vous de toujours bien avoir le bon nombre de rangs entre chaque torsade dans A.1b et A.3b., et en même temps, continuez et répétez A.2b en hauteur. Bon tricot!
30.07.2020 - 09:09Coby Teune-Pabon wrote:
Net klaar met breien en een week lang aangehad. Deze wol pilt enorm, dat vind ik wel jammer van al mijn werk, die ik er in heb gestoken.
31.01.2020 - 11:41Helena wrote:
Bei den Ärmelabnahmen verstehe ich die Anleitung nicht ganz. Einmal ist von 2 M je 3 x [...] und dann stets je 2 M beidseitig die Rede. Wo ist da der Unterschied? Wenn ich beides synonym verwende habe ich am Schluss 7 Maschen zum Abketten. Richtig?
07.01.2020 - 10:17DROPS Design answered:
Liebe Helena, bei den Ärmeln sollen Sie am Anfang jeder Reihe (= Hin- sowie Rückreihen) so abketten: 2 Maschen 3 Mal (= 6 Maschen beidseitig), dann 1 Masche 1-2-3-4-6-9 Mal (siehe Größe) (= 1-2-3-4-6-9 Maschen beidseitig), dann 2 Maschen bis die Ärmel 54-55-56 cm mist (die abgekettene Maschenanzahl hängt hier an Ihrer Maschenprobe), dann 3 Maschen (dazu in A.4 abnehmen). Hoffentlich hilft es Innen. Viel Spaß beim stricken!
07.01.2020 - 12:24Eva wrote:
Het patroon van de mouw klopt niet. Bij het patroon moet je in de ruit 8 toeren breien zoals ze zijn en dan weer in het patroon, Maar als je op een gegeven moment bij de kop heen en weer moet breien komt dat niet uit en moet je de overhalingen op de averechtse kant doen. Dan kan volgens mij niet. Ik maak dus maar 1 toer korter in het patroon van de mouw. Jammer, want ik had de rest al klaar dus hoop ik maar dat het niet opvalt.
03.01.2020 - 12:56Bret wrote:
Peut on faire ce modele en 2 parties et non avec des aiguilles circulaires car je n'en n'ai jamais fait et jai un peu peur
03.12.2019 - 09:09DROPS Design answered:
Bonjour Mme Bret, vous trouverez ici, comment adapter un modèle sur aiguilles droites; osez vous lancer avec les aiguilles circulaires à l'aide de nos vidéos, votre magasin DROPS saura vous conseiller si besoin, même par mail ou téléphone. Bon tricot!
03.12.2019 - 12:55Coby Teune-Pabon wrote:
Wat een prachtig patroon ! Mooi model. En met pen 5 en deze dikte van wol gaat het heel snel. En jullie wol is altijd zo goed van kwaliteit en jullie maken tenminste nog garen van echte wol, daar word ik warm van. Letterlijk en figuurlijk. Ik zit er over te denken om alles door te breien. Armen apart tot de oksels en dan weer alles samen. Dat ga ik voor het eerst proberen. Kijken of het me lukt. Zijn er dan speciale dingen, waar ik op zou moeten letten?
23.09.2019 - 13:24DROPS Design answered:
Dag Coby,
Dankjewel voor de complimenten! Daar worden wij ook warm van :)
Een tip: Als je voor het eerst in de rondte breit, let er dan op dat als je begint met breien na het opzetten, de steken niet gedraaid zijn. Voor de rest is het gewoon een kwestie van rustig het patroon doorlezen en stap voor stap volgen.
Veel breiplezier!
03.10.2019 - 16:37