
Popular categories
Looking for a yarn?


|
||||||||||||||||||||||||||||
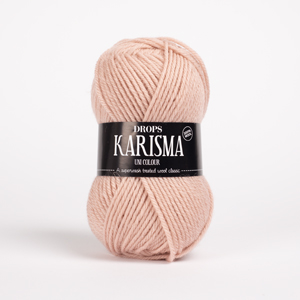
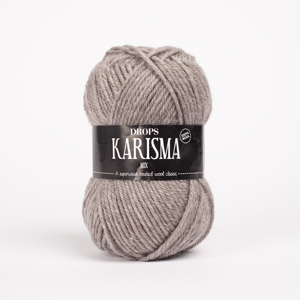
Alana |
||||||||||||||||||||||||||||
 |
 |
|||||||||||||||||||||||||||
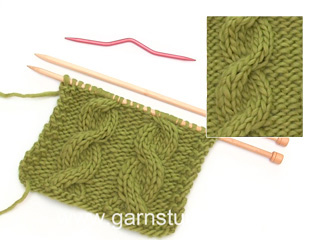
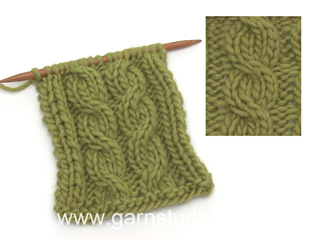
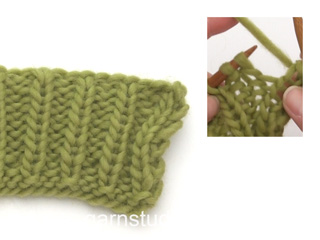
Knitted DROPS jumper with cables and raglan, worked top down in ”Karisma”. Size S-XXL
DROPS 156-19 |
||||||||||||||||||||||||||||
|
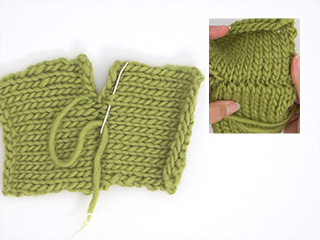
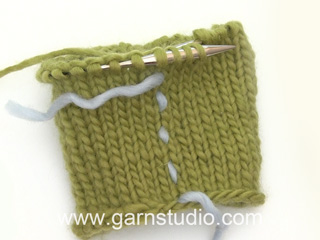
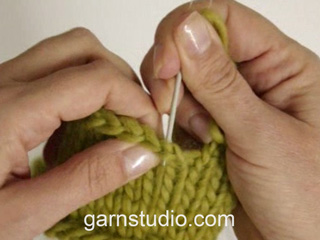
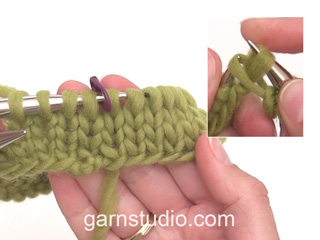
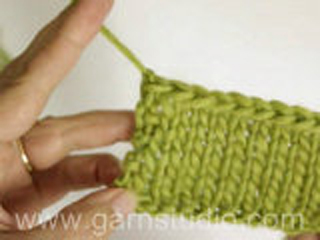
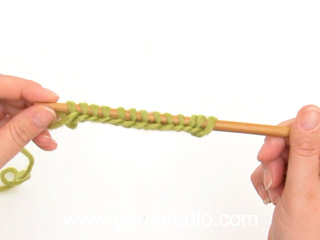
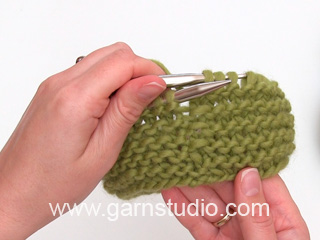
GARTER ST (in the round on circular needle): * K 1 round and P 1 round *, repeat from *-*. 1 ridge = 2 rounds. GARTER ST (back and forth on needle): K all rows. 1 ridge = K2 rows. PATTERN: See diagrams A.1 - A.5. The diagrams show all rows in pattern seen from RS. RAGLAN: Inc on each side of raglan sts (A.1/A.2, marker, A.2/A.1) by making 1 YO = 8 inc on round. On next round K the YOs twisted to avoid holes. Then P the new sts on sleeves, and on front and back piece work the new sts in pattern as explained below. DECREASE TIP (applies to sleeves): Dec on each side of marker as follows: Work until 3 sts remain before marker, P 2 tog, P 2, P 2 tog = 2 sts dec. INCREASE TIP: Inc 1 st by making a YO. On next round P YOs twisted, i.e. work in the back loop of st instead of front to avoid holes. P the new sts. ---------------------------------------------------------- JUMPER: Worked top down in the round on circular needle. Work sleeve in the round on circular needle/double pointed needles. YOKE: Cast on 92-92-97-97-101 sts on circular needle size 4 mm / US 6 with Karisma. Work 3 ridges in GARTER ST in the round on circular needle - see explanation above. Continue to work an elevation in GARTER ST back and forth -see explanation above, from mid back as follows (1st row = RS): Now work 5-5-7-7-9 sts, turn, work 10-10-14-14-18 sts, turn, work 15-15-19-19-23 sts, turn, work 20-20-24-24-28 sts, turn, work 25-25-29-29-33 sts, turn, work 30-30-34-34-38 sts, turn, work 35-35-39-39-43 sts, turn, work 40-40-43-43-48 sts, turn, work back to beg of round. Now K 1 round AT THE SAME TIME inc 24-24-23-23-27 sts evenly = 116-116-120-120-128 sts. P 18-18-19-19-21, insert 1st marker here (= this is now beg of round), A.2, P 2, A.2, P 2, A.1, insert 2nd marker here, A.2, P 0-0-1-1-3, A.3, P 0-0-1-1-3, A.1, insert 3rd marker here, A.2, P 2, A.2, P 2, A.1, insert 4th marker here, A.2, P 0-0-1-1-3, A.3, P 0-0-1-1-3, A.1. READ THE NEXT 2 SECTIONS BEFORE CONTINUING! REMEMBER THE GAUGE! On next round beg inc for RAGLAN – see explanation above, AT THE SAME TIME work pattern as follows: RAGLAN: Repeat inc every round 0-2-10-20-20 times in total. Then inc every other round 23-32-30-26-27 times and every 3rd round 6-0-0-0-0 times = 348-388-440-488-504 sts. PATTERN: Work pattern on body as follows (P the inc sts on sleeves): Work the first 6 sts inc in A.2, then P next 8-9-7-8-8 inc sts, work the next 6 inc sts in A.2, P the next 8-9-7-8-8 inc sts. NOTE: (Size M-L-XL-XXL): When A.3 has been worked 1 time vertically, continue with A.2 over cable and P the remaining sts from A.3 until start of body. S/M: Then inc as before on sleeve and inc inside A.1/A.2 (i.e. between A.1 and A.2, towards marker for raglan) on front and back piece 1-4 more times. P the new sts. L/XL/XXL: Continue with A.2 over the next 6 inc sts, P the next 7-8-8 inc sts, then inc as before on sleeve and inc inside A.1/A.2 (i.e. between A.1 and A.2, towards marker for raglan) on front and back piece 1-4-5 more times. P the last 1-4-5 inc sts. Piece now measures 27-28-29-30-31 cm / 10½"-11"-11½"-11 3/4"-12 1/4" from shoulder. Now work as follows: Slip the first 80-90-102-114-116 sts on a stitch holder for sleeve, cast on 12 new sts under sleeve, insert a blue marker in the middle of these new sts, work the next 94-104-118-130-136 sts (= front piece), slip the next 80-90-102-114-116 sts on a stitch holder for sleeve, cast on 12 new sts under sleeve, insert a blue marker in the middle of these new sts, work the remaining 94-104-118-130-136 sts on round (= back piece). NOW MEASURE THE PIECE FROM HERE. BODY: There are now 212-232-260-284-296 sts for body. Then continue pattern as follows: S/M: P 6-3, * A.2 0-1 time in width, P 7-7, A.2, P 8-9, insert a marker, A.2, P 8-9, insert a marker, A.2, P 9-9, A.2, P 9-9, A.2, insert a marker, P 8-9, A.2, insert a marker, P 8-9, A.1*, P 7-7, repeat from *-* 1 more time, P 1-4 L/XL/XXL: P 3-3-0, * A.2 1-1-2 times in width, P 4-6-5, A.2, P 7-8-8, insert a marker, A.2, P 7-8-8, insert a marker, A.2, P 7-8-8, insert a marker, A.2, P 10-11-12, A.2, P 10-11-12, A.2, insert a marker, P 7-8-8, A.2, insert a marker, P 7-8-8, A.2, insert a marker, P 7-8-8, A.1 *, P 4-6-5, repeat from *-* 1 more time, P 1-3-5. READ THE NEXT 2 SECTIONS BEFORE CONTINUING! Now dec and inc at the same time as follows: DECREASE: Dec differently as follows - READ DECREASE TIP: Dec 1 st on each side of the middle cable on front and back piece. Repeat dec every 2-2-1½-1½-1½ cm / ½"-½"-½"-3/4"-3/4" 3-3-4-4-6 more times. AT THE SAME TIME dec 1 st towards cable in every section with P sts with marker in (= 8-8-12-12-12 markers). Repeat dec every 3-2½-5-4-4 cm / 1 1/8"-7/8"-2"-1½"-1½" 2-3-1-2-2 more times. INCREASE (towards the sides): When piece measures 3 cm / 1'', inc along the cable towards the sleeve (i.e. cable from raglan) in P section towards the sides – READ INCREASE TIP! Inc 4 sts on round. Repeat inc every 1½-1½-2½-1½-1 cm / ½"-½"-7/8"-½"-3/8" 3-4-2-4-10 more times. When all dec and inc are done, 188-204-228-248-276 sts remain. When piece measures 11-12-12-13-14 cm / 4½"-4 3/4"-4 3/4"-5"-5½", work pattern as follows: P 6-3-6-6-0, A.2 0-1-1-1-2 times in width, P 7-8-6-11-15, A.4 0-0-1-1-1 time in width, * A.5, A.4 *, repeat from *-* 2-2-3-3-3 more times in width, A.5 1-1-0-0-0 times in width, P 7-8-6-11-15, A.2 0-1-1-1-2 times in width, P 7-8-6-11-15, A.4 0-0-1-1-1 time in width, * A.5, A.4 *, repeat from *-* 2-2-3-3-3 more times in width, A.5 1-1-0-0-0 times in width, P 1-5-0-5-15. NOTE: Adjust the first cable in A.4 and A.5 to get a nice transition between diagrams. Continue with pattern and inc according to diagram. When A.4 and A.5 have been worked vertically and piece measures approx. 33-34-34-35-35 cm / 13"-13½"-13½"-13 3/4"-13 3/4", there are 308-324-364-384-412 sts on round. Insert a marker here. NOW MEASURE THE PIECE FROM HERE. Now work rib as follows: S/M: * Work K over K and P over P until 7-11 sts remain before the blue marker in the side, P 2, K 2, P 3-4 *, repeat from *-* 1 more time and continue with K over K and P over P the rest of round. L/XL/XXL: * Work K over K and P over P until 8-14-21 sts remain before the blue marker in the side, K 2-2-2, P 3-4-3, K 0-2-2, P 0-3-3, K 0-0-2, P 0-0-3 *, repeat from *-* 1 more time and continue with K over K and P over P the rest of round. When rib has been worked for 2 cm / 3/4'' from marker, inc by making 1 YO before first P st in every P section - remember INCREASE TIP. When rib has been worked for 5-5-6-6-6 cm / 2"-2"-2½"-2½"-2½", bind off with K over K and P over P. SLEEVES: Slip the 80-90-102-114-116 sts from stitch holder back on circular needle. K 1 row over all sts and cast on 12 new sts at the end of row = 92-102-114-126-128 sts. Insert a marker in the middle of the new sts (i.e. 6 sts on each side of marker). NOW MEASURE THE PIECE FROM HERE. Then work sleeve in the round on circular needle/double pointed needles. Continue the middle cable on sleeve as before but work P over cables in raglan. On 2nd round beg dec on each side of marker - READ DECREASE TIP. Repeat dec in every other round 6 more times = 78-88-100-112-114 sts. Then dec 1 st on each side of marker every 2-1½-1-1-1 cm / 3/4"-½"-3/8"-3/8"-3/8" 13-17-22-27-27 times = 52-54-56-58-60 sts. AT THE SAME TIME when piece measures 15 cm / 6'', work A.5 over cable in the middle of sleeve - adjust the first cable in A.5 to get a nice transition between diagrams. NOTE: Do not inc in A.5 on sleeve, i.e. do not work YOs in diagram. When A.5 is finished and sleeve measures 37 cm / 14½'', work rib as follows from marker at beg of round: P 0-0-1-2-3, K 1-2-2-2-2, P 3, K 2, P 3, K 2, P 2, continue rib as on last row in A.5 (= 26 sts), P 2, K 2, P 3, K 2, P 3, K 1-2-2-2-2, P 0-0-1-2-3. Continue like this for 3 cm / 1'', bind off with K over K and P over P. ASSEMBLY: Sew the holes under the sleeves. |
||||||||||||||||||||||||||||
Diagram explanations |
||||||||||||||||||||||||||||
|
||||||||||||||||||||||||||||

|
||||||||||||||||||||||||||||

|
||||||||||||||||||||||||||||

|
||||||||||||||||||||||||||||
|
Have you made this or any other of our designs? Tag your pictures in social media with #dropsdesign so we can see them! Do you need help with this pattern?You'll find tutorial videos, a Comments/Questions area and more by visiting the pattern on garnstudio.com. © 1982-2024 DROPS Design A/S. We reserve all rights. This document, including all its sub-sections, has copyrights. Read more about what you can do with our patterns at the bottom of each pattern on our site. |
||||||||||||||||||||||||||||


With over 40 years in knitting and crochet design, DROPS Design offers one of the most extensive collections of free patterns on the internet - translated to 17 languages. As of today we count 304 catalogs and 11422 patterns - 11417 of which are translated into English (US/in).
We work hard to bring you the best knitting and crochet have to offer, inspiration and advice as well as great quality yarns at incredible prices! Would you like to use our patterns for other than personal use? You can read what you are allowed to do in the Copyright text at the bottom of all our patterns. Happy crafting!
Comments / Questions (218)
I'm sorry. I know this question has been asked before but I just don't understand. When the directions say to work rib as follows: for size M, work until 11 sts. remain before side marker, P2, K2, P4 is only 8 sts. How do I possibly make this work? Thank you.
17.03.2024 - 16:45DROPS Design answered:
Dear Mrs Allain, after you have worked these 8 sts just repeat from *to* as before, that's okay that there are not 11 sts as the "missing" 3 sts are the first 3 sts from the repeat from *to*. Happy knitting!
18.03.2024 - 09:25As Linda below, I am struggling with following the pattern increase instructions. All great up to this point. Thank you. Diane
03.03.2024 - 14:59DROPS Design answered:
Dear Diane, which increases are you referring to? There are many different increases: raglan increases, increases towards the sides, rib increases, sleeve increases. Could you please indicate the specific section you are struggling with? Happy knitting!
03.03.2024 - 23:37Bonjour merci de vos modeles super beau mais j 'ai un petit probleme je n aimes pas du tout tricoter de bas en haut et le modele 156-19 nr peut il se tricoter de bas en haut merci de ce que vous ppurrez me dire pour realiser ce modele
17.02.2024 - 19:29DROPS Design answered:
Bonjour Marie, vous pouvez probablement adapter les explications pour le tricoter de bas en haut, mais il paraît plus simple de tricoter comme indiqué; retrouvez sinon tous nos pulls tricotés de bas en haut avec torsades ici, n'hésitez pas à ajouter des filtres si besoin. Bon tricot!
19.02.2024 - 09:12This is by far the most confusing pattern I have ever seen. I have another question, please. When I'm decreasing and increasing at the same time after putting sleeves stitches on holders, I'm confused. I've figured out where to decrease, both decreases. I don't know where to increase. At the last cable near the sleeves on front and back, do I increase on the side front and back or under the armhole where I originally added the 12 stitches? Thank you.
05.02.2024 - 04:32DROPS Design answered:
Dear Mrs Allain, you will increase the number of stitches in the Purl sections after the cable on previous raglan at the end of left front piece, before the cable on previous raglan at the beg of back piece, after the cable on previous raglan at the end of back piece and before the cable on previous raglan at the beg of right front piece = 2 sts are increased on each side, 4 sts in total. Happy knitting!
05.02.2024 - 15:43Please ignore my last question. I found a few lines of the directions that didn't print out for some reason. Thanks!
02.02.2024 - 01:13Near the end of the body, when I have 324 sts. for size M , the directions say to put a marker and to measure the piece from there. But then there is only one more row of ribbing in the directions. Do I do more than one row and when do I bind off??? Thank you.
02.02.2024 - 00:43DROPS Design answered:
Hi Celeste, You measure the ribbing from this last marker - first 2 cm of rib, then increase 1 stitch before each purled section, then work until the ribbing measures a total of 5 cm in size M before binding off. Happy knitting!
02.02.2024 - 08:01I\'m making size M. Once I have 388 sts. the directions say to increase 4 more times on sleeve and inside A.1 and A.2. That would be 8 sts. every row. Two questions: will this be done every row or every other row as before? Then I have too many stitches to have the rest of the directions be accurate for the M size. Should I only do this 3 times instead of 4? Thank you.
24.01.2024 - 17:07DROPS Design answered:
Dear Mrs Allain, these sections explain how to work the new stitches increased for raglan, this means when all increases are done, you have 388 sts on needle and piece measures 28 cm from shoulder down, now divide piece as explained just afterwards. Happy knitting!
25.01.2024 - 08:34I'm currently increasing for raglan. until I have 388 sts. But where it says PATTERN: P the inc sts. on sleeves. Then it says work the first 6 sts. inc in A.2, P 9 sts, next 6 inc. sts. in A.2, P 9 sts. Where are those sts if I'm supposed to be purling the inc. sts?
06.01.2024 - 16:53DROPS Design answered:
Dear Mrs Allain, the new stitches increased on sleeves are always purled, but the new stitches for raglan on front and back piece will be worked in pattern: first work the first 6 increases as shown in A.2, then purl the next 8 increaes, then work the next 6 increases as in A.2, and purl the next 9 increases. Happy knitting!
08.01.2024 - 10:18For DECREASE TIP (sleeves) it says work until 3 stitches remain before marker, P 2 tog, P2, P 2 tog. That requires 6 stitches. I'm confused yet again by your instructions. Please advise? Thank you.
03.01.2024 - 20:04DROPS Design answered:
Hi Celeste, The marker sits in the middle of the 2 purled stitches and you purl 2 together on each side of these 2 purled stitches and marker (which covers 6 stitches). Happy knitting!
04.01.2024 - 07:46When reading instructions for increasing for raglan, it says to K the YOs twisted. Then to P the new stitches on sleeves. But when reading instructions where it says INCREASE TIP, it says to P YOs twisted then to P the new stitches. I'm confused as to whether to K or P?
03.01.2024 - 19:23DROPS Design answered:
Dar Mrs Allain, the yarn overs will be knitted twisted on next round then work either purl or knit depending on the pattern, but you can choose to work them purl twisted from the beg if you like to. Happy knitting!
04.01.2024 - 08:12