
Popular categories
Looking for a yarn?


|
|||||||
Clear Lake |
|||||||
 |
 |
||||||
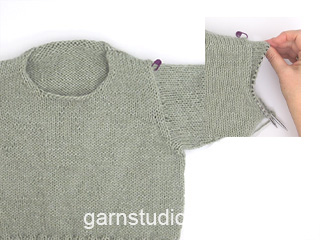
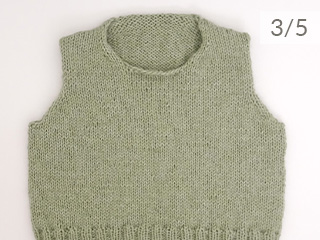
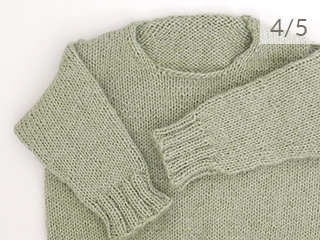
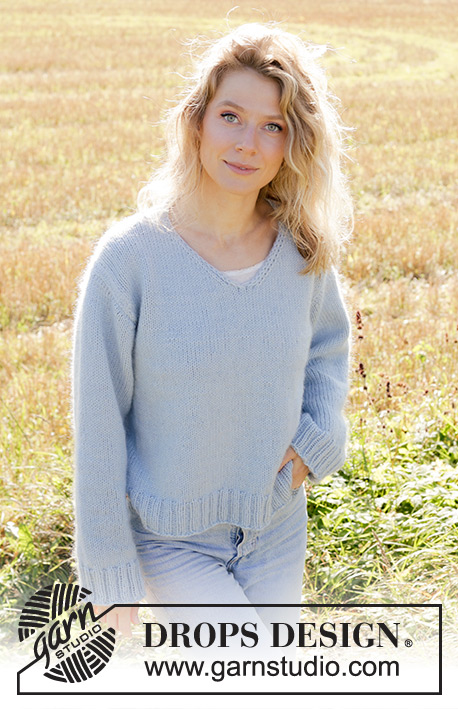
Knitted sweater in DROPS Daisy and DROPS Kid-Silk. Piece is knitted top down with European shoulder / diagonal shoulder, V-neck and I-Cord. Size: XS - XXL
DROPS 250-12 |
|||||||
|
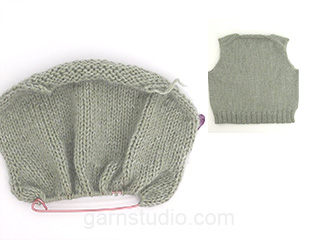
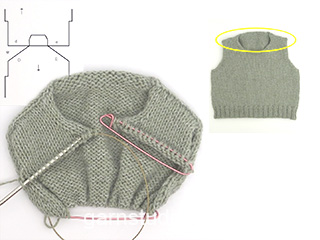
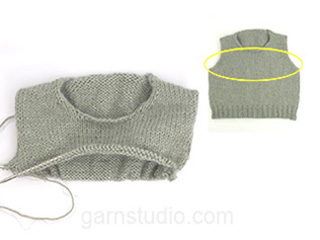
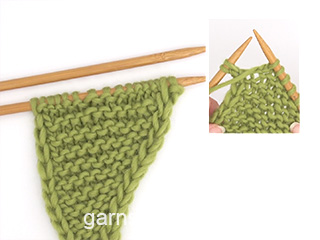
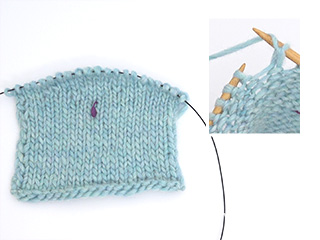
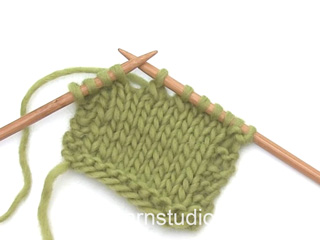
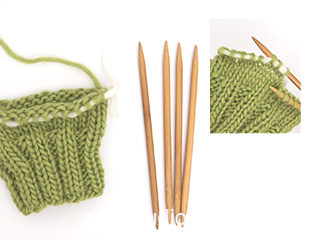
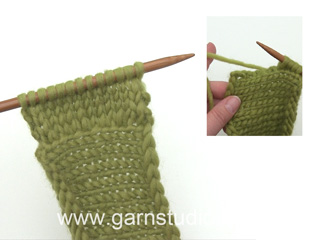
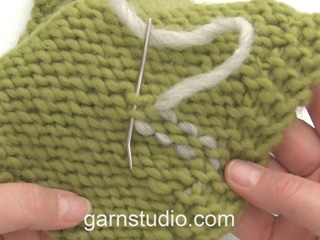
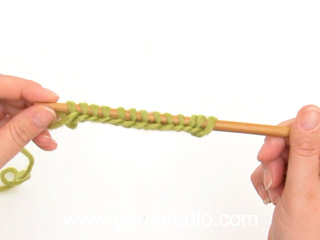
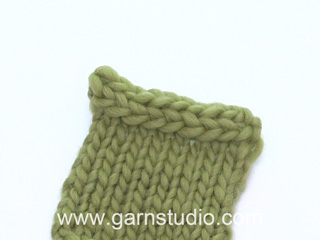
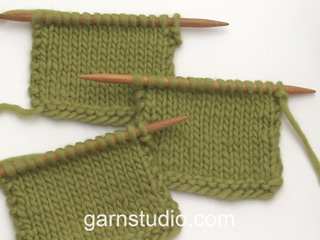
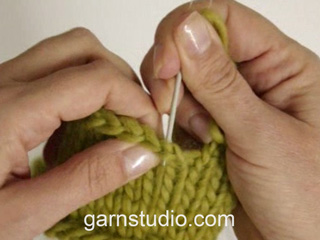
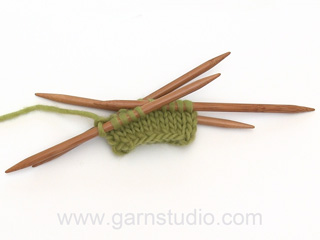
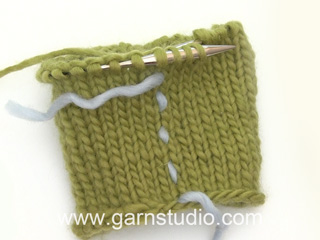
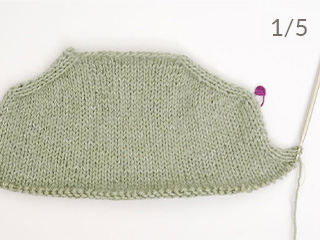
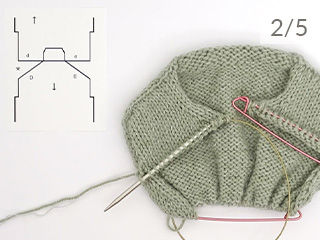
---------------------------------------------------------- EXPLANATION FOR THE PATTERN: ---------------------------------------------------------- INCREASE TIP-1 (from right side): Increase 1 stitch towards the left: Use left needle to pick up yarn between 2 stitches from row below, pick up yarn from the front and knit stitch in back loop of stitch. Increase 1 stitch towards the right: Use left needle to pick up yarn between 2 stitches from row below, pick up yarn from the back and knit stitch in front loop of stitch. INCREASE TIP-2 (from wrong side): Increase 1 stitch towards the left: Use left needle to pick up yarn between 2 stitches from row below, pick up yarn from the back and purl stitch in front loop of stitch. Increase 1 stitch towards the right: Use left needle to pick up yarn between 2 stitches from row below, pick up yarn from the front and purl stitch in back loop of stitch. EDGE STITCHES I-CORD RIGHT FRONT PIECE: Right side: Work until 3 stitches remain, purl 1, slip 1 stitch purlwise with strand in front of piece and knit 1. Wrong side: Slip 1 stitch purlwise with strand in front of piece and knit 1, knit 1, work the rest of row. EDGE STITCHES I-CORD LEFT FRONT PIECE: Right side: Slip 1 stitch purlwise with strand in front of piece, knit 1, purl 1, work the rest of row. Wrong side: Work until 3 stitches remain, knit 1, slip 1 stitch purlwise with strand in front of piece, knit 1. DECREASE TIP (applies to mid under sleeves): Decrease 1 stitch on each side of marker thread as follows: Work until 3 stitches remain before marker thread and knit 2 together, knit 2 (marker thread is between these 2 stitches), slip 1 stitch knitwise, knit 1, pass slipped stitch over stitch worked. I-CORD BIND-OFF: ROW 1 (= right side): Knit 2 together, knit the next 2 stitches twisted together. ROW 2 (= right side): Slip the 3 stitches from right needle back on left needle, knit 2 together, knit the next 2 stitches twisted together. Repeat ROW 2 until 3 stitches remain on right needle. Slip the 3 stitches from right needle back on left needle. Bind off. Sew a little stitch that binds beginning/end of I-cord to the garment. ---------------------------------------------------------- START THE PIECE HERE: ---------------------------------------------------------- SWEATER - SHORT OVERVIEW OF THE PIECE: In this pattern long and short needles have been used - begin with fitting length and switch as needed. Work piece back and forth on needle. Begin by casting on stitches in the back of neck. Then work back piece downwards while at the same time increasing in each side of piece until number of stitches for shoulder width is reached. Back piece has a slight diagonal shoulder. Then work down to armholes. Now put back piece aside and work the front piece. Front piece is first worked in 2 parts. Begin by picking up stitches along right shoulder, work while increasing towards the neck. Repeat on the left shoulder. Put right and left front piece together when increases for neck are done. Then work front piece down to armholes. Now slip front piece and back piece on to same needle and work body downwards in the round on circular needle. Pick up stitches for sleeves around the armholes. First work back and forth with short rows to form a sleeve cap. Then work sleeves downwards in the round on needle. BACK PIECE: Cast on 26-28-28-32-34-34 stitches on circular needle size 5 MM = US 8 with 1 strand of each color (2 strands). Purl 1 row from wrong side. Read INCREASE TIP-1 and work next row from right side as follows: Knit 3, increase towards the left, knit until 3 stitches remain, increase towards the right, knit 3. Read INCREASE TIP-2 and work next row from wrong side as follows: Purl 3, increase towards the left, purl until 3 stitches remain, increase towards the right, purl 3. Continue like this and increase the same way from both right side and wrong side 24-26-28-30-32-36 times in total. REMEMBER THE KNITTING GAUGE! After last increase there are 74-80-84-92-98-106 stitches on needle. Insert 1 marker in the side. Now measure piece from here! Work stockinette stitch back and forth until piece measures 12-13-13-14-13-14 cm = 4¾"-5⅛"-5⅛"-5½"-5⅛"-5½", measured along the edge of armhole. Work next row as follows from right side: Knit 3, increase towards the left, work until 3 stitches remain, increase towards the right, knit 3 – remember INCREASE TIP-1 Increase like this on every row from right side 2-2-3-3-4-4 times in total = 78-84-90-98-106-114 stitches. Work until piece measures 14-15-16-17-17-18 cm = 5½"-6"-6¼"-6¾"-6¾"-7", measured along armhole. Cut the yarn, slip stitches on a thread or stitch holder, and work front piece as explained below. FRONT PIECE: Begin with right shoulder (when garment is worn). Pick up 24-26-28-30-32-36 stitches inside outermost stitch along right shoulder on back piece (i.e. pick up 1 stitch in every row from edge at the top of back piece, see E on chart). All length measurements are done from here! Purl 1 row from wrong side, work next row as follows from right side: stockinette stitch until 3 stitches remain, 3 EDGE STITCHES in I-CORD - read explanation above. When piece measures 6 cm = 2⅜", increase stitches towards the neck. Increase towards the right at the end of every row from right side, increase before 4 stitches - remember INCREASE TIP-1. Increase 1 stitch on every other row (every row from right side) 13-14-14-16-17-17 times in total = 37-40-42-46-49-53 stitches. When last row with increase is done, slip stitches on a thread or needle. Then work left shoulder as explained below. Pick up 24-26-28-30-32-36 stitches inside outermost stitch along left shoulder on back piece (i.e. pick up 1 stitch in every row from edge at the top of back piece, see D on chart). All length measurements are done from here! Purl 1 row from wrong side, then work as follows from right side: 3 EDGE STITCHES in I-CORD - read explanation above, stockinette stitch over the remaining stitches. Continue like this. When piece measures 6 cm = 2⅜", increase stitches towards the neck. Increase towards the left at the beginning of every row from right side, increase after 4 stitches– remember INCREASE TIP-1. Increase 1 stitch on every other row (every row from right side) 13-14-14-16-17-17 times in total = 37-40-42-46-49-53 stitches. Work next row as follows from wrong side: Work stockinette stitch over the 37-40-42-46-49-53 stitches from left shoulder, slip stitches from right shoulder on left needle and then work them in stockinette stitch = 74-80-84-92-98-106 stitches. Work next row as follows - from right side: Knit 36-39-41-45-48-52, slip next stitch on a cable needle in front of piece, knit 1, knit stitch from cable needle, work the last 36-39-41-45-48-52 stitches on row. Continue in stockinette stitch. Continue to work until piece measures 22-23-23-24-25-26 cm = 8¾"-9"-9"-9½"-9¾"-10¼". Work next row as follows from right side: Knit 3, increase towards the left, knit until 3 stitches remain, increase towards the right, knit 3 – remember INCREASE TIP-1. Increase like this on every row from right side 2-2-3-3-4-4 times in total = 78-84-90-98-106-114 stitches. Continue in stockinette stitch until piece measures 24-25-26-27-29-30 cm = 9½"-9¾"-10¼"-10⅝"-11⅜"-11¾", finish with a row from wrong side. Now put front piece and back piece together for body as explained below. BODY: Work stockinette stitch over the 78-84-90-98-106-114 stitches from front piece, cast on 4-4-6-6-8-10 new stitches at the end of this row (in the side), work stockinette stitch over the 78-84-90-98-106-114 stitches from back piece, cast on 4-4-6-6-8-10 new stitches at the end of row = 164-176-192-208-228-248 stitches. Work stockinette stitch until piece measures 50-52-54-56-58-60 cm = 19¾"-20½"-21¼"-22"-22¾"-23⅝", measured from the top point on shoulder on front piece. Knit 1 round while increasing 20-24-24-24-28-28 stitches evenly = 184-200-216-232-256-276 stitches. Switch to circular needle size 4 MM = US 6. Work rib (knit 2/purl 2) in the round for 6 cm = 2⅜". Bind off. Sweater measures 56-58-60-62-64-66 cm = 22"-22¾"-23⅝"-24⅜"-25¼"-26" in total, measured from the top of shoulder in towards the neck. SLEEVES: Place piece flat and insert 1 marker at the top of armhole (NOTE! It is not where stitches were picked up for front piece but approx. 5-6 cm = 2"-2⅜" down on front piece = mid on top of shoulder). All length measurements on sleeve piece are done from here! Use circular needle size 5 MM = US 8, begin in the middle of the new stitches cast on under sleeve, and pick up 68-74-80-82-90-94 stitches along armhole - adjust to pick up same number of stitches on each side of marker along armhole. Now work stockinette stitch back and forth with short rows over sleeve cap, this is done to get a better shape on sleeve. Begin mid under sleeve. 1st row (right side): work 9-10-10-10-11-11 stitches past marker, turn 2nd row (wrong side): work 9-10-10-10-11-11 stitches past marker, turn. 3rd row (right side): 10-11-8-6-5-5 stitches past where the previous turn was, turn 4th row (wrong side): work 10-11-8-6-5-5 stitches past where the previous turn was, turn Repeat 3rd and 4th row until 29-32-34-34-36-36 stitches have been worked past marker mid on top of sleeve (3-3-4-5-6-6 turns have been done in each side). Work from right side until beginning of round (mid under sleeve). Insert 1 marker thread here, this is used when decreasing stitches under sleeve. Move marker thread upwards when working. Continue working in the round in stockinette stitch over all stitches. When sleeve measures 5-5-6-7-7-7 cm = 2"-2"-2⅜"-2¾"-2¾"-2¾", decrease 2 stitches mid under sleeve - read DECREASE TIP. Decrease every other round 2-2-3-3-4-4 times, then decrease every 4½-3½-2½-2½-2-1½ cm = 1⅝"-1¼"-1"-1"-¾"-½" 6-8-9-9-11-12 times, 8-10-12-12-15-16 times in total = 52-54-56-58-60-62 stitches. Continue to work until sleeve measures 46-46-46-44-43-42 cm = 18"-18"-18"-17¼"-17"-16½". 6 cm = 2⅜" remain until finished measurements. Try the sweater and work to desired length before rib. Knit 1 round while increasing 8-6-8-6-8-6 stitches evenly = 60-60-64-64-68-68 stitches. Switch to double pointed needles size 4 MM = US 6. Work rib (knit 2/purl 2) for 6 cm = 2⅜". Loosely bind off. Sleeve measures approx. 52-52-52-50-49-48 cm = 20½"-20½"-20½"-19¾"-19¼"-19". I-CORD NECK EDGE AT THE BACK: Use circular needle size 5 MM = US 8 and cast on 2 stitches on needle with 1 strand in each quality, then pick up stitches along the neck edge at the back, begin at shoulder line from right side and pick up inside 1 stitch to the other shoulder line. Pick up 24-26-28-30-32-36 stitches in total. Fasten off. Begin in the side where stitches were cast on and bind off with I-CORD - read explanation above. |
|||||||
Diagram explanations |
|||||||
|
|||||||

|
|||||||

|
|||||||
|
Have you made this or any other of our designs? Tag your pictures in social media with #dropsdesign so we can see them! Do you need help with this pattern?You'll find tutorial videos, a Comments/Questions area and more by visiting the pattern on garnstudio.com. © 1982-2024 DROPS Design A/S. We reserve all rights. This document, including all its sub-sections, has copyrights. Read more about what you can do with our patterns at the bottom of each pattern on our site. |
|||||||


With over 40 years in knitting and crochet design, DROPS Design offers one of the most extensive collections of free patterns on the internet - translated to 17 languages. As of today we count 304 catalogs and 11422 patterns - 11417 of which are translated into English (US/in).
We work hard to bring you the best knitting and crochet have to offer, inspiration and advice as well as great quality yarns at incredible prices! Would you like to use our patterns for other than personal use? You can read what you are allowed to do in the Copyright text at the bottom of all our patterns. Happy crafting!
Comments / Questions (12)
Hello? Can you pls answer my question below?
31.05.2024 - 22:20Ok tack. Tyvärr visar videon den vänstra axeln och ni säger att man skall börja med den högra. Men det kanske inte spelar ngn roll?
23.05.2024 - 14:36Har stickat fram till FRAMSTYCKE förstår inte vad ”sticka upp” betyder och var börjar jag när det står innanför yttersta maskan? Finns det ngn video som visar? Stickar man alltså styckena för sig eller sätta de ihop?
22.05.2024 - 20:45DROPS Design answered:
Hej Pia, ja du finder hvert moment i videoerne øverst i opskriften, klik på Video. Her ser du den du spørger om: Europeisk axel #2
23.05.2024 - 14:08Jag stickar på modell Clearing lake. Markerade small i utskriften (står S på framsidan i fet stil) och går efter ringarna som markerats. Nu när jag kommit halvvägs ser jag att det är den första ringen som är markerad?! Är det xs jag stickar efter? Hur gör jag? Vilket mått skall jag följa? Så tröttsamt… Mvh Pia
09.05.2024 - 14:10DROPS Design answered:
Hei Pia. Takk for at du gjorde oss oppmerksom på dette. Det er nå ordnet. Den første størrelsen er XS. mvh DROPS Design
13.05.2024 - 12:41Hei! Miten työ on tarkoitus viimeistellä; upottamalla veteen/kastelemalla, höyryttämällä vai miten?
05.05.2024 - 19:09DROPS Design answered:
Hei, kostuta neule tai höyrytä se kevyesti.
06.05.2024 - 17:25Hei! Kiitos kauniista mallista! Onko mallitilkku tarkoitus neuloa nro 4:n vai 5:n puikoilla?
05.03.2024 - 13:50DROPS Design answered:
Hei, mallitilkku neulotaan puikoilla nro 5.
05.03.2024 - 17:18Bonjour pourquoi tout les modèles se tricotent de haut en bas Je suis une grand mère qui a l habitude de travailler de Bas en haut alors je suis limitée dans les modèles dommage
27.02.2024 - 15:21DROPS Design answered:
Bonjour Mme Harribaud, nous essayons de répondre à la demande des tricoteuses en proposant aussi bien des modèles tricotés de haut en bas que des modèles tricotés de bas en haut, retrouvez par exemple tous nos pulls tricotés de bas en haut (y compris de la dernière collection) ici. Bon tricot!
27.02.2024 - 16:22The fields sweater
19.01.2024 - 14:53Forget-me-not
18.01.2024 - 23:43Alpin Dew
18.01.2024 - 17:16