
Popular categories
Looking for a yarn?


|
||||||||||||||||||||||
Day to Knight |
||||||||||||||||||||||
 |
 |
|||||||||||||||||||||
Knitted vest in DROPS Lima or DROPS Karisma. Piece is knitted with V-neck, cables, textured pattern and double sleeve edges. Size: S - XXXL
DROPS 228-5 |
||||||||||||||||||||||
|
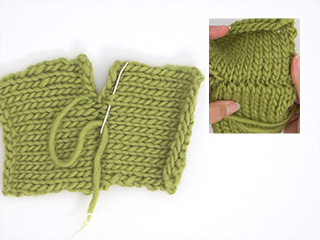
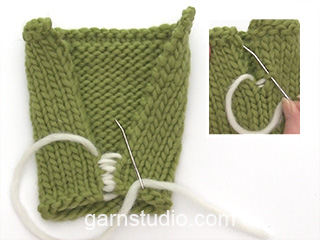
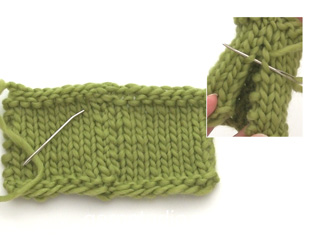
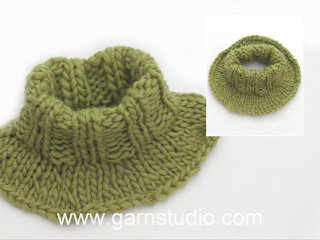
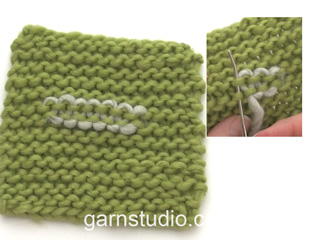
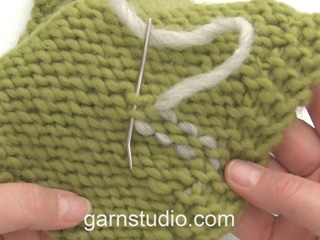
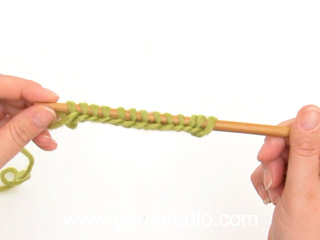
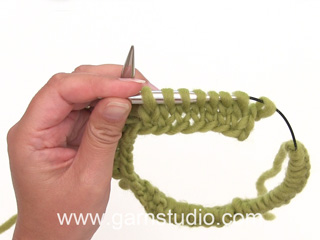
---------------------------------------------------------- EXPLANATION FOR THE PATTERN: ---------------------------------------------------------- GARTER STITCH (back and forth): Knit all rows. 1 ridge vertically = knit 2 rows. PATTERN: See diagrams A.1 to A.3. Diagrams show all rows in pattern seen from the right side. DECREASE TIP (evenly): To calculate how to decrease evenly, use the total number of stitches on row (e.g. 105 stitches) and divide stitches by number of decreases to be done (e.g. 5) = 21. In this example decrease by purling every 20th and 21st stitch together. BIND-OFF TIP: To avoid a tight bind-off edge when binding off, you may use a larger needle. If this still is too tight make 1 yarn over after approx. every 4th stitch while binding off (bind off yarn overs as stitches). ---------------------------------------------------------- START THE PIECE HERE: ---------------------------------------------------------- VEST – SHORT SUMMARY OF PIECE: Work front and back piece back and forth in 2 parts. Then assemble the piece at the shoulder seems and sew the side seams. Finish with sleeve edges in round on a circular needle. BACK PIECE: Cast on 104-115-126-137-148-159 stitches (including 2 edge stitches in each side) on circular needle size 4 MM = US 6 with DROPS Lima or DROPS Karisma. Purl 1 row from wrong side. Then work pattern as follows: 2 edge stitches in GARTER STITCH – read explanation above, A.1 over the next 99-110-121-132-143-154 stitches (= 9-10-11-12-13-14 repetitions of 11 stitches), work first stitch in A.1, 2 edge stitches in garter stitch. Continue back and forth until A.1 has been worked 5 times vertically. REMEMBER THE KNITTING GAUGE. Now work A.2 over every repetition A.1 (continue edge stitches as before). When A.2 has been worked vertically, there are 95-105-115-125-135-145 stitches on row and piece measures approx. 15 cm = 6". Work next row from right side as follows: Purl over all stitches on needle and decrease 1-5-3-7-5-3 stitches evenly– read DECREASE TIP = 94-100-112-118-130-142 stitches. Cast on 1 stitch at the end of row (= 1 edge stitch), turn and knit over all stitch, cast on 1 stitch at the end of row (= 1 edge stitch) = 96-102-114-120-132-144 stitches. Now work pattern as follows: 1 edge stitch in garter stitch, A.3 until 2 stitches remain on needle, work first stitch in A.3, 1 edge stitch in garter stitch. Continue back and forth like this. When piece measures 24-25-26-27-28-29 cm = 9½"-9¾"-10¼"-10⅝"-11"-11⅜", bind off 6-6-9-9-12-12 stitches for armholes at the beginning of the next 2 rows. On next row from right side, decrease 1 stitch in each side as follows: Work 1 edge stitch in garter stitch, work 3 stitch in pattern as before, slip 1 stitch knitwise, knit 1, pass slipped stitch over stitch worked (= 1 stitch decreased), work until 6 stitches remain, knit 2 together (= 1 stitch decreased), work the last 4 stitches in pattern as before. Decrease like this every other row 5-5-9-9-7-10 times in total, then every 4th row 4-4-3-3-5-5 times (= 9-9-12-12-12-15 stitches decreased for armhole in each side) = 66-72-72-78-84-90 stitches. Continue to work until piece measures 51-53-55-57-59-61 cm = 20"-21"-21⅝"-22½"-23¼"-24". Now work in garter stitch over the middle 28-28-28-34-34-34 stitches, work remaining stitches in pattern as before. When 2 ridges have been worked over these stitch, bind off the middle 22-22-22-28-28-28 stitches on next row from right side = 22-25-25-25-28-31 stitches remain on each shoulder. Now finish each shoulder separately. Work pattern as before, i.e. work 1 edge stitch in garter stitch towards the side, 2 edge stitches in garter stitch towards the neck and A.3 over the remaining stitches. When piece measures 54-56-58-60-62-64 cm = 21¼"-22"-22¾"-23⅝"-24⅜"-25¼", bind off. Work the other shoulder the same way. FRONT PIECE: Cast on and work as on back piece until piece measures 24-25-26-27-28-29 cm = 9½"-9¾"-10¼"-10⅝"-11"-11⅜". OVERVIEW OF NEXT SECTION: Then decrease for armholes, at the same time divide for right and left front piece and decrease for V-neck. DECREASE FOR ARMHOLES: When piece measures 24-25-26-27-28-29 cm = 9½"-9¾"-10¼"-10⅝"-11"-11⅜", bind off 6-6-9-9-12-12 stitches for armholes at the beginning of the next 2 rows. On next row from right side, decrease 1 stitch in each side as follows: Work 1 edge stitch in garter stitch, work 3 stitch in pattern as before, slip 1 stitch knitwise, knit 1, pass slipped stitch over stitch worked (= 1 stitch decreased), work until 6 stitches remain, knit 2 together (= 1 stitch decreased), work the last 4 pattern in pattern as before. Decrease like this every other row 5-5-9-9-7-10 times in total, then every 4th row 4-4-3-3-5-5 times (= 9-9-12-12-12-15 stitches decreased for armhole in each side). V-NECK: AT THE SAME TIME when piece measures 34-35-36-37-38-39 cm = 13⅜"-13¾"-14¼"-14½"-15"-15¼", work next row from wrong side as follows: Work as before until the 2 middle stitches on needle. Work 2 stitches in each of the middle 2 stitches on needle (i.e. work in front and back loop of stitch) = 2 stitches increased, work the rest of row. Turn and work the next row - work the new stitch in the middle of front piece in garter stitch. Now divide the piece in the middle of these middle stitches and continue each part separately. LEFT FRONT PIECE: Work as follows from right side: Work pattern and decrease for armhole as before until 10 stitches remain before V-neck, knit the next 2 together (= 1 stitch decreased), work pattern as before the rest of row. Decrease like this every other row 4-4-3-7-7-6 times, then every 4th row 8-8-9-8-8-9 times 12-12-12-15-15-15 stitches decreased for V-neck When all decreases for armholes and neck are done, 22-25-25-25-28-31 stitches remain for shoulder. Continue to work until piece measures 54-56-58-60-62-64 cm = 21¼"-22"-22¾"-23⅝"-24⅜"-25¼". Bind off knitting from right side. RIGHT FRONT PIECE: Work as follows from right side: Work pattern as before over the first 8 stitches, slip 1 stitch knitwise, knit 1, pass slipped stitch over stitch worked (= 1 stitch decreased), work pattern the rest of row and decrease for armhole as before. Decrease like this every other row 4-4-3-7-7-6 times, then every 4th row 8-8-9-8-8-9 times in total = 12-12-12-15-15-15 stitches decreased for V-neck When all decreases for armhole and neck are done, there are 22-25-25-25-28-31 stitches on round. Continue to work until piece measures 54-56-58-60-62-64 cm = 21¼"-22"-22¾"-23⅝"-24⅜"-25¼". Bind off knitting from right side. ASSEMBLY: Sew the shoulder seams. Sew side seam from armholes and down to where 1 edge stitch was cast on in each side (= approx. 16 cm = 6¼" vent). DOUBLE SLEEVE EDGES: Begin mid under sleeve in side seam and pick up approx. 136 to 162 stitch around armhole with circular needle size 3 MM = US 2.5 and DROPS Lima or DROPS Karisma. Number of stitches must be divisible by 2. Work rib in the round as follows: * Knit 1, purl 1 *, repeat from *-* in the round for 6 cm = 2⅜" round. Bind off – read BIND-OFF TIP. Work the same way around the other armhole. Fold the rib around sleeves on inside of garment. Fasten rib to get a double sleeve edge. To avoid a tight sleeve edge that sticks out it is important to keep the seam elastic. |
||||||||||||||||||||||
Diagram explanations |
||||||||||||||||||||||
|
||||||||||||||||||||||

|
||||||||||||||||||||||

|
||||||||||||||||||||||
|
Have you made this or any other of our designs? Tag your pictures in social media with #dropsdesign so we can see them! Do you need help with this pattern?You'll find tutorial videos, a Comments/Questions area and more by visiting the pattern on garnstudio.com. © 1982-2024 DROPS Design A/S. We reserve all rights. This document, including all its sub-sections, has copyrights. Read more about what you can do with our patterns at the bottom of each pattern on our site. |
||||||||||||||||||||||


With over 40 years in knitting and crochet design, DROPS Design offers one of the most extensive collections of free patterns on the internet - translated to 17 languages. As of today we count 304 catalogs and 11422 patterns - 11417 of which are translated into English (US/in).
We work hard to bring you the best knitting and crochet have to offer, inspiration and advice as well as great quality yarns at incredible prices! Would you like to use our patterns for other than personal use? You can read what you are allowed to do in the Copyright text at the bottom of all our patterns. Happy crafting!
Comments / Questions (21)
Die Anleitung leicht verständlich! Ergebnis: Super schön! So wie es sein sollte.Mit Baumwolle - Cashmere gestrickt.\r\nMaschenprobe angepasst.\r\nVoll zu empfehlen.\r\nDanke dafür.Hat nicht jeder!🥰
11.03.2024 - 19:42Bonjour, Je débute le devant gauche. Je comprends les diminutions du côté de l’emmanchure. Je ne sais pas où faire la diminution de une maille est ce avant de commencer les diminutions de l’emmanchure ou après Merci 😊
07.03.2024 - 15:06DROPS Design answered:
Bonjour Mme Tremblay, lorsque l'on tricote les devants séparément, les diminutions des emmanchures ne sont pas encore terminées, autrement dit, vous continuez à diminuer comme indiqué auparavant sous DIMINUTIONS EMMANCHURES: pour votre taille, en début de rang sur l'endroit pour le devant gauche (vous diminuerez pour l'emmanchure en fin de rang sur l'endroit pour le devant droit)= après les 4 premières mailles pour l'emmanchure, en même temps, diminuez pour l'encolure avant les 8 dernières mailles sur l'endroit (devant gauche). Bon tricot!
07.03.2024 - 15:47Bonjour Je fait le modèle de 126 mailles. Je n’arrive pas à comprendre le début pour le dos. Il me dise de faire 11 fois le motif A1 au dessus des 121 mailles plus deux mailles de chaque côté mais il me reste une maille de surplus. Merci de me répondre et Bonne journée!
19.02.2024 - 14:13DROPS Design answered:
Bonjour Mme Tremblay, tricotez ainsi: 2 m point mousse, répétez ensuite 11 fois les 11 mailles de A.1, tricotez maintenant la 1ère maille de A.1 pour que le motif soit symétrique et terminez par 2 m point mousse soit: 2+(11x11)+1+2= 126 mailles. Bon tricot!
19.02.2024 - 15:24Bonjour Comment faire pour avoir les mensurations ? Merci
15.01.2024 - 12:42Wanneer je mindert voor de armsgaten: hoe werk je dan verder in het patroon? Bv. Die 9 keer iedere andere naald, daar doe je 1 kantsteek, 3 steken in patroon, 1 afhalen, 1 recht, en de vorige eroverheen afhalen, ga je dan met de volgende steek terug verder in het patroon of telt die ene geminderde of die ene rechte mee in het patroon?
16.12.2023 - 23:11DROPS Design answered:
Dag Emilia,
Op het moment dat je mindert voor de armsgaten ben je patroon A.3 aan het breien. Zorg ervoor dat A.3 over de rest van het pand door loopt. Als je bijvoorbeeld 1 steek hebt geminderd dan brei je 1 steek minder in het patroon, maar het patroon mag niet verschuiven.
17.12.2023 - 17:23Day to it pattern, I dont understand the symbol in a1 chart row 3 and 7. Do I have to purl 3 tog. 2 times? Pls explain the symbol. Thank you
23.11.2023 - 03:09DROPS Design answered:
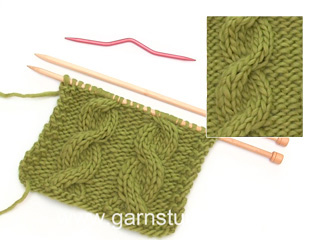
Hi Helga, The diagonal lines in chart A.1 are for the cabling. The first line from top right to bottom left is "place 1 stitch on cable needle held behind the piece, knit 1 as usual, then purl the stitch on the cable needle". The line from bottom right to top left is "place 1 stitch on the cable needle held in front of the piece, purl 1 as usual and knit the stitch on the cable needle". Happy knitting!
23.11.2023 - 07:26Telpatroon: aangegeven is dat het telpatroon alle naalden aan de goede kant laat zien. Alleen als ik uitga van heen- en teruggaande naalden, krijg ik het juiste patroon. Klopt dit?\r\nTelpatroon A1-3e naald (heengaand) Steek op kabelnaald achter het werk, 1 recht en 1 averecht van de kabelnaald . Daarna steek op kabelnaald 1 steek voor het werk, 1 averecht en 1 recht van de kabelnaald (dus precies andersom dan is aangegeven. Idem voor 7e naald - ook andersom dan is aangegeven.
11.11.2023 - 18:13Tengo una duda. En la espalda, al seguir tejiendo, despues de la disminucion de las sisas, habla de trabajar en punto musgo en algunos puntos y segun el patron en el resto, pero no me queda claro si el punto musgo es sobre los puntos centrales o no.
10.08.2023 - 03:02DROPS Design answered:
Hola Ximena, se trataba de una errata, ya está corregida. Trabajas en punto musgo sobre los 28-28-28-34-34-34 puntos centrales.
20.08.2023 - 18:20Hej der står i opskriften at diagrammet viser alle retninger. Skal jeg så strikke vrangpind som masken viser. På forhånd tak for hjælpen. Håber på hurtig svar da jeg skal til at begynde på den . Venlig hilsen Majbrit Sloth Jørgensen
01.05.2023 - 06:07DROPS Design answered:
Hei Majbritt. Man leser et strikkediagram motsatt av slik man normalt leser: Fra høyre mot venstre, nedenfra og opp. Du begynner altså nederst i det høyre hjørnet (fre retten), og jobber deg mot venstre og oppover. Da blir 2.rekke i diagrammet fra vrangen og det strikkes da fra venstre mot høyre. Og så er det viktig å lese diagramikon forklaringen. F.eks blank firkant strikkes rett fra retten, vrang fra vrangen, og en firkant med en vannrett strekk strikkes vrang fra retten, rett fra vrangen . mvh DROPS Design
02.05.2023 - 13:38Hej der står i opskriften at diagrammet viser alle retninger, skal jeg så strikke vrangpinden som masken viser . På forhånd tak håber på hurtig svar da jeg skal til igang med den
01.05.2023 - 06:05