
Popular categories
Looking for a yarn?


|
|
Peaches and Cream |
|
 |
 |
Knitted sweater in DROPS Brushed Alpaca Silk. Piece is knitted top down with ¾ pouffe sleeves. Size: S - XXXL
DROPS 223-1 |
|
|
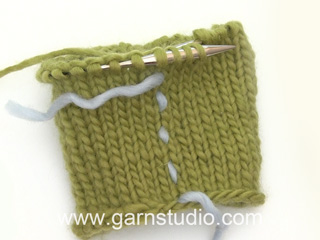
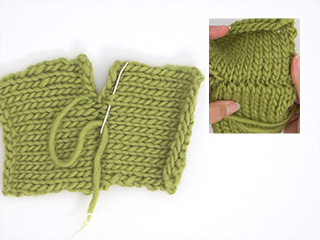
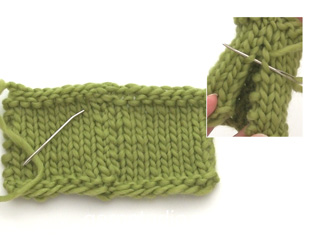
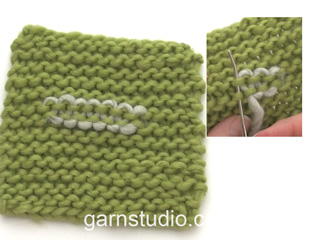
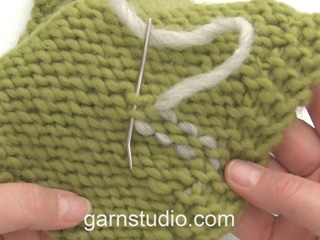
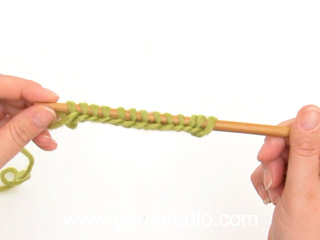
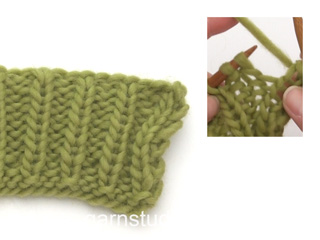
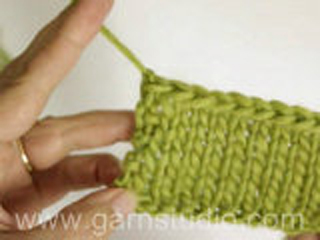
------------------------------------------------------- EXPLANATION FOR THE PATTERN: ------------------------------------------------------- GARTER STITCH (back and forth): Knit all rows. 1 ridge vertically = knit 2 rows. INCREASE TIP-1 (applies to armholes): All increases are done from the right side. Increase inside 3 edge stitches in garter stitch. Increase 1 stitch by making 1 yarn over. On next row (wrong side) purl yarn overs twisted to avoid holes. Then work the increased stitches in stockinette stitch. INCREASE TIP-2 (applies to sides of body): Increase 1 stitch inside 1 edge stitch in garter stitch in the side by making 1 yarn over. On next row (wrong side) purl yarn overs twisted to avoid holes. INCREASE/DECREASE TIP (evenly): To calculate how to increase/decrease evenly, use the total number of stitches on row (e.g. 70 stitches) minus edge stitches (e.g. 2 stitches), and divide the remaining stitches by number of increases/decreases to be done (e.g. 8) = 8,5. In this example increase by making 1 yarn over after alternately every 8th and 9th stitch, do not increase over edge stitches. On next row work yarn overs twisted to avoid holes If decreasing knit in this example alternately every 7th and 8th stitch and every 8th and 9th stitch together. DECREASE TIP-1 (applies to sides of body): All decreases are done from the right side! Decrease inside 1 edge stitch in garter stitch. Decrease as follows after 1 edge stitch in garter stitch: Slip 1 stitch knitwise, knit 1, pass slipped stitch over stitch worked (= 1 stitch decreased). Decrease as follows before 1 edge stitch in garter stitch: Work until 2 stitches remain before edge stitch, knit 2 together(= 1 stitch decreased). DECREASE TIP-2 (applies to mid under sleeves): Work until 3 stitches remain before marker thread, knit 2 together, knit 2 stitches (marker thread is between these 2 stitches), slip 1 stitch knitwise, knit 1, pass slipped stitch over stitch worked (= 2 stitches decreased). BIND-OFF TIP: To avoid a tight bind-off edge you may use a larger needle size. If this also is too tight, work a 1 yarn over after approx. every 3rd stitch while binding off (bind off yarn overs as regular stitches). ------------------------------------------------------- START THE PIECE HERE: ------------------------------------------------------- SWEATER - SHORT OVERVIEW OF THE PIECE: Work front pieces and back piece back and forth on circular needle separately, top down. Sleeve cap is worked back and forth on circular needle, top down. Then work the rest of sleeve in the round on circular needle/double pointed needles. RIGHT SHOULDER BACK (when garment is worn): Cast on 20-21-20-21-21-22 stitches on circular needle size 4 mm = US 6. Work 1 ridge in GARTER STITCH - read explanation above, over all stitches. Switch to circular needle size 5 mm = US 8. Then work the outermost 3 stitches in each side of piece in garter stitch and work the remaining stitches in stockinette stitch. When piece measures 4 cm = 1½", work, next row from wrong side as follows: Work as before over all stitches and cast on 20-20-22-22-24-24 new stitches at the end of row for neck = 40-41-42-43-45-46 stitches. Cut the yarn. Put piece aside and work the left shoulder at the back. LEFT SHOULDER BACK (when garment is worn): Cast on 20-21-20-21-21-22 stitches on circular needle size 4 mm = US 6. Work 1 ridge over all stitches. Switch to circular needle size 5 mm = US 8. Then work the outermost 3 stitches in each side of piece in garter stitch and work the remaining stitches in stockinette stitch. Continue like this until piece measures 4 cm = 1½"– adjust to finish with last row from wrong side. Then work back piece as explained below. BACK PIECE: Now slip left and right shoulder on to same circular needle so that the 20-20-22-22-24-24 new stitches cast on for neck are in the middle of needle = 60-62-62-64-66-68 stitches. READ ALL OF THE FOLLOWING SECTION BEFORE CONTINUING! Work pattern from the right side as follows: 3 stitches in garter stitch, stockinette over the next 14-15-14-15-15-16 stitches, garter stitch over the next 26-26-28-28-30-30 stitches, stockinette stitch over the next 14-15-14-15-15-16 stitches, 3 stitches in garter stitch. Continue back and forth like this until 3 ridges have been worked over stitches for neck. Then work in stockinette stitch with 3 edge stitches in garter stitch in each side towards armholes. AT THE SAME TIME when piece measures 17-14-8-12-10-7 cm = 6¾"-5½"-3⅛"-4¾"-4"-2¾" from cast-on edge on shoulders, increase 1 stitch in each side for armholes – read INCREASE TIP-1. Increase like this every 4th-4th-4th-2nd-2nd-2nd row, 2-4-8-11-15-19 times in total in each side= 64-70-78-86-96-106 stitches. Piece measures approx. 19-20-21-22-23-24 cm = 7½"-8"-8¼"-8¾"-9"-9½". REMEMBER THE KNITTING GAUGE. Now cast on 3 new stitches for armholes at the end of the next 2 rows = 70-76-84-92-102-112 stitches. NOW MEASURE PIECE FROM HERE! Work 4 rows in stockinette stitch with 6 stitches in garter stitch in each side. Then work in stockinette stitch with 1 edge stitch in garter stitch in each side. When piece measures 4 cm = 1½" from armhole, decrease 1 stitch in each side - read DECREASE TIP-1 (= 2 stitches decreased). Repeat decrease when piece measures 8-8-9-9-10-10 cm = 3⅛"-3⅛"-3½"-3½"-4"-4" and 12-13-14-15-16-17 cm = 4¾"-5⅛"-5½"-6"-6¼"-6¾" = 64-70-78-86-96-106 stitches. When piece measures 15-16-17-18-19-20 cm = 6"-6¼"-6¾"-7"-7½"-8", increase 1 stitch inside 1 edge stitch in garter stitch in each side - READ INCREASE TIP-2 (= 2 stitches increased). Repeat increase when piece measures 19-20-21-22-23-24 cm = 7½"-8"-8¼"-8¾"-9"-9½" and 23-24-25-26-27-28 cm = 9"-9½"-9¾"-10¼"-10⅝"-11" = 70-76-84-92-102-112 stitches. Continue until piece measures 24-25-26-27-28-29 cm = 9½"-9¾"-10¼"-10⅝"-11"-11⅜" from armhole and increase 8-8-9-10-12-14 stitches evenly on last row from wrong side - read INCREASE/DECREASE TIP = 78-84-93-102-114-126 stitches. Switch to circular needle size 4 mm = US 6 and work next row from right side as follows: 1 edge stitch in garter stitch, * knit 1, purl 2 *, repeat from *-* until 2 stitches remain on needle, knit 1, 1 edge stitch in garter stitch. Continue rib like this for 3 cm = 1⅛". Bind off with knit over knit and purl over purl - read BIND-OFF TIP. Back piece measures approx. 46-48-50-52-54-56 cm = 18"-19"-19¾"-20½"-21¼"-22" from shoulder and down. LEFT SHOULDER FRONT (when garment is worn): Cast on 20-21-20-21-21-22 stitches on circular needle size 4 mm = US 6. Work 1 ridge over all stitches. Switch to circular needle size 5 mm = US 8. Then work the outermost 3 stitches in each side of piece in garter stitch and work the remaining stitches in stockinette stitch. When piece measures 7-7-8-8-9-9 cm = 2¾"-2¾"-3⅛"-3⅛"-3½"-3½", work next row from wrong side as follows: Work as before over all stitches and cast on 20-20-22-22-24-24 new stitches at the end of row for neck = 40-41-42-43-45-46 stitches. Cut the yarn. Put piece aside and work the right front shoulder. RIGHT SHOULDER FRONT (when garment is worn): Cast on 20-21-20-21-21-22 stitches on circular needle size 4 mm = US 6. Work 1 ridge over all stitches. Switch to circular needle size 5 mm = US 8. Then work the outermost 3 stitches in each side of piece in garter stitch and work the remaining stitches in stockinette stitch. Continue until piece measures 7-7-8-8-9-9 cm = 2¾"-2¾"-3⅛"-3⅛"-3½"-3½", adjust so that last row is worked from wrong side. FRONT PIECE: Work as on back piece. SLEEVE: Cast on 20-20-20-22-22-22 stitches on circular needle size 5 mm = US 8. Knit 1 row from right side while increasing 7-8-9-8-8-8 stitches evenly - read INCREASE/DECREASE TIP = 27-28-29-30-30-30 stitches. Purl 1 row from wrong side. Work next row as follows from right side: Knit 1, work 2 stitches in each of the next 25-26-27-28-28-28 stitches (i.e. work in front and back loop of stitch), knit 1 = 52-54-56-58-58-58 stitches. Work stockinette stitch back and forth to sleeve cap, and cast at the same time on new stitches at the end of every row in each side as follows: Cast on 3 stitches 1-1-1-1-1-1 time in each side, 2 stitches 3-3-3-3-3-3 times in each side, 1 stitch 0-1-2-3-5-6 times in each side, 2 stitches 3-3-3-3-3-4 times in each side, and then 3 stitches 1 time in each side = 88-92-96-100-104-110 stitches. Put piece together and continue in the round on circular needle. Insert 1 marker thread where piece is put together (= mid under sleeve). Work in stockinette stitch in the round. When piece measures 4 cm = 1½" from where it was put together, decrease 2 stitches mid under sleeve - read DECREASE TIP-2. Decrease like this every 4-4-3-3-2-2 cm = 1½"-1½"-1⅛"-1⅛"-¾"-¾" 3-3-4-4-5-6 times in total = 82-86-88-92-94-98 stitches. Work until piece measures 38-38-39-39-40-40 cm = 15"-15"-15¼"-15¼"-15¾"-15¾" from cast-on edge. Knit 1 round while decreasing 14-14-12-12-14-14 stitches evenly = 68-72-76-80-80-84 stitches. Work next round as follows: * Knit 2, knit 2 together(= 1 stitch decreased) *, work from *-* the entire round= 51-54-57-60-60-63 stitches. Switch to double pointed needles size 4 mm = US 6 and work rib in the round = knit 1/purl 2 for 7 cm = 2¾". Loosely bind off with knit over knit and purl over purl – remember BIND-OFF TIP. Sleeve measures approx. 45-45-46-46-47-47 cm = 17¾"-17¾"-18"-18"-18½"-18½" from cast-on edge and down. Work another sleeve the same way. ASSEMBLY: Sew shoulder seams inside cast-on edges. Sew side seams inside 1 edge stitch in garter stitch. Now sew sleeves to body by placing sleeves under edge in garter stitch along armholes and sewing small stitches from right side (there should not be a loose edge when sewing, and sew in outermost stitch in garter stitch from right side, so that the edge in garter stitch lies nicely outside sleeve). |
|

|
|
|
Have you made this or any other of our designs? Tag your pictures in social media with #dropsdesign so we can see them! Do you need help with this pattern?You'll find tutorial videos, a Comments/Questions area and more by visiting the pattern on garnstudio.com. © 1982-2024 DROPS Design A/S. We reserve all rights. This document, including all its sub-sections, has copyrights. Read more about what you can do with our patterns at the bottom of each pattern on our site. |
|


With over 40 years in knitting and crochet design, DROPS Design offers one of the most extensive collections of free patterns on the internet - translated to 17 languages. As of today we count 304 catalogs and 11422 patterns - 11417 of which are translated into English (US/in).
We work hard to bring you the best knitting and crochet have to offer, inspiration and advice as well as great quality yarns at incredible prices! Would you like to use our patterns for other than personal use? You can read what you are allowed to do in the Copyright text at the bottom of all our patterns. Happy crafting!
Comments / Questions (63)
Ou trouver nombre de pelotes à commander pour la taille choisie ? Merci !
08.12.2023 - 18:41DROPS Design answered:
Bonjour Mme Rappeneau, vous trouverez la quantité nécessaire au poids pour chaque taille dans l'en-tête, autrement dit, il faut ici en taille S par exemple 125 g Brushed Alpaca Silk / 25 g la pelote = 5 pelotes. Pour trouver votre taille mesurez un vêtement similaire dont vous aimez la forme et comparez les mesures à celles du schéma, retrouvez plus d'infos ici. Bon tricot!
11.12.2023 - 07:20Just finished this jumper for myself and I love it. Pattern instructions were easy to follow . Thank you Drops.
27.11.2023 - 11:46Buongiorno, questo modello è adatto alla stagione invernale?
03.07.2023 - 11:00DROPS Design answered:
Hi Olga, I live in Poland and I wear this sweater in cold Polish winter. It is very warm. Happy knitting!
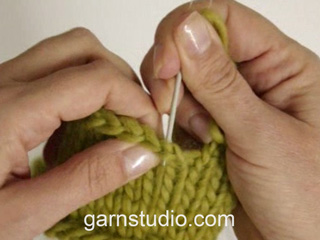
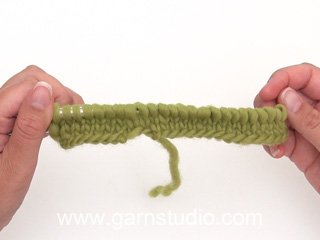
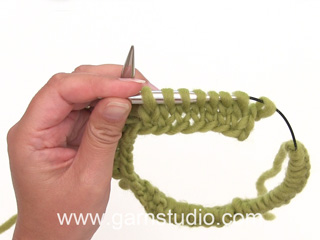
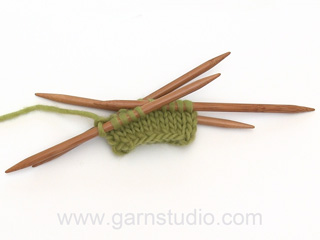
05.07.2023 - 11:09How to I create the creases in the sleeves that are show in the picture? Do I fold it when attaching the sleeve to the garment?
31.12.2022 - 21:12DROPS Design answered:
Dear Anne, this video shows how to work the increases to make th puff-sleeve - you can then shape the top of sleeve nicely along armhole before sewing. Happy knitting!
02.01.2023 - 14:01Er staat ronde hals maar die van mij is vierkant hoe krijg ik hem rond
20.12.2022 - 20:24DROPS Design answered:
Dag Mary,
Je hebt gelijk, er staat bij de trefwoorden een ronde hals, maar het is een vierkante hals. Ik zal het doorgeven, want dit trefwoord hoort er niet bij.
20.12.2022 - 21:41Hej igen, det er i bunden af ryggen, lige inden ribben. 8 udtagninger fra vrangen jævnt fordelt. Det eneste sted man skal tage ud fra vrangen. Det giver huller. Mvh. Maraili
20.12.2022 - 16:57DROPS Design answered:
Hej Maraili, hvis du strikker omslaget drejet på næste pind, vil hullerne ikke kunne ses.... MEN du kan også tage ud ved at strikke 2 masker i én maske, hvis du synes det bliver finere :)
21.12.2022 - 14:42Hej strikkere, jeg har samme spørgsmål som Ch. Kristensen, da der opstår huller ved udtagningerne lavet på vrangen. Dem ser man ikke på billedet. Desuden forstår jeg ikke formålet med udtagningerne. Tak! Mvh. M
19.12.2022 - 21:37DROPS Design answered:
Hej Maraili, vi vil gerne hjælpe, men skriv hvor du er i opskriften? Hvilke huller og hvilke udtagninger?
20.12.2022 - 14:37Hej Drops, tak for en fin opskrift. vedr. bagstykket. Hvordan kan man tage ud på hver 4. pind, når det skal ske fra retsiden? Skal det så ikke være hver 5. pind? Måske har jeg misforstået noget. Mvh. Maraili
25.11.2022 - 22:29DROPS Design answered:
Hej Maraili, hvis din første pind er fra retsiden, så tager du ind på pind 1,5,9,13 osv (da bliver det hver 4.pind :)
30.11.2022 - 14:17When knitting the front piece, am I supposed to make the additions to both sides immediately after knitting the 8 cm shoulder pieces? The back piece required an additional 4 cm after the shoulder pieces that were 4 cm, so I am a bit concerned I might have made the front piece too long.
06.05.2022 - 06:49DROPS Design answered:
Dear Emma, yes correct, the neck on back piece is shorter, so that you join both shoulders together after 4 cm, while the neck on front piece will be deeper, reason why you join both shoulders together after 8 cm (in 3rd and 4th size). Happy knitting!
06.05.2022 - 07:50Vraag gaat over meerdering eind achterpand voordat het boord begint, 8 steken meerderen verdeel over 68 steken, zonder de kantsteken, zou inhouden tussen 8e en 9e steek zoals in het voorbeeld. Nu tel ik vanaf steek 2 en dan maak ik een lus tussen 8e en 9e steek maar het komt niet uit. Het moet ik het dan wel doen? Graag advies! Dank
27.02.2022 - 19:18DROPS Design answered:
Dag Jacqueline,
Als je 68 deelt door 8 dan kom je op 8,5, dus je zou om de 8,5 steken moeten meerderen. Dat kan natuurlijk niet, dus je meerdert afwisselt steeds na 8 en 9 steken.
28.02.2022 - 07:25