
Popularne kategorie
Szukasz włóczki?


|
||||||||||||||||||||||||||||
Alana |
||||||||||||||||||||||||||||
 |
 |
|||||||||||||||||||||||||||
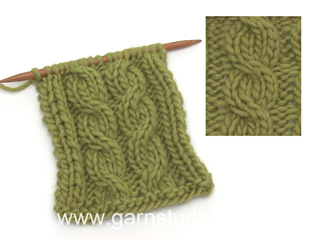
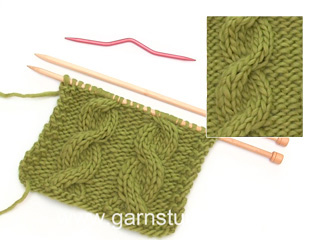
Sweter DROPS z warkoczami i reglanem, przerabiany z góry na dół, z włóczki „Karisma”. Od S do XXL
DROPS 156-19 |
||||||||||||||||||||||||||||
|
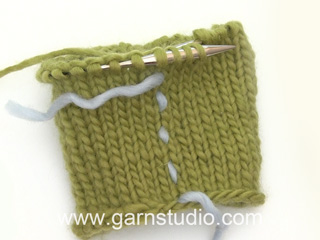
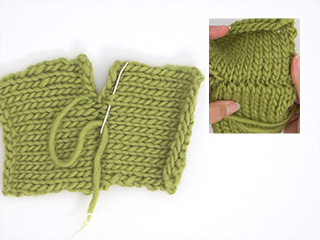
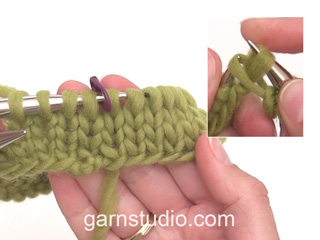
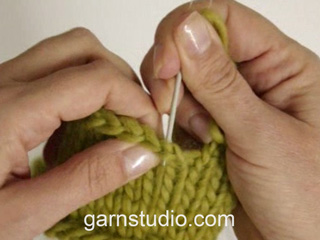
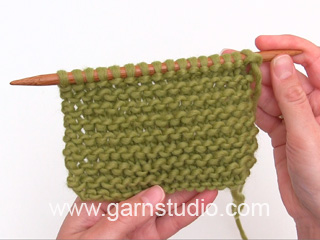
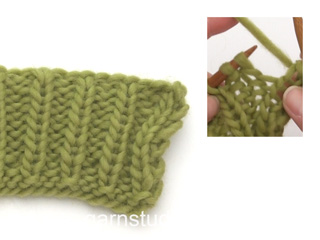
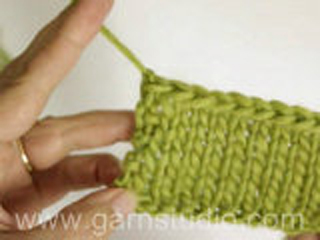
ŚCIEG FRANCUSKI (na okrągło na drutach z żyłką): Przer.: *1 okr. na prawo, 1 okr. na lewo*, powt. od *-*. 1 „ściągacz” francuski = 2 okr. ŚCIEG FRANCUSKI (w tę i z powrotem): Przer. w każdym rzędzie na prawo. 1 ściągacz francuski = 2 rz. na prawo. ŚCIEG FANTAZYJNY: Patrz schematy od A.1 do A.5. Schematy przedstawiają wszystkie rzędy ściegu fantazyjnego, widok na prawej stronie robótki. REGLAN: Dodawać z każdej strony oczek reglanu (A.1/A.2, marker, A.2/A.1) wykonując 1 narzut = 8 dodanych o. W nast. okrążeniu przer. oczka przekręcone w miejscu narzutów na prawo, aby uniknąć dziur. Dodawane o. na rękawach są przerabiane na lewo, a oczka przodu i tyłu są przerabiane ściegiem fantazyjnym jak opisano poniżej. ZAMYKANIE OCZEK (rękawy): Zamknąć z każdej strony markera następująco: przer. aż zostaje 3 o. przed markerem, 2 o. razem na lewo, 2 o.l., 2 o. razem na lewo = 2 zamknięte o. DODAWANIE OCZEK: Aby dodać 1 o. należy wykonać 1 narzut. W nast. okrążeniu przer. narzuty przekręcone na lewo, wkłuwając drut z tyłu robótki zamiast z przodu, aby uniknąć dziur. Przer. dodawane o. na lewo. ---------------------------------------------------------- SWETER: Przerabiany z góry na dół, na okrągło, na drutach z żyłką. Rękawy są przerabiane na okrągło na drutach z żyłką/drutach pończoszniczych. KARCZEK: Na drutach z żyłką nr 4 nabrać 92-92-97-97-101 o. włóczką Karisma. Przer. 3 ściągacze ściegiem francuskim na okrągło na drutach z żyłką - patrz powyżej. Przer. teraz podwyższenie na dekolt tyłu, ściegiem francuskim, w tę i z powrotem - patrz powyżej, od środka tyłu następująco (1-szy rz. = na prawej stronie robótki): przer. 5-5-7-7-9 o., obrócić, przer. 10-10-14-14-18 o., obrócić, przer. 15-15-19-19-23 o., obrócić, przer. 20-20-24-24-28 o., obrócić, przer. 25-25-29-29-33 o., obrócić, przer. 30-30-34-34-38 o., obrócić, przer. 35-35-39-39-43 o., obrócić, przer. 40-40-43-43-48 o., obrócić, Przer. rząd powrotny do początku okrążenia. Przer. teraz 1 okr. na prawo, W TYM SAMYM CZASIE równomiernie dodać 24-24-23-23-27 o. = 116-116-120-120-128 o. Przer. 18-18-19-19-21 o.l., umieścić 1-szy marker tutaj (= okrążenia zaczynają się od teraz tutaj), A.2, 2 o.l., A.2, 2 o.l., A.1, umieścić 2-gi marker tutaj, A.2, 0-0-1-1-3 o.l., A.3, 0-0-1-1-3 o.l., A.1, umieścić 3-ci marker tutaj, A.2, 2 o.l., A.2, 2 o.l., A.1, umieścić 4-ty marker tutaj, A.2, 0-0-1-1-3 o.l., A.3, 0-0-1-1-3 o.l., A.1. PRZED DALSZĄ PRACĄ NAD ROBÓTKĄ UWAŻNIE PRZECZYTAĆ 2 NASTĘPNE AKAPITY! ZACHOWAĆ TAKIE SAME NAPRĘŻENIE NICI JAK W PRZYPADKU PRÓBKI! W nast. okrążeniu zacząć dodawanie o. na REGLAN – patrz powyżej, W TYM SAMYM CZASIE przer. ściegiem fantazyjnym następująco: REGLAN: Powt. dodawanie o. w sumie 0-2-10-20-20 razy w każdym okrążeniu. Następnie dodawać o. 23-32-30-26-27 razy co 2 okr. i 6-0-0-0-0 razy co 3 okr. = 348-388-440-488-504 o. ŚCIEG FANTAZYJNY: Przer. ściegiem fantazyjnym z przodu i z tyłu następująco (przer. dodawane o. na rękawach na lewo): przer. 6 pierwszych dodanych o. wg schematu A.2, dalej przer. na lewo 8-9-7-8-8 nast. dodawanych o., przer. 6 nast. dodawanych o. wg schematu A.2, przer. 8-9-7-8-8 nast. dodawanych o. na lewo. UWAGA: (rozmiary M-L-XL-XXL): gdy schemat A.3 zostanie przerobiony 1 raz na wysokość, dalej przer. schemat A.2 ponad warkoczem, a na lewo pozostałe o. schematu A.3 do początku tyłu/przodu. S/M: następnie dodawać o. jak wcześniej na rękawach i dodawać przed/za A.1/A.2 (tj. między A.1 i A.2, od strony markera na reglan) na przodzie i tyle jeszcze 1-4 razy. Przer. nowe o. na lewo. L/XL/XXL: dalej przer. wg schematu A.2 ponad 6 nast. dodanymi o., przer. na lewo 7-8-8 nast. dodanych o., dalej dodawać jak wcześniej na rękawach i dodawać przed/za A.1/A.2 (tj. między A.1 i A.2, od strony markera na reglan) na przodzie i tyle jeszcze 1-4-5 razy. Przer. 1-4-5 ost. dodanych o. na lewo. Dł. robótki wynosi teraz 27-28-29-30-31 cm od ramienia. Przer. teraz następująco: zdjąć na drut pomocniczy 80-90-102-114-116 pierwszych o. na rękaw, nabrać 12 o. pod rękawem, umieścić niebieski marker na środku tych nowych o., przer. 94-104-118-130-136 nast. o. (= przód), zdjąć na drut pomocniczy 80-90-102-114-116 nast. o. na drugi rękaw, nabrać 12 o. pod rękawem, umieścić niebieski marker na środku tych nowych o., przer. 94-104-118-130-136 pozostałych o. (= tył). OD TEJ CHWILI MIERZYĆ STĄD. TYŁ & PRZÓD: Jest teraz 212-232-260-284-296 o. na tył i przód. Dalej przer. ściegiem fantazyjnym następująco: S/M: 6-3 o.l., *0-1 razy A.2 na szerokość, 7-7 o.l., A.2, 8-9 o.l., umieścić marker, A.2, 8-9 o.l., umieścić marker, A.2, 9-9 o.l., A.2, 9-9 o.l., A.2, umieścić marker, 8-9 o.l., A.2, umieścić marker, 8-9 o.l., A.1*, 7-7 o.l., powt. od *-*jeszcze 1 raz, 1 -4 o.l. L/XL/XXL: 3-3-0 o.l., *1-1-2 razy A.2 na szerokość, 4-6-5 o.l., A.2, 7-8-8 o.l., umieścić marker, A.2, 7-8-8 o.l., umieścić marker, A.2, 7-8-8 o.l., umieścić marker, A.2, 10-11-12 o.l., A.2, 10-11-12 o.l., A.2, umieścić marker, 7-8-8 o.l., A.2, umieścić marker, 7-8-8 o.l., A.2, umieścić marker, 7-8-8 o.l., A.1*, 4-6-5 o.l., powt. od *-*jeszcze 1 raz, 1-3-5 o.l. PRZED DALSZĄ PRACĄ NAD ROBÓTKĄ UWAŻNIE PRZECZYTAĆ 2 NASTĘPNE AKAPITY! W TYM SAMYM CZASIE zamykać i dodawać o. następująco: ZAMYKANIE OCZEK: Oczka są zamykane w różny sposób jak w opisie poniżej - PATRZ ZAMYKANIE OCZEK: zamknąć 1 o. z każdej strony warkocza na środku przodu i na środku tyłu. Powt. zamykanie o. jeszcze 3-3-4-4-6 razy co 2-2-1½-1½-1½ cm. W TYM SAMYM CZASIE zamknąć 1 o. od strony warkocza we wszystkich grupach oczek lewych z markerem (= 8-8-12-12-12 markerów). Powt. zamykanie o. jeszcze 2-3-1-2-2 razy co 3-2½-5-4-4 cm. DODAWANIE OCZEK (na bokach): Na wys. 3 cm dodawać o. wzdłuż warkocza od strony rękawa (tj. tzn. warkocz reglanu) w grupach oczek lewych na bokach – PATRZ DODAWANIE OCZEK! Dodać 4 o. w okrążeniu. Powt. dodawanie o. jeszcze 3-4-2-4-10 razy co 1½-1½-2½-1½-1 cm. Po zamknięciu i dodaniu wszystkich o. zostaje 188-204-228-248-276 o. Na wys. 11-12-12-13-14 cm przer. ściegiem fantazyjnym następująco: 6-3-6-6-0 o.l., 0-1-1-1-2 razy A.2 na szerokość, 7-8-6-11-15 o.l., 0-0-1-1-1 razy A.4 na szerokość, *A.5, A.4*, powt. od *-* jeszcze 2-2-3-3-3 razy na szerokość, 1-1-0-0-0 razy A.5 na szerokość, 7-8-6-11-15 o.l., 0-1-1-1-2 razy A.2 na szerokość, 7-8-6-11-15 o.l., 0-0-1-1-1 razy A.4 na szerokość, *A.5, A.4*, powt. od *-* jeszcze 2-2-3-3-3 razy na szerokość, 1-1-0-0-0 razy A.5 na szerokość, 1-5-0-5-15 o.l. UWAGA: Dopasować pierwsze warkocze schematów A.4 i A.5, aby powstały estetyczne przejścia między schematami. Dalej przer. ściegiem fantazyjnym i dodawać wg schematu. Gdy schematy A.4 i A.5 zostaną przerobione i dł. robótki wynosi ok. 33-34-34-35-35 cm, jest 308-324-364-384-412 o. Umieścić marker tutaj. OD TEGO MOMENTU MIERZYĆ STĄD. Przer. teraz ściągaczem następująco: S/M: * przer. o. tak jak schodzą z drutu, aż zostaje 7-11 o. przed niebieskim markerem na boku, 2 o.l., 2 o.p., 3-4 o.l.*, powt. od *-* jeszcze 1 raz i dalej przer. oczka prawe na prawo, a lewe na lewo przez pozostałą część okrążenia. L/XL/XXL: * przer. o. tak jak schodzą z drutu, aż zostaje 8-14-21 o. przed niebieskim markerem z boku, 2-2-2 o.p., 3-4-3 o.l., 0-2-2 o.p., 0-3-3 o.l., 0-0-2 o.p., 0-0-3 o.l.*, powt. od *-* jeszcze 1 raz i dalej przer. oczka prawe na prawo, a lewe na lewo przez pozostałą część okrążenia. Gdy ściągacze zostały przerobione na wys. 2 cm od markera, dodawać o. wykonując 1 narzut przed 1-szym o.l. we wszystkich grupach oczek lewych - PATRZ DODAWANIE OCZEK. Gdy ściągacze zostaną przerobione przez 5-5-6-6-6 cm, zamknąć o. tak jak schodzą z drutu. RĘKAWY: Wziąć z powrotem 80-90-102-114-116 o. z drutu pomocniczego na druty z żyłką. Przer. 1 rz. na prawo przez wszystkie oczka i nabrać 12 o. na końcu rzędu = 92-102-114-126-128 o. Umieścić marker na środku nowych oczek (tj. mamy 6 o. z każdej strony markera). OD TEJ CHWILI MIERZYĆ STĄD. Dalej przer. rękaw na okrągło, na drutach z żyłką/pończoszniczych. Dalej przer. warkocz na środku rękawa jak wcześniej, ale przer. na lewo oczka ponad warkoczami reglanu. W 2-gim okr. zacząć zamykanie o. z każdej strony markera – PATRZ ZAMYKANIE OCZEK. Powt. zamykanie o. jeszcze 6 razy co 2 okr. = 78-88-100-112-114 o. Następnie zamknąć 1 o. z każdej strony markera 13-17-22-27-27 razy co 2-1½-1-1-1 cm = 52-54-56-58-60 o. W TYM SAMYM CZASIE gdy dł. robótki wynosi 15 cm, przer. schemat A.5 ponad warkoczem na środku rękawa – dopasować 1-szy warkocz wg schematu A.5, aby przejście między schematami było estetyczne. UWAGA: nie dodawać o. w schemacie A.5 ponad rękawami, tj. nie wykonywać narzutów ze schematu. Gdy schemat A.5 jest zakończony, a dł. rękawa wynosi 37 cm, przer. ściągaczem od markera na początku okrążenia następująco: 0-0-1-2-3 o.l., 1-2-2-2-2 o.p., 3 o.l., 2 o.p.. 3 o.l., 2 o.p., 2 o.l., dalej przer. ściągaczem jak w ost. rzędzie, w schemacie A.5 (= 26 o.), 2 o.l., 2 o.p., 3 o.l., 2 o.p., 3 o.l., 1-2-2-2-2 o.p., 0-0-1-2-3 o.l. Dalej przer. tak samo przez 3 cm, zamknąć oczka tak jak schodzą z drutu. WYKOŃCZENIE: Zszyć otwory pod rękawami. |
||||||||||||||||||||||||||||
Objaśnienia do schematu |
||||||||||||||||||||||||||||
|
||||||||||||||||||||||||||||

|
||||||||||||||||||||||||||||

|
||||||||||||||||||||||||||||

|
||||||||||||||||||||||||||||
|
Czy wykonałaś ten lub inny z naszych wzorów? Otaguj zdjęcia na portalu społecznościowym #dropsdesign, abyśmy mogli je zobaczyć! Potrzebujesz pomocy w związku z tym wzorem?Zobacz instrukcje video, sekcję Komentarze/Pytania i jeszcze więcej, wchodząc na stronę wzoru na garnstudio.com © 1982-2024 DROPS Design A/S. Wszelkie prawa zastrzeżone. Ten dokument, w całości, jest chroniony prawem. Zobacz co możesz robić z naszymi wzorami na dole każdego wzoru na naszej stronie. |
||||||||||||||||||||||||||||


Posiadając 40 lat doświadczenia w projektowaniu wzorów na druty i szydełko, DROPS Design oferuje jedną z największych kolekcji bezpłatnych wzorów w internecie – przetłumaczonych na 17 języków. Obecnie jest dostępnych 304 katalogów i 11422 wzorów - w tym 11058 przetłumaczonych na język polski.
Dokładamy wszelkich starań, aby oferować Wam druty i szydełka, inspiracje, fachowe porady oraz doskonałej jakości włóczki w najlepszych cenach! Zamierzasz wykorzystać nasze wzory inaczej niż tylko do osobistego użytku? Przeczytaj jakie masz prawa w Copyright, który znajdziesz na końcu każdego wzoru. Miłej pracy!
Komentarze / Pytania (218)
I'm sorry. I know this question has been asked before but I just don't understand. When the directions say to work rib as follows: for size M, work until 11 sts. remain before side marker, P2, K2, P4 is only 8 sts. How do I possibly make this work? Thank you.
17.03.2024 - 16:45DROPS Design answered:
Dear Mrs Allain, after you have worked these 8 sts just repeat from *to* as before, that's okay that there are not 11 sts as the "missing" 3 sts are the first 3 sts from the repeat from *to*. Happy knitting!
18.03.2024 - 09:25As Linda below, I am struggling with following the pattern increase instructions. All great up to this point. Thank you. Diane
03.03.2024 - 14:59DROPS Design answered:
Dear Diane, which increases are you referring to? There are many different increases: raglan increases, increases towards the sides, rib increases, sleeve increases. Could you please indicate the specific section you are struggling with? Happy knitting!
03.03.2024 - 23:37Bonjour merci de vos modeles super beau mais j 'ai un petit probleme je n aimes pas du tout tricoter de bas en haut et le modele 156-19 nr peut il se tricoter de bas en haut merci de ce que vous ppurrez me dire pour realiser ce modele
17.02.2024 - 19:29DROPS Design answered:
Bonjour Marie, vous pouvez probablement adapter les explications pour le tricoter de bas en haut, mais il paraît plus simple de tricoter comme indiqué; retrouvez sinon tous nos pulls tricotés de bas en haut avec torsades ici, n'hésitez pas à ajouter des filtres si besoin. Bon tricot!
19.02.2024 - 09:12This is by far the most confusing pattern I have ever seen. I have another question, please. When I'm decreasing and increasing at the same time after putting sleeves stitches on holders, I'm confused. I've figured out where to decrease, both decreases. I don't know where to increase. At the last cable near the sleeves on front and back, do I increase on the side front and back or under the armhole where I originally added the 12 stitches? Thank you.
05.02.2024 - 04:32DROPS Design answered:
Dear Mrs Allain, you will increase the number of stitches in the Purl sections after the cable on previous raglan at the end of left front piece, before the cable on previous raglan at the beg of back piece, after the cable on previous raglan at the end of back piece and before the cable on previous raglan at the beg of right front piece = 2 sts are increased on each side, 4 sts in total. Happy knitting!
05.02.2024 - 15:43Please ignore my last question. I found a few lines of the directions that didn't print out for some reason. Thanks!
02.02.2024 - 01:13Near the end of the body, when I have 324 sts. for size M , the directions say to put a marker and to measure the piece from there. But then there is only one more row of ribbing in the directions. Do I do more than one row and when do I bind off??? Thank you.
02.02.2024 - 00:43DROPS Design answered:
Hi Celeste, You measure the ribbing from this last marker - first 2 cm of rib, then increase 1 stitch before each purled section, then work until the ribbing measures a total of 5 cm in size M before binding off. Happy knitting!
02.02.2024 - 08:01I\'m making size M. Once I have 388 sts. the directions say to increase 4 more times on sleeve and inside A.1 and A.2. That would be 8 sts. every row. Two questions: will this be done every row or every other row as before? Then I have too many stitches to have the rest of the directions be accurate for the M size. Should I only do this 3 times instead of 4? Thank you.
24.01.2024 - 17:07DROPS Design answered:
Dear Mrs Allain, these sections explain how to work the new stitches increased for raglan, this means when all increases are done, you have 388 sts on needle and piece measures 28 cm from shoulder down, now divide piece as explained just afterwards. Happy knitting!
25.01.2024 - 08:34I'm currently increasing for raglan. until I have 388 sts. But where it says PATTERN: P the inc sts. on sleeves. Then it says work the first 6 sts. inc in A.2, P 9 sts, next 6 inc. sts. in A.2, P 9 sts. Where are those sts if I'm supposed to be purling the inc. sts?
06.01.2024 - 16:53DROPS Design answered:
Dear Mrs Allain, the new stitches increased on sleeves are always purled, but the new stitches for raglan on front and back piece will be worked in pattern: first work the first 6 increases as shown in A.2, then purl the next 8 increaes, then work the next 6 increases as in A.2, and purl the next 9 increases. Happy knitting!
08.01.2024 - 10:18For DECREASE TIP (sleeves) it says work until 3 stitches remain before marker, P 2 tog, P2, P 2 tog. That requires 6 stitches. I'm confused yet again by your instructions. Please advise? Thank you.
03.01.2024 - 20:04DROPS Design answered:
Hi Celeste, The marker sits in the middle of the 2 purled stitches and you purl 2 together on each side of these 2 purled stitches and marker (which covers 6 stitches). Happy knitting!
04.01.2024 - 07:46When reading instructions for increasing for raglan, it says to K the YOs twisted. Then to P the new stitches on sleeves. But when reading instructions where it says INCREASE TIP, it says to P YOs twisted then to P the new stitches. I'm confused as to whether to K or P?
03.01.2024 - 19:23DROPS Design answered:
Dar Mrs Allain, the yarn overs will be knitted twisted on next round then work either purl or knit depending on the pattern, but you can choose to work them purl twisted from the beg if you like to. Happy knitting!
04.01.2024 - 08:12