
Populaarsed kategooriad
Otsid lõnga?


|
|||||||||||||||||||||||||||||||
Alas de Libelula |
|||||||||||||||||||||||||||||||
 |
 |
||||||||||||||||||||||||||||||
DROPS Belle lõngast kootud pitsmustriga boolero suurustele S kuni XXXL
DROPS 200-25 |
|||||||||||||||||||||||||||||||
|
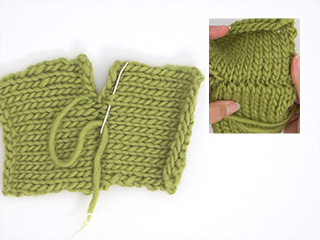
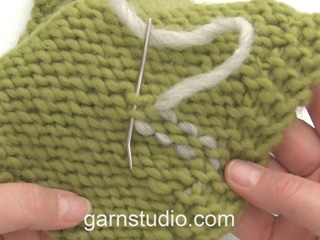
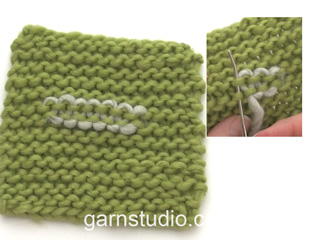
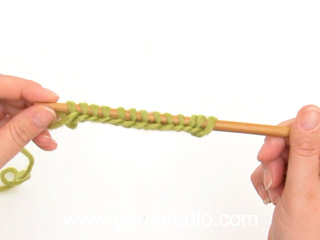
NÕUANDED ------------------------------------------------------- RIPSKUDE / RIPSIVALL (edasi-tagasi kududes) Koo kõik silmused parempidi igal real. 1 ripsivall = koo 2 rida ripskoes. KAHANDAMISE NIPP (ühtlaste vahedega) Arvutamaks, kui tihti kahandada ühtlaste vahedega, loe silmuste arv ringil (näiteks 70) miinus ääresilmused (4) ning jaga ülejäänud silmused kahanduste arvuga (näiteks 12) = 5,5. St. selles näites koo kahandades kordamööda umbes iga 4. ja 5. silmus või 5. ja 6. silmus kokku. Ära kahanda ääresilmuste hulgas. MUSTER Vaata skeeme A.1 kuni A.11. Muster on vaadatuna töö paremalt poolt ja näitab iga rida. KASVATAMISE NIPP (kehaosa külgedel ja varrukatel) Kõik kasvatused tehakse töö paremal pool. Kasvata 1 silmus 2 ääresilmuse kõrval mõlemal küljel, tehes õhksilmuse. Järgmisel real (töö pahemal pool) koo õhksilmus keerdsilmusena, et ei jääks auku. Koo kasvatatud silmused parempidises koes, kuni need mahuvad skeemi A.2/A.4 mustrisse. PÖÖRAMISE NIPP (lühendatud ridadel) Keset rida pöörates (lühendatud ridadel), tõsta esimene silmus kudumata parempidi võttega, pinguta lõnga ja jätka kudumist. Siis ei jää pöördekohale auku. ------------------------------------------------------ ALUSTA SIIT ------------------------------------------------------- BOOLERO – KOKKUVÕTE Kootakse ringvarrastega edasi-tagasi osadena, varruka otsast seljaosa keskele. Pärast õmmeldakse selja keskel osad kokku ja varrukaõmblused. VARRUKAS ja POOL SELJAOSA Loe järgnev läbi enne jätkamist! Loo 70-74-78 silmust 3,5 mm ringvarrastele Belle lõngaga. Koo 1 rida pahempidi töö pahemal pool. Koo järgmine rida töö paremal pool järgmiselt: koo 2 ääresilmust ripskoes, koo soonikut 2 parempidi/ 2 pahempidi, kuni jääb 4 silmust reale, koo 2 parempidi ja 2 ääresilmust ripskoes. Jätka niimoodi soonikut 4 cm. Nüüd koo 1 rida parempidi silmuseid, SAMAL AJAL kahanda 12 silmust ühtlaste vahedega real – loe KAHANDAMISE NIPPI = 58-62-66 silmust. Koo skeemi A.1, tehes 2 ääresilmust ripskoes mõlemal küljel (1. rida skeemil A.1 on töö pahemal pool). Kui skeem A.1 on tehtud, võta 4,5 mm ringvardad. Koo järgmine rida töö paremal pool järgmiselt: koo 2 ääresilmust ripskoes, 0-2-4 silmust parempidises koes, skeemi A.2 järgmised 16 silmust (= 2 korda 8 silmusega), skeemi A.3 (= 22 silmust), skeemi A.4 järgmised 16 silmust (= 2 mustrikordust 8 silmust), tee 0-2-4 silmust parempidises koes ja 2 ääresilmust ripskoes. Jätka niimoodi mustriga. JÄLGI KOETIHEDUST! SAMAL AJAL, kui töö kõrgus on 6-6-7 cm, kasvata 1 silmus mõlemal küljel – loe KASVATAMISE NIPPI (= 2 silmust kasvatatud). Kasvata niimoodi iga 2,5-2,5-2 cm järel kokku 11-11-13 korda mõlemal küljel = 80-84-92 silmust (kui viimane kasvatus on tehtud, on töö pikkus umbes 31 cm loomise reast). Paigalda 1 silmusemärkija mõlemale küljele, varruka õmblus lõppeb siin. NB! Allpool kirjeldatud pitsmuster tehakse enne viimast kasvatust. SAMAL AJAL, kui skeemid A.2 kuni A.4 on tehtud kokku 3 korda vertikaalselt, tee neid veel 1 kord vertikaalselt, aga lõpeta pärast 4 rida (st. pärast kolmnurgaga märgitud rida skeemil A.2). Töö pikkus on umbes 25 cm loomise reast). Paigalda 1 silmusemärkija skeemi A.3 rea keskele, tõsta seda töökäigus kõrgemale. Nüüd „kasvab“ skeem A.3 laiali külgedele, st. järgmisel real koo töö paremal pool nii: 2 ääresilmust ripskoes, koo skeemi A.2 nagu enne, kuni jääb 23 silmust enne silmusemärkijat töö keskel, tee skeemi A.5 (= 46 silmust – silmusemärkija on nüüd skeemi A.5 keskel), tee skeemi A.4 nagu enne, kuni jääb 2 silmust reale, lõpus tee 2 ääresilmust ripskoes. Jätka niimoodi mustriga. Kui skeem A.5 on tehtud, koo järgmine rida töö paremal pool järgmiselt: 2 ääresilmust ripskoes, koo skeemi A.2 nagu enne, kuni jääb 31 silmust enne silmusemärkijat töö keskel, tee skeemi A.6 (= 62 silmust), tee skeemi A.4 nagu enne, kuni jääb 2 silmust reale, lõpus tee 2 ääresilmust ripskoes. Jätka niimoodi mustriga, kuni tärniga märgitud silmused skeemil A.6 on tehtud kõikidel silmustel kuni ääresilmusteni mõlemal küljel. Koo järgmine rida töö paremal pool järgmiselt: koo 2 ääresilmust ripskoes, koo skeemi A.7 (= 11 silmust), skeemi A.8 kuni jääb 3 silmust reale enne silmusemärkijat (= 12-13-15 mustrikordust 2 silmusega), koo skeemi A.9 (= 6 silmust), skeemi A.10 kuni jääb 13 silmust reale (= 12-13-15 mustrikordust 2 silmusega), skeemi A.11 (= 11 silmust), lõpus tee 5 ääresilmust ripskoes. Jätka mustriga, kuni töö pikkus on 49-49-51 cm loomise reast (mustri tõttu on töö keskel pikem kui külgedel – mõõda lühemal kohal). Siis koo lühendatud ridu ripskoes. LÜHENDATUD READ Võta 3,5 mm ringvardad. Alusta töö paremal pool ja koo ripskoes lühendatud ridadega edasi-tagasi kuni silmusemärkijani, st. koo esimene rida edasi-tagasi 40-42-46 silmusel, siis 1 ripsivall (2 rida) edasi-tagasi 38-40-44 silmusel, jne. Iga kord koo 2 silmust vähem – loe PÖÖRAMISE NIPPI. SAMAL AJAL kahanda igal teisel ripsivallil (st. igal 4. real) 1 silmus rea alguses töö paremal pool, kududes 2 esimest silmust kokku. Et seljaosa keskele ei jääks teravat nurka. Jätka lühendatud ridadega ja kahanda igal neljandal real, kuni on kootud edasi-tagasi viimasel 2 silmusel. Koo 1 rida parempidi töö paremal pool kõigil silmustel. Pööra tööd, alusta töö pahemal pool ja koo lühendatud ridu edasi-tagasi kuni silmusemärkijani, nagu esimesel pool.st. koo esimene ripsivall edasi-tagasi 40-42-46 silmusel, siis 1 ripsivall (2 rida) edasi-tagasi 38-40-44 silmusel, jne. SAMAL AJAL kahanda igal teisel ripsivallil (st. igal 4. real) 1 silmus rea alguses töö pahemal pool, kududes 2 esimest silmust kokku. Jätka lühendatud ridadega ja kahanda igal neljandal real, kuni on kootud edasi-tagasi viimasel 2 silmusel. Koo 1 rida parempidi töö pahemal pool, 1 parempidi rida töö paremal pool ja 1 rida parempidi töö pahemal pool (kõigil silmustel). Võta 4 mm ringvardad ja koo silmused maha parempidi töö paremal pool. Tee teine varrukas samamoodi. VIIMISTLUS Õmble 2 osa kokku seljaosa keskel silmamise teel või mahakudumise ääre kõrvalt. Õmble kokku varrukaõmblused – alusta varruka otsast ja õmble kuni silmusemärkijani. |
|||||||||||||||||||||||||||||||
Skeemi seletused |
|||||||||||||||||||||||||||||||
|
|||||||||||||||||||||||||||||||

|
|||||||||||||||||||||||||||||||

|
|||||||||||||||||||||||||||||||

|
|||||||||||||||||||||||||||||||
|
Oled teinud selle või mõne meie teise disaini? Lisa oma piltidele sotsiaalmeedias silt #dropsdesign , et me näeksime neid pilte. Vajad abi selle mustriga?Garnstudio.com kodulehel on õppevideot, küsimuste/vastuste osa ja muudki. © 1982-2024 DROPS Design A/S. Kõik õigused kaitstud. See dokument, ning selle alajaotused on kaitsud autoriõigustega. Loe rohkem, mida meie mustritega võib teha, iga mustrilehe alt meie kodulehel. |
|||||||||||||||||||||||||||||||


Tegeledes üle 40 aasta kudumise ja heegeldamise disainidega, pakub DROPS Design ühte suurimat tasuta mustrite kollektsiooni internetis - tõlgituna 17 keelde. Tänaseks on meil 304 kataloogi ja 11422 mustrit - millest 8519 on tõlgitud Eesti keelde.
Me anname endast parima, et tuua teieni kõike mida kudumine ja heegeldamine võib pakkuda - inspiratsiooni, nõuandeid ning ka kvaliteetseid lõngu parima hinnaga! Soovid kasutada mustreid muukski, kui ainult oma tarbeks? Loe infot meie Copyright osas iga lehekülje all. Rõõmsat loomist!
Kommentaarid / Küsimused (25)
Good evening, I have a question regarding the "short rows" part of the pattern. Should I decrese the number of stitches I'm knitting every 2nd row or every 4th row? (I think I'm confused by the terms "ridge" and "row") Thank you in advance.
11.03.2024 - 00:07DROPS Design answered:
Dear Maria, as indicated in the GARTER STITCH tip above: 1 ridge = 2 garter stitch rows. Since you decrease every 2 ridges then you decrease on every 4th row. Happy knitting!
11.03.2024 - 00:35Hola! En las instrucciones dice que la marca para coser las mangas es a los 31 cm, tras completar 4 veces A3 y haber aumentado 22 puntos. Entiendo que llegas a A5 con 80 puntos, pero 80 menos 46 puntos de A5 son 34, 17 puntos a cada lado para hacer A2 y A4, me falta uno para poder hacer las dos repeticiones de 8 puntos + 2 del borde. No hay que hacer dos repeticiones? \r\nCuando repites desde el triángulo 4 veces en total solo se hacen los agujeritos de la tercera línea una vez? Gracias!
28.11.2023 - 19:53DROPS Design answered:
Hola Monica, no tienes que trabajar repeticiones completas de A.2 y A.4, puedes trabajar estos diagramas sobre los puntos que tengas en ese momento entre los puntos del borde y los 46 puntos centrales. Ten en cuenta que comenzarás a trabajar A.5 cuando la labor mida 25 cm desde el borde de montaje (por lo que aún no has terminado los aumentos). Los puntos aumentados después de empezar con A.5 se trabajarán en A.2/ A.4.
11.12.2023 - 00:37Good morning. Thank you for your quick response regarding "Short Rows". I understand however I still don't get how you can decrease 1 stitch at the beginning of every forth row on the right side as the forth row will be on the wrong side (and centre of piece) given the two row "ridge". Do you mean every fifth row?
20.04.2023 - 16:49DROPS Design answered:
Hi Karen, You start the first decrease from a right side row and repeat the decrease every 4th row after that. Happy knitting!
21.04.2023 - 07:36Ok, pattern going great until short rows. If one ridge = 2 rows and you only decrease 1 stitch at the beginning of 2nd ridge (every 4 th row) * which is a wrong side row , how do you work each ridge (2 rows knit) over 2 fewer stitches each time and on the “right” side. Thanks
18.04.2023 - 23:01DROPS Design answered:
Dear Karen, starting from RS you will work 1 ridge over 40-42-46 sts, then work 1 ridge over 2 sts less = over 38-40-44 sts; then work 1 ridge over the same number as before, and work 1 ridge over 2 sts less (36-38-42) and continue like this, always starting each ridge from RS. Happy knitting!
19.04.2023 - 07:53Liebes Drops Team Ich beziehe mich auf den Teil der Anleitung VERKÜRZTE REIHEN. Nachdem die erste Hälfte der Arb. gearbeitet wurde soll ich eine Hin-Reihe mit 84M sticken (Gr. L-XL) Wie ist das möglich? Ich habe ja zuvor in jeder 4. R 1 M abgenommen. 🤔 Ist die Angabe von 84 M korrekt? Danke für eine Antwort. Und danke für Eure tollen Anleitungen. Liebe Grüsse Annemarie.
01.03.2021 - 11:56DROPS Design answered:
LIebe Annemarie, also ja stimmt, das muss weg von den deutschen Anleitung, Sie stricken jetzt nur noch 1 Hin-Reihe rechts über alle Maschen, und dann stricken Sie verkürzten Reihen, die mit einer Rückreihe anfangen. Viel Spaß beim stricken!
01.03.2021 - 13:31Still having problem with the increases. If the increases are at each side of sleeve by the garter stitches, are A2 and A4 adjusted for the increases so that when I get to A5 the extra stitches needed are there? If they are adjusted, then the knit 2 together with the yarn overs would be in different places each time the repeats are done. Or are A2 and A4 worked straight up and all increases are just in stockinette next to the edge stitches? If that is so, when are the increases worked into A5?
29.01.2021 - 19:37DROPS Design answered:
Dear Jeanny, I'm sorry I don't understand your question. You have to increase on each side, so that the new stitches will be worked in A.2 and in A.4 as far as there are enough stitches to be worked in pattern (you always have to have enough stitches to work 1 dec + 1 yarn over in the lace pattern row in diagram). When piece measures 25 cm then you will work A.5 over A.3 to let this pattern be worked over more stitches on each side- but the number of stitches don't increase anymore. Hope this helps. Happy knitting!
01.02.2021 - 07:59I still do not know where the increases are. Are they between A2 and A3?
18.01.2021 - 20:24DROPS Design answered:
Dear Jeannie, you have to increase on each side of piece, after the first 2 edge stitches in garter stitch and before the last 2 stitches in garter stitch = 2 sts increased on each row, these increased are worked in A.2 /A.4. Happy knitting!
19.01.2021 - 07:15Sorry, I have another question. Is A2 and A4 only worked over the first 8 stitches or over the whole 16 stitches? ( 8 x 2) . In the size that I am making, I have to knit the 2 edge stitches and then add 2 stitches before I start A2 , so where do I start the increase stitches? Before the A2 stitches or at the beginning of A3? The directions do not say where these start, it just says to increase 11 stitches.
17.01.2021 - 01:34DROPS Design answered:
Dear Jeanie, in 2nd size work: 2 sts in garter st, 2 sts in stocking st, A.2 over the next 16 sts, A.3, A.4 over the next 16 sts, 2 sts stocking st, 2 sts garter st. Diagrams are worked from bottom up, starting on the corner on the right side from RS, work diagram A.2 and A.4 a total of 2 times (= 8 sts x 2 = 16 sts). Happy knitting!
18.01.2021 - 09:20Thank you for your answer to my other question. I have another one. Chart A5 is supposed to have 46 stitches, I only have 40. Where are the other 6 stitches? If you take the 22 stitches from A3 and add the other 8 stitches from half of the 16 stitches from the deciding at the beginning of the pattern, there are only 40 stitches. Also, when the 11 stitches are added every 4th row, where are they added, at the side next to the 2 edge stitches or somewhere else. These charts are confusing.
09.01.2021 - 05:33DROPS Design answered:
Dear Jeannie, A.5 is worked over the middle 46 stitches (= the 22 sts from A.3 worked before + 12 stitches on each side of A.3) , on either side of A.5 you work A.2 as before (= at the beginning of the row after the 2 sts in garter stithc) before A.5 and A.4 as before after A.5 (before the last 2 sts in garter stitch). Happy knitting!
11.01.2021 - 07:59When does A5 start? At the triangle on A2 or when the 4th time in height is done? The directions are very confusing and there are too many charts to keep tract of.
05.01.2021 - 01:48DROPS Design answered:
Dear Jeannie, after you have worked A.2 and A.4 a total of 3 times in height + one more time to row 4 including = approx. 25 cm in height, now work as explained with A.5 in the middle and A.2/A.4 on each side as before. Happy knitting!
05.01.2021 - 11:29