
Populaarsed kategooriad
Otsid lõnga?


|
||||||||||||||||||||||||||||||||||
Sunburst |
||||||||||||||||||||||||||||||||||
 |
 |
|||||||||||||||||||||||||||||||||
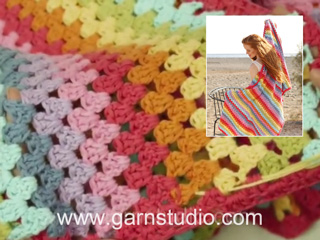
DROPS Cotton Merino lõngast heegeldatud motiividega ja narmastega õlarätik
DROPS 190-12 |
||||||||||||||||||||||||||||||||||
|
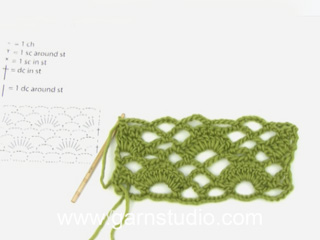
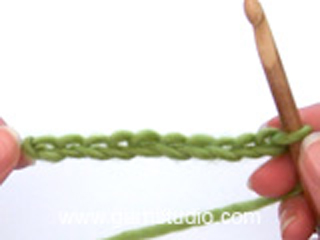
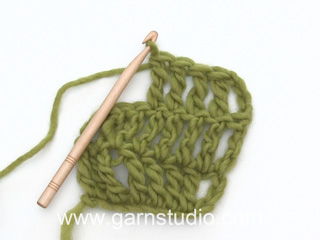
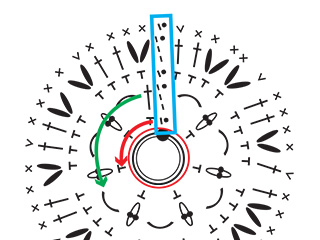
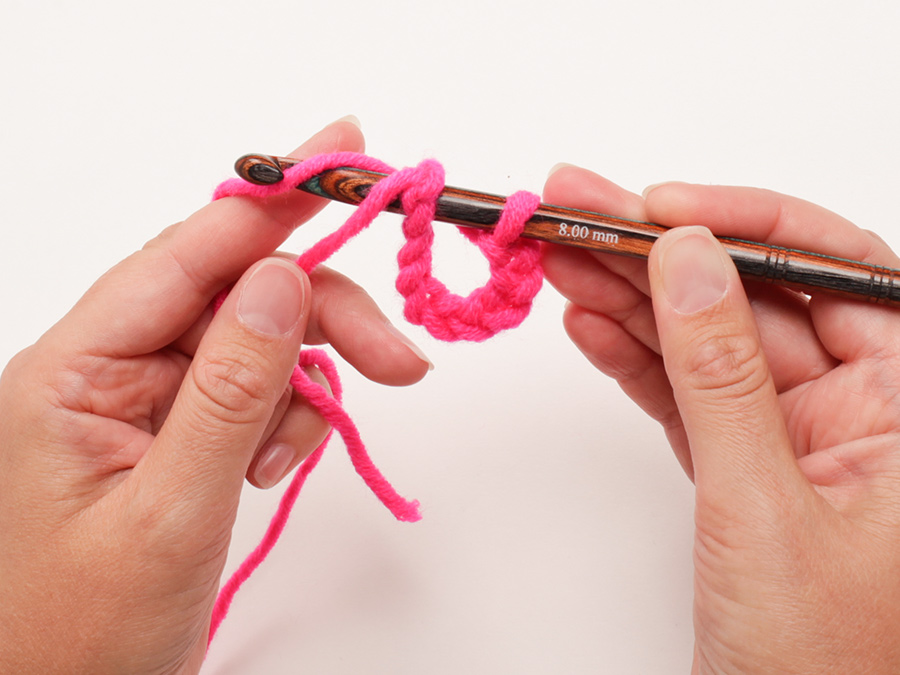
JUHEND MUSTER Vaata skeemi A.1. ---------------------------------------------------------- ÕLARÄTIK Kokku heegeldatakse 36 motiivi erinevate värvidega ning pärast ühendatakse need kokku. HEEGELDATUD RUUT Heegelda 4,5 mm heegelnõelaga ja Cotton Merino lõngaga mustrit ringselt skeemil A.1. Tee 1 motiiv iga värvikombinatsiooniga. Siis tee veel 18 erinevat motiivi, aga nüüd nüüd vaheta 2. ja 3. ringi värvid = 36 motiivi on kokku. NB! Värvikombinatsioonid 2 ja 5 on ühesugused, aga vastupidiste värvidega. Värvikombinatsioonid 10 ja 14 on ühesugused, aga vastupidiste värvidega. Kui kõik motiivid on tehtud, on 4 x 2 motiivi ühte värvi (= 8 motiivi). Ülejäänud 28 motiivi on järgmiste värvikombinatsioonidega: VÄRVIKOMBINATSIOON 1 Algus (ahelsilmustest ring) + 1. RING: puuder 2. RING: pistaatsia 3. RING: lavendel 4-5. RIDA: puuder VÄRVIKOMBINATSIOON 2 Algus (ahelsilmustest ring) + 1. RING: puuder 2. RING: punane 3. RING: mereroheline 4-5. RIDA: puuder VÄRVIKOMBINATSIOON 3 Algus (ahelsilmustest ring) + 1. RING: puuder 2. RING: erkroosa 3. RING: sinep 4-5. RIDA: puuder VÄRVIKOMBINATSIOON 4 Algus (ahelsilmustest ring) + 1. RING: puuder 2. RING: lilla 3. RING: erkroosa 4-5. RIDA: puuder VÄRVIKOMBINATSIOON 5 Algus (ahelsilmustest ring) + 1. RING: puuder 2. RING: mereroheline 3. RING: punane 4-5. RIDA: puuder VÄRVIKOMBINATSIOON 6 Algus (ahelsilmustest ring) + 1. RING: puuder 2. RING: türkiis 3. RING: pistaatsia 4-5. RIDA: puuder VÄRVIKOMBINATSIOON 7 Algus (ahelsilmustest ring) + 1. RING: puuder 2. RING: mereroheline 3. RING: türkiis 4-5. RIDA: puuder VÄRVIKOMBINATSIOON 8 Algus (ahelsilmustest ring) + 1. RING: puuder 2. RING: pistaatsia 3. RING: lilla 4-5. RIDA: puuder VÄRVIKOMBINATSIOON 9 Algus (ahelsilmustest ring) + 1. RING: puuder 2. RING: lavendel 3. RING: korall 4-5. RIDA: puuder VÄRVIKOMBINATSIOON 10 Algus (ahelsilmustest ring) + 1. RING: puuder 2. RING: punane 3. RING: korall 4-5. RIDA: puuder VÄRVIKOMBINATSIOON 11 Algus (ahelsilmustest ring) + 1. RING: puuder 2. RING: türkiis 3. RING: lilla 4-5. RIDA: puuder VÄRVIKOMBINATSIOON 12 Algus (ahelsilmustest ring) + 1. RING: puuder 2. RING: korall 3. RING: türkiis 4-5. RIDA: puuder VÄRVIKOMBINATSIOON 13 Algus (ahelsilmustest ring) + 1. RING: puuder 2. RING: erkroosa 3. RING: pistaatsia 4-5. RIDA: puuder VÄRVIKOMBINATSIOON 14 Algus (ahelsilmustest ring) + 1. RING: puuder 2. RING: korall 3. RING: punane 4-5. RIDA: puuder VÄRVIKOMBINATSIOON 15 Algus (ahelsilmustest ring) + 1. RING: puuder 2. RING: sinep 3. RING: erkroosa 4-5. RIDA: puuder VÄRVIKOMBINATSIOON 16 Algus (ahelsilmustest ring) + 1. RING: puuder 2. RING: lavendel 3. RING: sinep 4-5. RIDA: puuder VÄRVIKOMBINATSIOON 17 Algus (ahelsilmustest ring) + 1. RING: puuder 2. RING: sinep 3. RING: mereroheline 4-5. RIDA: puuder VÄRVIKOMBINATSIOON 18 Algus (ahelsilmustest ring) + 1. RING: puuder 2. RING: lilla 3. RING: lavendel 4-5. RIDA: puuder VIIMISTLUS Paiguta motiivid nagu näidatud joonisel. Number näitab värvikombinatsiooni numbrit. Täht A numbri taga näitab esimesi 18 värvikombinatsiooni järgi tehtud motiive, tähega B motiividel on vahetud ära 2. ja 3. ringi värvid. Et oleks lihtsam ühendada, võib motiivid ajutiselt natuke kokku siduda lõngaga, siis ei liigu nad kokkuheegeldamisel paigast. Pane ruudud kokku töö pahemate pooltega ja heegelda töö paremal pool puudri värvi lõngaga läbi mõlema kihi. Alusta noole 1 juurest ja heegelda üles mööda joont, siis risti alla tärni juurde ruutude 6A ja 4B vahel – vaata joonist. Tee 1 kinnissilmus ümber äärmise ahelsilmustest kaare kahe ruudu nurgas,* tee 6 ahelsilmust, (1 kinnissilmus ümber järgmise ahelsilmustest kaare, 4 ahelsilmust), korda sulgudes olevat osa veel 3 korda, tee 1 kinnissilmus ümber järgmise ahelsilmustest kaare, 6 ahelsilmust, 1 kinnissilmus ümber ahelsilmustest kaare nurgas, 2 ahelsilmust (= kahe ruudu vahe), 1 kinnissilmus ümber järgmise ahelsilmustest kaare nurgas (= uus motiiv) *, korda * kuni *, kuni 7 motiivi on heegeldatud kokku (st. kuni motiivini 6A), aga lõpeta kinnissilmusega ümber viimase ahelsilmustest kaare nurgas. Nüüd heegelda mööda joont alla tärnini: tee 1 ahelsilmus, 1 kinnissilmus ümber ahelsilmustest kaare nurgas (st. ümber ahelsilmustest kaare motiivil 4B ja ahelsilmustest kaare 6A nurgas), jätka niimoodi heegeldamist kuni tärnini, aga lõpus tee 1 kinnissilmus ümber ahelsilmustest kaare nurgas. Katkesta ja kinnita lõng. Heegelda niimoodi noolest 2, 3 jne nurgani ja siis risti alla, kuni kõik ruudud on heegeldatud kokku. Katkesta ja kinnita lõng. NARMAD Lõika 16 puudrivärvi lõnga pikkusega 26 cm, murra pooleks. Tõmba heegelnõelaga narmaste aas läbi ruudu 6A nurga ahelsilmustest kaare, tõmba otsad läbi ja pinguta. Kinnita niimoodi narmad mööda õlasalli alläärt, igasse teise ahelsilmustest kaarde. Et narmad hoiaks ilusti sirged, niisuta neid ja lase kuivada. |
||||||||||||||||||||||||||||||||||
Skeemi seletused |
||||||||||||||||||||||||||||||||||
|
||||||||||||||||||||||||||||||||||

|
||||||||||||||||||||||||||||||||||

|
||||||||||||||||||||||||||||||||||
|
Oled teinud selle või mõne meie teise disaini? Lisa oma piltidele sotsiaalmeedias silt #dropsdesign , et me näeksime neid pilte. Vajad abi selle mustriga?Garnstudio.com kodulehel on õppevideot, küsimuste/vastuste osa ja muudki. © 1982-2024 DROPS Design A/S. Kõik õigused kaitstud. See dokument, ning selle alajaotused on kaitsud autoriõigustega. Loe rohkem, mida meie mustritega võib teha, iga mustrilehe alt meie kodulehel. |
||||||||||||||||||||||||||||||||||


Tegeledes üle 40 aasta kudumise ja heegeldamise disainidega, pakub DROPS Design ühte suurimat tasuta mustrite kollektsiooni internetis - tõlgituna 17 keelde. Tänaseks on meil 304 kataloogi ja 11422 mustrit - millest 8519 on tõlgitud Eesti keelde.
Me anname endast parima, et tuua teieni kõike mida kudumine ja heegeldamine võib pakkuda - inspiratsiooni, nõuandeid ning ka kvaliteetseid lõngu parima hinnaga! Soovid kasutada mustreid muukski, kui ainult oma tarbeks? Loe infot meie Copyright osas iga lehekülje all. Rõõmsat loomist!
Kommentaarid / Küsimused (5)
Thank you for your reply. I have used this technique on another Drops blanket but the sunburst shawl instructions indicate that dc bd chains should be worked with two squares on top of each other (wrong side to wrong side) as opposed to working from one to the other making the zig zig pattern. Can I confirm that that is correct. Hope I'm making sense. Thanks very much.
04.08.2020 - 16:40DROPS Design answered:
Dear Mrs Bullen, oh oops you are right sorry, these squares are worked together from RS, this means you will crochet the dc around both chain spaces ( of each square), with the chains in between. I don't think we have a video for this technique, but you just have to work the squares together from WS chain between dc and work the dc around the ch-spaces of both squares, this way, the squares will be next to each other tighter than with the other technique. Happy assembly!
05.08.2020 - 07:46Thank you for the lovely pattern. This is the first time using a diagram to crochet and the squares are really lovely. However, I'm finding it difficult understanding the assembly and wondered whether there was a better tutorial to follow. I have watched the recommended tutorial but it is not the same by the look of the instructions in the Sunburst Shawl. Any help would be great. Thank you.
04.08.2020 - 11:35DROPS Design answered:
Dear Mrs Bullen, this video shows for another pattern how to crochet squares together - the technique is the same as for the shawl, you will just here crochet 4/6 chains between each dc and work 1 dc in each chain-space - but this should help you to understand the technique of crochet together. Happy crocheting!
04.08.2020 - 13:45Utter Beauty!
22.06.2019 - 19:26Dlaczego schemat jest inny niż kwadraty przedstawione w chuście ? Proszę o odpowiedź.
01.07.2018 - 14:39DROPS Design answered:
Witaj Olu, wg mnie schemat się zgadza. Czy już zaczęłaś go wykonywać? Jeśli tak napisz co według Ciebie się nie zgadza, sprawdzimy. Pozdrawiamy
02.07.2018 - 21:30Hej. Den är så vacker låt den bli med
21.12.2017 - 19:21