Clicking the ORDER button will redirect you to Wool Warehouse Direct Ltd website
The yarn cost is calculated from the pattern’s smallest size and the yarn’s cheapest product type. Looking for an even better price? You might find it on the DROPS Deals!
-------------------------------------------------------
Alternative Yarn – See how to change yarns here
Yarn Groups A to F – Use the same pattern and change the yarn here
Yarn usage using an alternative yarn – Use our yarn converter here
-------------------------------------------------------
Clicking the ORDER button will redirect you to Wool Warehouse Direct Ltd website
The yarn cost is calculated from the pattern’s smallest size and the yarn’s cheapest product type. Looking for an even better price? You might find it on the DROPS Deals!
This pattern has been corrected. Click here to see the correction/s.
= knit from the right side, purl from the wrong side | |
= purl from the right side, knit from the wrong side | |
= between 2 stitches make 1 yarn over, on next row/round work yarn over as shown in diagram (it should make a hole) | |
= knit 2 together | |
= slip 1 stitch knitwise, knit 1, pass slipped stitch over stitch worked | |
= in the stitch below the next stitch work as follows: knit 1, 1 yarn over, knit 1 (= 2 stitches increased) | |
= work 3 stitches in stocking stitch | |
= slip 2 stitches as if to knit together, knit 1, pass the 2 slipped stitches over stitch worked (= 2 stitches decreased) | |
= slip 1 stitch on cable needle in front of piece, knit 1, knit 1 from cable needle | |
= slip 1 stitch on cable needle behind piece, knit 1, knit 1 from cable needle |
Each of our patterns has specific tutorial videos to help you.
These step-by-step tutorials might also help you:
Why is the knitting/crochet tension so important?
Knitting tension is what determines the final measurements of your work, and is usually measured per 10 x 10 cm. It is provided like so: number of stitches in width x number of rows in height - eg: 19 stitches x 26 rows = 10 x 10 cm.
The knitting tension is very individual; some people knit/crochet loosely while others work tightly. You adjust the knitting tension with the needle size, which is why the suggested needle size is only meant as a guide! You need to adjust this (up or down) to ensure that YOUR knitting tension matches the knitting tension provided in the pattern. If you work with a different knitting tension than provided you will have a different yarn consumption, and your work will have different measurements than what the pattern suggests.
The knitting tension also determines which yarns can replace each other. As long as you achieve the same knitting tension you can replace one yarn with another.
See DROPS lesson: How to measure your tension/gauge
See DROPS video: How to make a gauge tension swatch
How do I know how many balls of yarn I need?
The required amount of yarn is provided in grams, eg: 450 g. To calculate how many balls you’ll need you first need to know how many grams are in 1 ball (25g, 50g or 100g). This information is available if you click on the individual yarn quality on our pages. Divide the amount required with the amount of each ball. For example, if each ball is 50g (the most common amount), the calculation will be as follows: 450 / 50 = 9 balls.
Can I use a different yarn than what the pattern suggests?
The important thing when changing from one yarn to another is that the knitting/crochet tension remains the same. This is so that the measurements of the finished piece will be the same as on the sketch provided. It is easier to achieve the same knitting tension using yarns from the same yarn group. It is also possible to work with multiple strands of a thinner yarn to achieve the knitting tension of a thicker one. Please try our yarn converter. We recommend you to always work a test swatch.
Please NOTE: when changing yarn the garment might have a different look and feel to the garment in the photo, due to individual properties and qualities of each yarn.
See DROPS lesson: Can I use a different yarn than the one mentioned in the pattern?
What are the yarn groups?
All our yarns are categorised into yarn groups (from A to F) according to thickness and knitting tension – group A contains the thinnest yarns and group F the thickest. This makes it easier for you to find alternative yarns to our patterns, should you wish to switch yarn. All yarns within the same group have a similar knitting tension and can easily replace each other. However, different yarn qualities have different structures and properties which will give the finished work a unique look and feel.
How do I use the yarn calculator?
At the top of all our patterns you’ll find a link to our yarn calculator, which is a helpful tool should you wish to use a different yarn than suggested. By filling in the yarn quality you wish to replace, the amount (in your size) and number of strands, the calculator will present good alternative yarns with the same knitting tension. Additionally it will tell you how much you’ll require in the new qualities and whether you’ll need to work with multiple strands. Most skeins are 50g (some are 25g or 100g).
If the pattern is worked with multiple colours, every colour will have to be calculated separately. Similarly, if the pattern is worked with several strands of different yarns (for example 1 strand Alpaca and 1 strand Kid-Silk) you will have to find alternatives for each, individually.
Why do you show discontinued yarns in the patterns?
Since different yarns have different qualities and textures we have chosen to keep the original yarn in our patterns. However, you can easily find options among our available qualities by using our yarn calculator, or simply pick a yarn from the same yarn group.
It is possible that some retailers still have discontinued yarns in stock, or that someone has a few skeins at home that they would like to find patterns for.
The yarn calculator will provide both alternative yarn as well as required amount in the new quality.
What size should I knit?
If you think it's hard to decide what size to make, it can be a good idea to measure a garment you own already and like the size of. Then you can pick the size by comparing those measures with the ones available in the pattern's size chart.
You'll find the size chart at the bottom of the pattern.
See DROPS lesson: How to read size chart
Why do I get the wrong knitting tension with the suggested needle size?
The needle size provided in the pattern serves only as a guide, the important thing is to follow the knitting tension. And since knitting tension is very individual, you will have to adjust the needle size to ensure that YOUR tension is the same as in the pattern – maybe you’ll have to adjust 1, or even 2 needle sizes, up or down to achieve the correct tension. For this, we recommend that you work test swatches.
Should you work with a different knitting tension than the one provided, the measurements of the finished garment might deviate from the measurement sketch.
See DROPS lesson: How to measure your tension/gauge
See DROPS video: How to make a tension/gauge swatch
Why is the pattern worked top-down?
Working a garment top-down provides more flexibility and room for personal adjustment. For example it is easier to try the garment on while working, as well as making adjustments to length of yoke and shoulder caps.
The instructions are carefully explaining every step, in the correct order. Diagrams are adjusted to the knitting direction and are worked as usual.
How do I work according to a knitting diagram?
The diagram depicts all rows/rounds, and every stitch seen from the right side. It is read from bottom to top, from right to left. 1 square = 1 stitch.
When working back and forth, every other row is worked from the right side and every other row is worked from the wrong side. When working from the wrong side, the diagram will have to be worked reversed: from left to right, knit stitches are purled, purl stitches are knit etc.
When working in the round every round is worked from the right side and the diagram are worked from right to left on all rounds.
See DROPS lesson: How to read knitting diagrams
How do I work according to a crochet diagram?
The diagram depicts all rows/rounds, and every stitch seen from the right side. It is worked from bottom to top, from right to left.
When working back and forth every other row is worked from the right side: from right to left and every other row is worked from the wrong side: from left to right.
When working in the round, every row in the diagram are worked from the right side, from right to left.
When working a circular diagram you start in the middle and work your way outwards, counter clockwise, row by row.
The rows usually start with a given number of chain stitches (equivalent to the height of the following stitch), this will either be depicted in the diagram or explained in the pattern.
See DROPS lesson: How to read crochet diagrams
How do I work several diagrams simultaneously on the same row/round?
Instructions for working several diagrams after each other on the same row/round, will often be written like so: “work A.1, A.2, A.3 a total of 0-0-2-3-4 times". This means you work A.1 once, then A.2 is worked once, and A.3 is repeated (in width) the number of times provided for your size – in this case like so: S = 0 times, M = 0 times, L=2 times, XL= 3 times and XXL = 4 times.
The diagrams are worked as usual: begin with the first row in A.1, then work the first row in A.2 etc.
See DROPS lesson: How to read knitting diagrams
See DROPS lesson: How to read crochet diagrams
Why are the sleeves shorter in larger sizes?
The total width of the garment (from wrist-to-wrist) will be larger in the larger sizes, despite the actual sleeves being shorter. The larger sizes have longer sleeve caps and wider shoulders, so there will be a good fit in all sizes.
Where on the garment is the length measured?
The measurement sketch/schematic drawing provides information regarding the full length of the garment. If it’s a jumper or a jacket the length is measured from the highest point on the shoulder closest to the neckline, and straight down to the bottom of the garment. It is NOT measured from the tip of shoulder. Similarly, the length of yoke is measured from the highest point on the shoulder and down to where yoke is split into body and sleeves.
On a jacket measures are never taken along bands, unless specifically stated. Always measure inside band stitches when measuring the length.
See DROPS lesson: How to read a schematic drawing
What is a repeat?
Diagrams are often repeated on the round or in height. 1 repeat is the diagram the way it appears in the pattern. If it says to work 5 repeats of A.1 in the round, then you work A.1 a total of 5 times after/next to each other in the round. If it says to work 2 repeats of A.1 vertically/in height you work the entire diagram once, then begin again at the start and work the entire diagram one more time.
Why does the piece start with more chain stitches than it’s worked with?
Chain stitches are slightly narrower than other stitches and to avoid working the cast-on edge too tight, we simply chain more stitches to begin with. The stitch count will be adjusted on the following row to fit the pattern and measurement sketch.
Why increase before the rib edge when the piece is worked top-down?
The rib edge is more elastic and will contract slightly compared to, for example, stocking stitch. By increasing before the rib edge, you avoid a visible difference in width between the rib edge and the rest of the body.
Why increase in the cast-off edge?
It’s very easy to cast off too tightly, and by making yarn overs while casting off (and simultaneously casting these off) you avoid a too tight cast off edge.
See DROPS video: How to bind off with yarn overs (yo)
How do I increase/decrease on every 3rd and 4th row/round alternately?
To achieve an even increase (or decrease) you can increase on, for example: every 3rd and 4th row alternately, like so: work 2 rows and increase on the 3rd row, work 3 rows and increase on the 4th. Repeat this until the increase is complete.
See DROPS lesson: Increase or decrease 1 st on every 3rd and 4th row alternately
How can I work a jacket in the round instead of back and forth?
Should you prefer to work in the round instead of back and forth, you may of course adjust the pattern. You’ll need to add steeks mid-front (usually 5 stitches), and follow the instructions. When you would normally turn and work from the wrong side, simply work across the steek and continue in the round. At the end you’ll cut the piece open, pick up stitches to work bands, and cover the cut edges.
See DROPS video: How to knit steeks and cut open
Can I work a jumper back and forth instead of in the round?
Should you prefer to work back and forth instead of in the round, you may of course adjust the pattern so you work the pieces separately and then assemble them at the end. Divide the stitches for the body in 2, add 1 edge stitch in each side (for sewing) and work the front and back pieces separately.
See DROPS lesson: Can I adapt a pattern for circular needles into straight needles?
Why is the pattern slightly different than what I see in the photo?
Pattern repeats can vary slightly in the different sizes, in order to get the correct proportions. If you’re not working the exact same size as the garment in the photo, yours might deviate slightly. This has been carefully developed and adjusted so that the complete impression of the garment is the same in all sizes.
Make sure to follow instructions and diagrams for your size!
How do I make a women’s size garment into a men’s size one?
If you have found a pattern you like which is available in women’s size it’s not very difficult to convert it to men’s size. The biggest difference will be the length of sleeves and body. Start working on the women size that you think would fit across the chest. The additional length will be worked right before you cast off for the armhole/sleeve cap. If the pattern is worked top-down you can add the length right after the armhole or before the first decrease on sleeve.
Regarding additional yarn amount, this will depend on how much length you add, but it is better with a skein too many than too few.
How do I prevent a hairy garment from shedding?
All yarns will have excess fibres (from production) that might come off as lint or shedding. Brushed yarns (ie hairier yarns) have more of these loose, excess fibres, causing more shedding.
Shedding also depends on what is worn under or over the garment, and whether this pulls at the yarn fibres. It’s therefore not possible to guarantee that there will be no shedding
Below are some tips on how to get the best result when working with hairier yarns:
1. When the garment is finished (before you wash it) shake it vigorously so the looser hairs come off. NOTE: do NOT use a lint roller, brush or any method that pulls at the yarn.
2. Place the garment in a plastic bag and put it in your freezer - the temperature will cause the fibres to become less attached to each other, and excess fibres will come off easier.
3. Leave in the freezer for a few hours before taking it out and shaking it again.
4. Wash the garment according to the instructions on the yarn label.
Why does my garment pill?
Pilling is a natural process that happens to even the most exclusive of fibers. It's a natural sign of wear and tear that is hard to avoid, and that is most visible in high friction areas of your garment like a sweater's arms and cuffs.
You can make your garment look as new by removing the pilling, using a fabric comb or a pill/lint remover.
Fish Fables |
|||||||||||||||||||||||||||||||
|
|
||||||||||||||||||||||||||||||
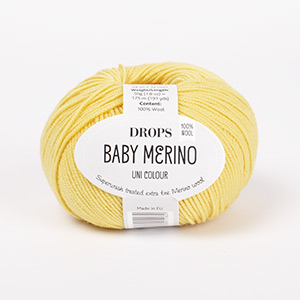
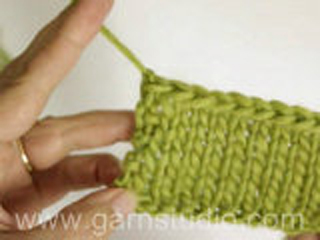
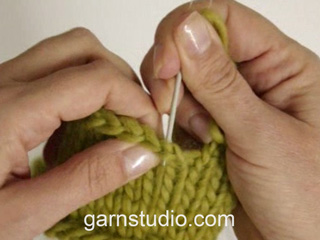
Knitted head band and wrist warmers in DROPS BabyMerino. Work the entire set with lace pattern and small cables.
DROPS 214-37 |
|||||||||||||||||||||||||||||||
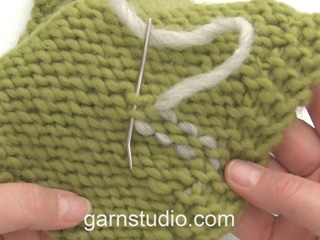
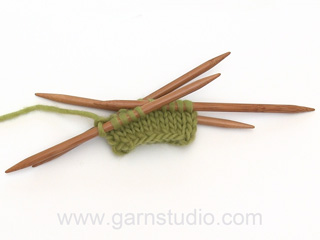
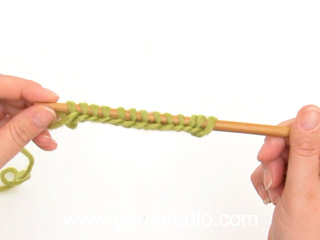
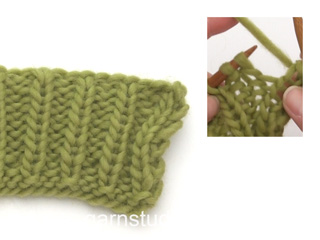
------------------------------------------------------- EXPLANATION FOR THE PATTERN: ------------------------------------------------------- INCREASE/DECREASE TIP (evenly): To calculate how to increase/decrease evenly, use the total number of stitches on row (e.g. 30 stitches), minus edge stitches (e.g. 4 stitches) and divide the remaining stitches by number of increases/decreases to be done (e.g. 5) = 5.2. In this example increase by making 1 yarn over after approx. every 5th stitch. On next row work yarn overs twisted to avoid holes. To decrease in this example knit approx. every 4th and 5th stitch together PATTERN: Head band: See diagram A.1. Wrist warmers: See diagrams A.2 and A.3. Choose diagram for your size (applies to A.2). Diagrams show all rows in pattern seen from the right side. INCREASE TIP-1 (applies to increase for thumb gusset): Increase 1 stitch after marker on right wrist warmer and before marker on left wrist warmer. Increase 1 stitch by making 1 yarn over, on next round work yarn over twisted. Work the increased stitches in rib, i.e. knit the first stitch, purl 2nd stitch etc. Make every increase right after/right before marker so get a nice line along the increase. CAST-OFF TIP: To avoid a tight cast-off edge you may use a larger needle size. If this also is too tight, work a 1 yarn over after approx. every 4th stitch while casting off (cast off yarn overs as regular stitches). ------------------------------------------------------- START THE PIECE HERE: ------------------------------------------------------- HEAD BAND - SHORT OVERVIEW OF THE PIECE: Work back and forth and sew together mid back. HEAD BAND: Cast on 30-30 stitches with needle size 2.5 mm with BabyMerino. Knit 3 rows (1st row = wrong side). Knit 1 row from right side while increasing 5 stitches evenly - read INCREASE/DECREASE TIP = 35-35 stitches. Work next row as follows from wrong side: Knit 2 edge stitches, purl 31-31 stitches and knit 2 edge stitches. Then work A.1 back and forth over all stitches until piece measures approx. 48-50 cm. REMEMBER THE KNITTING TENSION! Approx. 1 cm remain until finished measurements, try the head band on and work until desired length. Knit 1 row from right side while decreasing 5 stitches evenly - remember INCREASE/DECREASE TIP = 30-30 stitches. Knit 3 rows over all stitches. Cast off knitting from right side. ASSEMBLY: Sew piece together mid back inside cast-off edge/cast-on edge. ------------------------------------------------------- WRIST WARMERS - SHORT OVERVIEW OF THE PIECE: Work piece in the round on double pointed needles, bottom up. RIGHT WRIST WARMER: Cast on 52-56 stitches on double pointed needles size 2.5 mm with BabyMerino. Knit 1 round. Then work rib in the round = knit 1/ purl 1. When 5 rounds rib have been worked, switch to double pointed needles size 3 mm. Work next round as follows: Work A.2 over the first 29-33 stitches (= inside hand), and knit over the remaining 23-23 stitches. Then work as follows: Continue A.2 over the first 29-33 stitches, and work A.3 over the remaining 23-23 stitches. REMEMBER THE KNITTING TENSION! When piece measures 8-8 cm, begin increase for thumb gusset. Begin by inserting 1 marker after the first 5-7 stitches on round, i.e. after a knit stitch. Then work as before, but on first round increase 1 stitch after marker - read INCREASE TIP-1. Increase like this every other round 12-14 times in total – work the increased stitches in rib as explained in increase tip. When increases are done, piece measures approx. 15-16 cm from cast-on edge - NOTE: If the piece is shorter than this, continue in the round without increases until correct measurements. Try the wrist warmer on and work until desired length before slipping thumb stitches on a stitch holder. Now slip the 12-14 stitches increased for thumb on 1 stitch holder = 52-56 stitches remain on needles. Continue in the round with rib inside hand and A.3 on top of hand. When piece measures approx. 19½-20½ cm, work next round as follows: Work rib as before over the first 29-33 stitches, and knit over the remaining 23-23 stitches. Switch to double pointed needles size 2.5 mm. On next round work rib in the round over all stitches - make sure to continue rib over stitches inside hand nicely. When 5 rounds have been worked in total with rib over all stitches, loosely cast off with knit over knit and purl over purl - read CAST-OFF TIP! Wrist warmer measures approx. 21-22 cm from top and down. THUMB: Slip the 12-14 stitches from stitch holder back on double pointed needles size 3 mm, and pick in addition up 6-6 stitches in the edge behind the thumb = 18-20 stitches. Work rib in the round = knit 1/purl 1 for 2-2½ cm. Knit 1 round over all stitches, and then loosely cast off by knitting. LEFT WRIST WARMER: Cast on 52-56 stitches on double pointed needles size 2.5 mm with BabyMerino. Knit 1 round. Then work rib in the round = knit 1/ purl 1. When 5 rounds rib have been worked, switch to double pointed needles size 3 mm. Displace the beginning of the round 1 stitch to the right, so that the round starts with 1 purl, then work as follows: Knit 23-23 (= on top of hand), and work A.2 over the remaining 29-33 stitches (= inside hand). Then work as follows: Work A.3. over the first 23-23 stitches, and continue A.2 over the remaining 29-33 stitches. When piece measures 8-8 cm, begin increase for thumb gusset. Begin by inserting 1 marker before the last 5-7 stitches on round, i.e. Before a knit stitch. Then work as before, but on first round increase 1 stitch before marker - read INCREASE TIP-1. Increase like this every other round 12-14 times in total – work the increased stitches in rib as explained in increase tip. When increases are done, piece measures approx. 15-16 cm from cast-on edge - adjust length according to right wrist warmer. Now slip the 12-14 stitches increased for thumb on 1 stitch holder = 52-56 stitches remain on needles. Continue in the round with A.3 on top of hand and rib inside hand. When piece measures approx. 19½-20½ cm, work next round as follows: Knit the first 23-23 stitches, and continue rib as before over the remaining 29-33 stitches. Switch to double pointed needles size 2.5 mm. On next round work rib in the round over all stitches - make sure to continue rib over stitches inside hand nicely. When 5 rounds have been worked in total with rib over all stitches, loosely cast off with knit over knit and purl over purl - remember CAST-OFF TIP! Work thumb the same way as on right wrist warmer. |
|||||||||||||||||||||||||||||||
Diagram explanations |
|||||||||||||||||||||||||||||||
|
|||||||||||||||||||||||||||||||
Have you made this or any other of our designs? Tag your pictures in social media with #dropsdesign so we can see them! Do you need help with this pattern?You'll find tutorial videos, a Comments/Questions area and more by visiting the pattern on garnstudio.com. © 1982-2024 DROPS Design A/S. We reserve all rights. This document, including all its sub-sections, has copyrights. Read more about what you can do with our patterns at the bottom of each pattern on our site. |
With over 40 years in knitting and crochet design, DROPS Design offers one of the most extensive collections of free patterns on the internet - translated to 17 languages. As of today we count 304 catalogues and 11422 patterns - 11422 of which are translated into English (UK/cm).
We work hard to bring you the best knitting and crochet have to offer, inspiration and advice as well as great quality yarns at incredible prices! Would you like to use our patterns for other than personal use? You can read what you are allowed to do in the Copyright text at the bottom of all our patterns. Happy crafting!
Comments / Questions (12)
Mieke Baken wrote:
Het valt mij op dat de kleuren van de diverse garens niet kloppen met de nummers, de benamingen en de foto's. Wat is de reden hiervoor? Bijvoorbeeld bij dit patroon kleur 42 Noordzee. 42 is petroleumblauw. Alvast dank voor uw antwoord. M. vr. g. Mieke
02.03.2024 - 18:24DROPS Design answered:
Dag Mieke,
Dat kan kloppen, want in de loop van de tijd zijn sommige benamingen veranderd waardoor er bij de oudere patronen nog andere namen staan en dat kan inderdaad verwarrend zijn. De nummers zijn, als het goed is, niet gewijzigd, dus kijk altijd naar de nummers van de kleuren.
06.03.2024 - 22:30Annette wrote:
Hvad betyder denne rettelse?VENSTRE PULSVARMER: ...\r\nForskyd omgangens start 1 maske til højre, så omgangen starter med 1 vrang, og strik således:\r\nbetyder det blot at man skal starte med en vrang, i stedet for hvad diagrammet viser?
21.11.2023 - 17:51DROPS Design answered:
Hej Annette, det er skrevet ind i opskriften på nettet, så du kan bare følge opskriften :)
24.11.2023 - 13:50Matei Loredana wrote:
Bonjour. J'ai terminé la mitaine droite et j'ai commencé la gauche, au début de modèle, il faut faire 23 maille à l'endroit et continue A2 sur les dernières 29 mailles, mais âpres les 23 maille le A2 commence avec une maille endroit sur une maille envers, les côtés change (ça veut dire que les mailles de A2 ne continue pas comme "en côtes",comme pour la droite. Merci d'avance. Vous avez des très jolies modèle et facile à suivre. Tout mes félicitations !!
26.01.2023 - 22:04DROPS Design answered:
Une correction a été faite - cf ci-dessous.
27.01.2023 - 16:14Loredana Matei wrote:
Bonjour. J'ai terminé la mitaine droite et j'ai commencé la gauche, au début de modèle, il faut faire 23 maille à l'endroit et continue A2 sur les dernières 29 mailles, mais âpres les 23 maille le A2 commence avec une maille endroit sur une maille envers, les côtés change (ça veut dire que les mailles de A2 ne continue pas comme "en côtes". Merci d'avance Vous avez des très jolies modèle et facile à suivre. Tout mes félicitations !
26.01.2023 - 21:59DROPS Design answered:
Bonjour Mme Matei, effectivement, une correction a été faite ici, on va décaler le tour d'une maille à droite juste avant de tricoter les mailles endroit, ainsi, les côtes continueront comme avant. Merci pour votre retour, bon tricot!
27.01.2023 - 16:14Eva-Maria Dewes wrote:
Liebes drops Team, wenn ich beim linken Pulswärmer zuerst 23 M rechts stricke (A3) und dann die 33M Rippen, geht das nicht mit A2 auf, weil nach den 23M A3 eine linke Masche kommt und A2 aber mit einer rechten Masche beginnen soll. Ist da in der Anleitung ein Fehler oder habe ich es falsch verstanden? Viele Grüße, über einen Hinweis würde ich mich freuen. Eva- Maria Dewes
08.04.2022 - 19:08DROPS Design answered:
Liebe Frau Dewes, über die 23 ersten Maschen stricken Sie zuerst rechts dann A.3, und die letzten 23 Maschen stricken Sie wie beim A.2, dh, (1 M links, 1 M rechts), von (bis) wiederholen und dann mit 1 M links enden, dh stricken Sie das Bündchen wie zuvor. Viel Spaß beim stricken!
19.04.2022 - 07:35Annelie Runesdotter wrote:
Fråga kring pannband A1 drops214-37 Vad betyder lägg upp 30-30 maskor och öka 35-35? Enligt mönster sticka fram och tillbaka diagram A1 stickas då från höger till vänster och sedan nästa diagramrad från vänster till höger ? I beskrivning stör att youtube mönster är diagram A1 men på youtube är det diagram A3 som visas. Finns det youtube klipp på A1 med eller ? Mvh Annelie
13.11.2021 - 11:16DROPS Design answered:
Hei Annelie. Legg opp 30 masker (samme maskeantall i begge str). Strikk 3 pinner rett, strikk 1 pinne rett fra retten der det økes 5 masker jevnt fordelt = 35-35 masker (fremdeles samme maskeantall i begge str.). Neste pinne er fra vrangen og strikkes slik: 2 kantmasker rett, 31 masker vrang og 2 kantmasker rett. Neste pinne fra retten og nå strikkes du 1. rad av diagrammet (fra høyre til venstre), neste pinne vrangen og diag strikkes fra venstre til høyre. Det er ingen video til diagram A.1. Det skal være A.3 på videoteksten, dette er nå forandret. Takk for at du gjorde oss oppmerksom på det. mvh DROPS Design
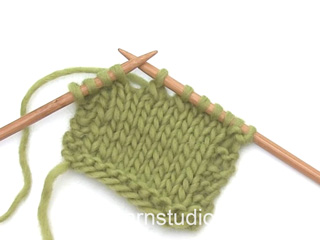
15.11.2021 - 11:05Joyce Sierhuis wrote:
Hoe brei ik in a3 de driehoek over 4 steken dank goor uw antwoord mvg
09.04.2021 - 21:56DROPS Design answered:
Dag Joyce,
De driehoek over 4 steken zijn de 2 laatste symbolen uit de lijst van symbolen, die je dus achter elkaar maakt.
11.04.2021 - 13:34Marina Romano wrote:
Hallo an das drops Team Wird das Stirnband (Drops 214-37) komplett mit Nadel 2,5 gestrickt?
25.10.2020 - 19:39DROPS Design answered:
Liebe Frau Romano, ja genau, das Stirnband wird nur mit Nadeln 2,5 gestrickt (oder die benötige Größe um die Maschenprobe (= 26 M x 32 R = 10 x 10 cm) zu haben). Viel Spaß beim stricken!
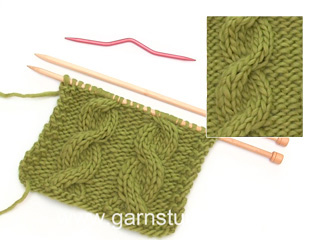
26.10.2020 - 13:05Aila Koskinen wrote:
Kysyisin piirroksesta A1. Heti aloituksesta 2oikein 2 nurin. Mitä sitten tarkoittaa kolmio neljän silmukan kohdalla? En ymmärrä kuinka tehdään? Anteeksi! Olisin kiitollinen vastauksestanne. Siis silmukat 5-8?
16.10.2020 - 21:34DROPS Design answered:
Tämä kolmio on oikeastaan 2 eri kahden ruudun merkkiä. Neulo ne seuraavasti: Ensimmäinen merkki (2 ruutua): Siirrä 1 silmukka apupuikolle työn eteen, neulo 1 silmukka oikein ja neulo apupuikon silmukka oikein. Toinen merkki (seuraavat 2 ruutua): Siirrä 1 silmukka apupuikolle työn taakse, neulo 1 silmukka oikein ja neulo apupuikon silmukka oikein.
19.10.2020 - 17:35Dea wrote:
Buongiorno, è possibile avere una foto dove viene mostrato il fatto che esiste il pollice? Inoltre un video che mostri come riprendere bene le maglie dal dietro del pollice visto che in questo modello non esistono maglie fatte a nuovo e in più è a coste. Grazie
08.10.2020 - 15:20DROPS Design answered:
Buongiorno Dea, inoltriamo la sua richiesta al settore design. Buon lavoro!
12.10.2020 - 10:35