
Popular categories
Looking for a yarn?


|
||||||||||||||||||||||
Pearl Pointe |
||||||||||||||||||||||
 |
 |
|||||||||||||||||||||
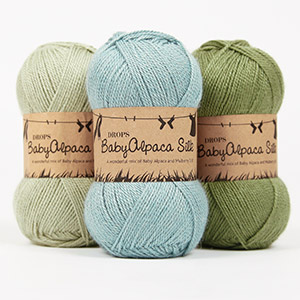
Knitted wrap-around jacket in DROPS BabyAlpaca Silk and DROPS Kid-Silk. The piece is worked top down with lace pattern. Sizes S - XXXL.
DROPS 212-9 |
||||||||||||||||||||||
|
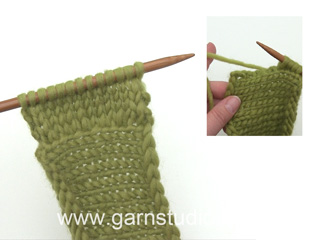
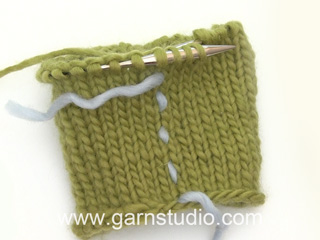
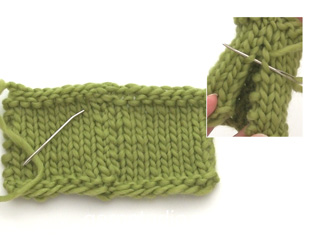
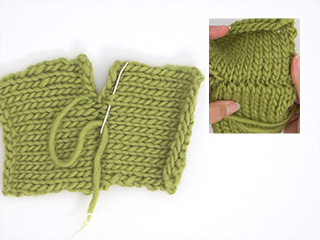
------------------------------------------------------- EXPLANATIONS FOR THE PATTERN: ------------------------------------------------------- RIDGE/GARTER STITCH (worked back and forth): Knit all rows. 1 ridge in height = Knit 2 rows. PATTERN: See diagrams A.1 to A.4. The diagrams show all rows in the pattern seen from the right side. INCREASE TIP-1 (for armholes): All increases are worked from the right side! Increase on the inside of the 3 edge stitches in garter stitch. Increase 1 stitch by making 1 yarn over. On the next row (wrong side) purl the yarn over twisted to avoid a hole. Then work the increased stitch in stocking stitch. INCREASE TIP-2 (for front neck): Increase for the neck inside the 20 stitches in A.1/A.2. Increase 1 stitch by making 1 yarn over. On the next row (wrong side) purl the yarn over twisted to avoid a hole. Then work the increased stitch in stocking stitch. INCREASE TIP-3 (for sides of body): Increase 1 stitch inside the 1 edge stitch in garter stitch by making 1 yarn over. On the next row (wrong side) purl the yarn over twisted to avoid a hole. DECREASE TIP-1 (for sides of body): All decreases are worked from the right side! Decrease on the inside of the 1 edge stitch in garter stitch. Decrease as follows after the 1 edge stitch in garter stitch: Slip 1 stitch as if to knit, knit 1, pass the slipped stitch over the knitted stitch (= 1 stitch decreased). Decrease as follows before the 1 edge stitch in garter stitch: Work until there are 2 stitches left before the edge stitch and knit 2 together (= 1 stitch decreased). DECREASE TIP-2 (for mid under sleeve): Work until there are 3 stitches left before the marker thread, knit 2 together, knit 2 (marker thread sits between these 2 stitches), slip 1 stitch as if to knit, knit 1 and pass the slipped stitch over the knitted stitch (= 2 stitches decreased). CASTING-OFF TIP: To avoid the cast-off edge being tight you can cast off with a larger size needle. If the edge is still tight, make 1 yarn over after approx. each 4th stitch at the same time as casting off and the yarn overs are cast off as normal stitches. ------------------------------------------------------- START THE PIECE HERE: ------------------------------------------------------- WRAP-AROUND JACKET – SHORT OVERVIEW OF THE PIECE: The front and back pieces are worked back and forth with circular needle, top down. Stitches are knitted up for the ties. The sleeve caps are worked back and forth with circular needle, top down. Then the rest of the sleeve is worked in the round with circular needle/double pointed needles, top down. BACK RIGHT SHOULDER (when garment is worn): Cast on 22-22-22-22-22-22 stitches with circular needle size 4 mm and 1 strand BabyAlpaca Silk + 1 strand Kid-Silk (= 2 strands). Work 1 RIDGE – read description above. Change to circular needle size 5 mm and continue with garter stitch until the piece measures approx. 2 cm; on the last row from the wrong side cast on 16-18-18-20-22-24 new stitches on the needle = 38-40-40-42-44-46 stitches. Lay the piece to one side and work the back left shoulder. BACK LEFT SHOULDER (when garment is worn): Cast on 22-22-22-22-22-22 stitches with circular needle size 4 mm and 1 strand BabyAlpaca Silk + 1 strand Kid-Silk (= 2 strands). Work 1 ridge. Change to circular needle size 5 mm and continue with garter stitch until the piece measures approx. 2 cm; adjust so the last row is worked from the wrong side. Now place the parts together and work the back piece as described below. BACK PIECE: Place the right and left shoulders on the same circular needle size 5 mm with the 16-18-18-20-22-24 cast-on-stitches in the middle = 60-62-62-64-66-68 stitches. Start from the right side and work 3 ridges over all stitches. Then work stocking stitch with 3 edge stitches in garter stitch towards the armholes. When the piece measures 17-14-8-12-10-7 cm increase 1 stitch on each side towards the armholes – read INCREASE TIP-1. Increase like this every 4th-4th-4th-2nd-2nd-2nd row a total of 2-4-8-11-15-19 times on each side. Continue working until the piece measures 19-20-21-22-23-24 cm. Now cast on 3 new stitches for the armholes at the end of the next 2 rows = 70-76-84-92-102-112 stitches. The piece is now measured from here! Work 4 rows of stocking stitch with 6 edge stitches in garter stitch on each side. Then work stocking stitch with 1 edge stitch in garter stitch on each side. When the piece measures 4 cm from the armhole decrease 1 stitch on each side – read DECREASE TIP-1 (= 2 stitches decrease). Repeat the decrease when the piece measures 8-8-9-9-10-10 and 12-13-14-15-16-17 cm = 64-70-78-86-96-106 stitches. When the piece measures 15-16-17-18-19-20 cm increase 1 stitch inside the 1 edge stitch in garter stitch on each side – read INCREASE TIP-3. Repeat the increase when the piece measures 19-20-21-22-23-24 cm and 23-24-25-26-27-28 cm = 70-76-84-92-102-112 stitches. Continue working until the piece measures 24-25-26-27-28-29 cm from the armholes and increase at the same time 8-8-9-10-12-14 stitches evenly spaced on the last row from the wrong side = 78-84-93-102-114-126 stitches. Change to circular needle size 4 mm and work the next row from the right side as follows: 1 edge stitch in garter stitch, * knit 1, purl 2 *, work from *-* until there are 2 stitches left on the row, knit 1, 1 edge stitch in garter stitch. Continue this rib for 3 cm. Cast off with knit over knit and purl over purl – read CASTING-OFF TIP. The back piece measures approx. 46-48-50-52-54-56 cm from the shoulder. RIGHT FRONT PIECE (when the piece is worn): Cast on 22-22-22-22-22-22 stitches with circular needle size 4 mm and 1 strand BabyAlpaca Silk + 1 strand Kid-Silk (= 2 strands). Work 1 ridge. Change to circular needle size 5 mm and work the next row from the right side as follows: 3 edge stitches in garter stitch towards the armhole, 2-2-2-2-2-2 stitches in stocking stitch, A.1 (= 17 stitches on the first row) = 25-25-25-25-25-25 stitches when the first row in A.1 has been worked. Continue this pattern back and forth, repeat A.1 in height from 3rd row. When the piece measures 4 cm increase for the neck-line on the inside of A.1 towards mid front – read INCREASE TIP-2. Increase like this every 4th row (i.e. every 2nd row from the right side) a total of 8-8-9-11-12-13 times, every 2nd row (i.e. every row from the right side) a total of 14-16-15-14-14-14 times and finally every 4th row 2-2-2-2-2-2 times. At the same time, when the piece measures 17-14-8-12-10-7 cm, increase 1 stitch in the side for the armhole – continue to increase in the same way as on the back piece. Continue working until the piece measures 19-20-21-22-23-24 cm and cast on 3 new stitches at the end of the next row from the wrong side. Continue as before with A.1 towards mid front, increases for neck-line and stocking stitch but, over the outermost 6 stitches towards the side, work 2 ridges (i.e. on the next 4 rows). Then continue with stocking stitch and 1 edge stitch in garter stitch towards the side and A.1 towards mid front (increases continued as before). When the piece measures 4 cm from the armhole, decrease 1 stitch in the side – remember DECREASE TIP-1. Repeat the decrease when the piece measures 8-8-9-9-10-10 and 12-13-14-15-16-17 cm. When the piece measures 15-16-17-18-19-20 cm, increase 1 stitch inside the 1 edge stitch in garter stitch on the side – remember INCREASE TIP-3. Repeat the increase when the piece measures 19-20-21-22-23-24 cm and 23-24-25-26-27-28 cm. When all the increases on the inside of A.1 are finished continue the pattern as before until the increases in the side are finished. When all the increases are finished there are 54-58-62-66-71-76 stitches on the needle. Continue working until the piece measures 24-25-26-27-28-29 cm from the armhole and increase 6-8-7-6-7-8 stitches evenly spaced = 60-66-69-72-78-84 stitches. Change to circular needle size 4 mm and work rib as follows: 1 edge stitch in garter stitch, * purl 2, knit 1 *, work from *-* until there are 20 stitches left on the row, work A.3 over the last 20 stitches (2 stitches are decreased in the diagram = 18 stitches) = 58-64-67-70-76-82 stitches. Continue the rib for 3 cm. Cast off with knit over knit and purl over purl – remember CASTING-OFF TIP. The front piece measures approx. 46-48-50-52-54-56 cm from the shoulder. LEFT FRONT PIECE (when garment is worn): Cast on 22-22-22-22-22-22 stitches with circular needle size 4 mm and 1 strand BabyAlpaca Silk + 1 strand Kid-Silk (= 2 strands). Work 1 ridge. Change to circular needle size 5 mm and work the next row from the right side as follows: Work A.2 (= 17 stitches on the first row), work 2-2-2-2-2-2 stitches in stocking stitch and finish with 3 edge stitches in garter stitch towards the armhole = 25-25-25-25-25-25 stitches when the first row in A.2 has been completed. Continue this pattern back and forth, repeat A.2 in height from 3rd row. When the piece measures 4 cm increase for the neck-line on the inside of A.2 towards mid front – remember INCREASE TIP-2. Increase like this every 4th row (i.e. every 2nd row from the right side) a total of 8-8-9-11-12-13 times, every 2nd row (i.e. every row from the right side) a total of 14-16-15-14-14-14 times and finally every 4th row 2-2-2-2-2-2 times. At the same time, when the piece measures 17-14-8-12-10-7 cm, increase 1 stitch in the side for the armhole – Continue to increase in the same way as on the back and right front piece. Continue working until the piece measures 19-20-21-22-23-24 cm and cast on 3 new stitches at the end of the next row from the right side. Continue as before with A.2 towards mid front, increases to neck-line and stocking stitch but, over the outermost 6 stitches towards the side, work 2 ridges (i.e. on the next 4 rows). Then continue with stocking stitch, 1 edge stitch in garter stitch towards the side and A.2 towards mid front (increases continue as before). When the piece measures 4 cm from the armhole decrease 1 stitch in the side – remember DECREASE TIP-1. Repeat the decrease when the piece measures 8-8-9-9-10-10 and 12-13-14-15-16-17 cm. When the piece measures 15-16-17-18-19-20 cm, increase 1 stitch inside the 1 edge stitch in garter stitch on the side – remember INCREASE TIP-3. Repeat the increase when the piece measures 19-20-21-22-23-24 cm and 23-24-25-26-27-28 cm. When all the increases inside A.2 are finished continue the pattern as before until the increases in the side are finished. When all increases are finished there are 54-58-62-66-71-76 stitches on the needle. Continue working until the piece measures 24-25-26-27-28-29 cm from the armhole and increase 6-8-7-6-7-8 stitches evenly on the row = 60-66-69-72-78-84 stitches. Change to circular needle size 4 mm and work rib as follows: A.4 over the first 20 stitches (2 stitches are decreased in the diagram = 18 stitches), * knit 1, purl 2 *, work from *-* until there are 2 stitches left on the row, knit 1, 1 edge stitch in garter stitch = 58-64-67-70-76-82 stitches. Continue the rib for 3 cm. Cast off with knit over knit and purl over purl – remember CASTING-OFF TIP. The front piece measures approx. 46-48-50-52-54-56 cm from the shoulder. SLEEVE: Cast on 22-24-26-28-24-26 stitches with circular needle size 5 mm and 1 strand BabyAlpaca Silk + 1 strand Kid-Silk. Work stocking stitch back and forth for the sleeve cap and, at the same time, cast on new stitches at the end of every row as follows: Cast on 3 stitches 1 time on each side, 2 stitches 3-3-3-3-4-4 times on each side, 1 stitch 0-1-2-3-3-5 times on each side, 2 stitches 3-3-3-3-4-4 times on each side and finally 3 stitches 1 time on each side = 58-62-66-70-74-80 stitches. Join the piece together and continue in the round with double pointed needles/short circular needle. Insert 1 marker thread at the join = mid under sleeve. The thread will be used when decreasing under the sleeve. Work stocking stitch in the round. When the piece measures 4 cm from where it was joined, decrease 2 stitches mid under sleeve – read DECREASE TIP-2. Decrease like this every 4-3-2-1½-1-1 cm a total of 3-4-5-6-7-9 times = 52-54-56-58-60-62 stitches. Continue working until the piece measures 19-18-18-17-16-14 cm from the join. Knit 1 round where you increase 2-0-1-2-0-1 stitches evenly on the round = 54-54-57-60-60-63 stitches. Change to double pointed needles size 4 mm and work rib in the round (= knit 1 / purl 2) for 3 cm. Loosely cast off with knit over knit and purl over purl. The sleeve measures approx. 29-29-30-30-31-31 cm from the cast-on edge down. Work one more sleeve in the same way. ASSEMBLY: Sew the shoulder seams inside the cast-on edge. Sew the side seams inside the 1 edge stitch but leave openings in both sides to thread the ties through – the openings should be 8 cm from the bottom edge and 2½–3 cm in width. Lay the sleeves under the garter stitch edge along the armholes and sew neatly from the right side (there should not be a loose edge after sewing; sew in the outermost garter stitch from the right side so the edge lies neatly outside the sleeve). TIES: Knit up using needle size 4 mm and 1 strand of each quality: Approx. 6-7 stitches along the ribbed edge in front; 8 cm from the bottom cast-off edge up to the first of the 6-7 stitches. On the right front piece work garter stitch back and forth until the tie measures approx. 40 cm. Cast off. On the left front piece work garter stitch back and forth until the tie measures approx. 84-94 cm. Cast off. |
||||||||||||||||||||||
Diagram explanations |
||||||||||||||||||||||
|
||||||||||||||||||||||

|
||||||||||||||||||||||

|
||||||||||||||||||||||
|
Have you made this or any other of our designs? Tag your pictures in social media with #dropsdesign so we can see them! Do you need help with this pattern?You'll find tutorial videos, a Comments/Questions area and more by visiting the pattern on garnstudio.com. © 1982-2024 DROPS Design A/S. We reserve all rights. This document, including all its sub-sections, has copyrights. Read more about what you can do with our patterns at the bottom of each pattern on our site. |
||||||||||||||||||||||


With over 40 years in knitting and crochet design, DROPS Design offers one of the most extensive collections of free patterns on the internet - translated to 17 languages. As of today we count 304 catalogues and 11422 patterns - 11422 of which are translated into English (UK/cm).
We work hard to bring you the best knitting and crochet have to offer, inspiration and advice as well as great quality yarns at incredible prices! Would you like to use our patterns for other than personal use? You can read what you are allowed to do in the Copyright text at the bottom of all our patterns. Happy crafting!
Comments / Questions (91)
Hoe moeten de steken aan de averechtse kant gebreid worden bij de telpatronen? Alleen de rechte kant stat vermeldt in de patroontekening
07.05.2024 - 04:31DROPS Design answered:
Dag Margreet,
Als er een leeg vakje staat, worden de steken recht aan de goede kant gebreid en averecht aan de verkeerde kant. Als er een vakje met een horizontaal streepje staat, doe je dit andersom. Je breit de even rijen steeds op de verkeerde kant en oneven naalden op de goede kant, waardoor je het samen breien en de omslagen aan de goede kant doen.
08.05.2024 - 11:13Je ne comprends pas comment il faut monter les mailles sur le devant droit et/ou gauche pour l'emmanchure? Avant les 3 mailles au point mousse on augmente déjà, avec le jersey et si on les monte au bout du rang, on les tricote en mousse ? Si on doit continuer en Jersey, que fait on des 3 mailles au point mousse?
08.03.2024 - 20:14DROPS Design answered:
Bonjour Mme Munch, quand on doit monter les mailles de l'emmanchure, on les rajoute en fin de rang (sur l'envers pour le devant droit, sur l'endroit pour le devant gauche), comme dans cette vidéo/11.03.2024 - 07:44
Hej! Jag vill sticka det här mönstret och undrar om jag kan använda endast Drops brushed alpaca bris? Hur mycket behöver jag till stl L? Mvh Lisa Wahren
24.01.2024 - 18:30DROPS Design answered:
Hei Lisa. Om du mener DROPS Brushed Alpaca Silk (ikke Bris) vil du trenge 6 nøster / 150 gram til str. L. Da strikkes det med 1 tråd. Husk å få den oppgitte strikkefastheten. mvh DROPS Design
05.02.2024 - 08:44In the assembly it states .” Sew the side seams inside the 1 edge stitch but leave openings in both sides to thread the ties through – the openings should be 8 cm from the bottom edge and 2½–3 cm in width” but surely you only need one side open? Or am I missing something? Never made this type of cardi before so bit confused. 😕
12.12.2023 - 20:19DROPS Design answered:
Dear Ruth, you need to get an opening on both sides, then the big on the left font piece (the longer one) is pulled through the opening on the right side, along back piece and tied on the left side of piece; the tie on the right front piece will come in front through the opening on the left side and tied together on this side (reason why this tie is shorter). Happy assembly!
13.12.2023 - 08:02I am now on the sleeves🎉 the pattern has not been easy to read in English but I’m putting that down to translation/ different way of doing instruction. When starting the sleeves it initially says cast on 3 stitches at either end of rows. Then it says 2 stitches on each side. What Does that mean? 2 stitches at each end on the same row? Can you Please clarify thanks
28.10.2023 - 20:28DROPS Design answered:
Dear Ruth, you cast on at the end of the rows. First you cast on 3 stitches at the end of the next 2 rows (one from the right side and one from the wrong side) so you effectively cast on 3 stitches on each side of the piece. After this, on the next row, you cast on 2 stitches at the end of the next 6 or 8 rows, depending on the size. Continue as explained in the pattern; remember that the number of rows where you cast on at the end should be double the number of times indicated, because you need to cast on on each side (for example 3 times on each side would be 3 from the right side and 3 from the wrong side, so 6 in total). Happy knitting!
29.10.2023 - 19:54Hoe brei ik rechter voorpand wand heb al 3 keer uitgetrokken .dit komt niet uit voor rechter kant, ik heb iedere keer linkerkant als uitkomst op de goede kant
06.10.2023 - 22:04DROPS Design answered:
Dag Marleen,
Heb je gezien dat het rechter voorpand, aan de rechter kant zit als het gedragen wordt? Dus als je het aan zou hebben zit het aan de rechter kant.
08.10.2023 - 16:42Hoe brei ik rechter voorpand wand heb al 3 keer uitgetrokken .dit komt niet uit voor rechter kant, ik heb iedere keer linkerkant als uitkomst op de goede kant
06.10.2023 - 22:02Hej. Når jeg skal tage ud på højre forstykke på indersiden, er det så efter de 3 kantmasker og 2 masker glasstrik, at der skal tages ud? Så synes jeg bare, at mønsteret rykker sig ud mod ærmet, og sådan ser det ikke ud på billedet. Der ser det slet ikke ud til, at der tages ud på indersiden, men kun mod ærmet. Vh Marianne
30.07.2023 - 21:54DROPS Design answered:
Hej Marianne, mønsteret skal strikkes yderst i kanten hele vejen og udtagningerne sker indenfor mønsteret :)
07.08.2023 - 11:25Buongiorno. Volendo fare le maniche lunghe in questo modello (sto eseguendo la taglia M) come mi devo comportare con le diminuzioni dal gomito in giù? E quanto devono essere lunghe le maniche? Grazie!
29.07.2023 - 18:21DROPS Design answered:
Buonasera Susanna, in questa sede non ci è possibile adattare i modelli a tutte le varianti richieste. Per un'assistenza così personalizzata può rivolgersi al suo rivenditore DROPS di fiducia. Buon lavoro!
31.07.2023 - 19:38Hø. forstykke: Har strikket 2 p ret. Næste pind som 1. p i A1. Så skal jeg starte med 3. pind, men det hænger jo ikke sammen med at næste pind skal være en vrangpind. Hvad gør jeg efter at 1. pind i A1 er strikket, der hvor der er en rude, hvor der ingen maske er i? Skal jeg så ikke strikke vrangpinden, men kan ikke få den til at passe med det omslag, der var på 1. pind. Kompliceret.
27.07.2023 - 21:49DROPS Design answered:
Hei Marianne. Ja, du strikker 2 pinner rett og neste pinne strikkes fra retten med 3 kantmasker + 2 masker glattstrikk + 1. rad av A.1. Så fortsetter du mønsteret frem og tilbake slik, altså strikk A.1 1 gang i høyden og når du har strikket A.1 1 gang i høyden (siste rad strikkes fra vrangen). Nå skal du gjenta A.1 i høyden, men da fra 3. pinne i diagrammet (som strikkes fra retten). mvh DROPS Design
28.07.2023 - 13:41