Clicking the ORDER button will redirect you to Wool Warehouse Direct Ltd website
The yarn cost is calculated from the pattern’s smallest size and the yarn’s cheapest product type. Looking for an even better price? You might find it on the DROPS Deals!
-------------------------------------------------------
Alternative Yarn – See how to change yarns here
Yarn Groups A to F – Use the same pattern and change the yarn here
Yarn usage using an alternative yarn – Use our yarn converter here
-------------------------------------------------------
Clicking the ORDER button will redirect you to Wool Warehouse Direct Ltd website
The yarn cost is calculated from the pattern’s smallest size and the yarn’s cheapest product type. Looking for an even better price? You might find it on the DROPS Deals!
This pattern has been corrected. Click here to see the correction/s.
= off white | |
= dark grey |
Each of our patterns has specific tutorial videos to help you.
These step-by-step tutorials might also help you:
Why is the knitting/crochet tension so important?
Knitting tension is what determines the final measurements of your work, and is usually measured per 10 x 10 cm. It is provided like so: number of stitches in width x number of rows in height - eg: 19 stitches x 26 rows = 10 x 10 cm.
The knitting tension is very individual; some people knit/crochet loosely while others work tightly. You adjust the knitting tension with the needle size, which is why the suggested needle size is only meant as a guide! You need to adjust this (up or down) to ensure that YOUR knitting tension matches the knitting tension provided in the pattern. If you work with a different knitting tension than provided you will have a different yarn consumption, and your work will have different measurements than what the pattern suggests.
The knitting tension also determines which yarns can replace each other. As long as you achieve the same knitting tension you can replace one yarn with another.
See DROPS lesson: How to measure your tension/gauge
See DROPS video: How to make a gauge tension swatch
How do I know how many balls of yarn I need?
The required amount of yarn is provided in grams, eg: 450 g. To calculate how many balls you’ll need you first need to know how many grams are in 1 ball (25g, 50g or 100g). This information is available if you click on the individual yarn quality on our pages. Divide the amount required with the amount of each ball. For example, if each ball is 50g (the most common amount), the calculation will be as follows: 450 / 50 = 9 balls.
Can I use a different yarn than what the pattern suggests?
The important thing when changing from one yarn to another is that the knitting/crochet tension remains the same. This is so that the measurements of the finished piece will be the same as on the sketch provided. It is easier to achieve the same knitting tension using yarns from the same yarn group. It is also possible to work with multiple strands of a thinner yarn to achieve the knitting tension of a thicker one. Please try our yarn converter. We recommend you to always work a test swatch.
Please NOTE: when changing yarn the garment might have a different look and feel to the garment in the photo, due to individual properties and qualities of each yarn.
See DROPS lesson: Can I use a different yarn than the one mentioned in the pattern?
What are the yarn groups?
All our yarns are categorised into yarn groups (from A to F) according to thickness and knitting tension – group A contains the thinnest yarns and group F the thickest. This makes it easier for you to find alternative yarns to our patterns, should you wish to switch yarn. All yarns within the same group have a similar knitting tension and can easily replace each other. However, different yarn qualities have different structures and properties which will give the finished work a unique look and feel.
How do I use the yarn calculator?
At the top of all our patterns you’ll find a link to our yarn calculator, which is a helpful tool should you wish to use a different yarn than suggested. By filling in the yarn quality you wish to replace, the amount (in your size) and number of strands, the calculator will present good alternative yarns with the same knitting tension. Additionally it will tell you how much you’ll require in the new qualities and whether you’ll need to work with multiple strands. Most skeins are 50g (some are 25g or 100g).
If the pattern is worked with multiple colours, every colour will have to be calculated separately. Similarly, if the pattern is worked with several strands of different yarns (for example 1 strand Alpaca and 1 strand Kid-Silk) you will have to find alternatives for each, individually.
Why do you show discontinued yarns in the patterns?
Since different yarns have different qualities and textures we have chosen to keep the original yarn in our patterns. However, you can easily find options among our available qualities by using our yarn calculator, or simply pick a yarn from the same yarn group.
It is possible that some retailers still have discontinued yarns in stock, or that someone has a few skeins at home that they would like to find patterns for.
The yarn calculator will provide both alternative yarn as well as required amount in the new quality.
What size should I knit?
If you think it's hard to decide what size to make, it can be a good idea to measure a garment you own already and like the size of. Then you can pick the size by comparing those measures with the ones available in the pattern's size chart.
You'll find the size chart at the bottom of the pattern.
See DROPS lesson: How to read size chart
Why do I get the wrong knitting tension with the suggested needle size?
The needle size provided in the pattern serves only as a guide, the important thing is to follow the knitting tension. And since knitting tension is very individual, you will have to adjust the needle size to ensure that YOUR tension is the same as in the pattern – maybe you’ll have to adjust 1, or even 2 needle sizes, up or down to achieve the correct tension. For this, we recommend that you work test swatches.
Should you work with a different knitting tension than the one provided, the measurements of the finished garment might deviate from the measurement sketch.
See DROPS lesson: How to measure your tension/gauge
See DROPS video: How to make a tension/gauge swatch
Why is the pattern worked top-down?
Working a garment top-down provides more flexibility and room for personal adjustment. For example it is easier to try the garment on while working, as well as making adjustments to length of yoke and shoulder caps.
The instructions are carefully explaining every step, in the correct order. Diagrams are adjusted to the knitting direction and are worked as usual.
How do I work according to a knitting diagram?
The diagram depicts all rows/rounds, and every stitch seen from the right side. It is read from bottom to top, from right to left. 1 square = 1 stitch.
When working back and forth, every other row is worked from the right side and every other row is worked from the wrong side. When working from the wrong side, the diagram will have to be worked reversed: from left to right, knit stitches are purled, purl stitches are knit etc.
When working in the round every round is worked from the right side and the diagram are worked from right to left on all rounds.
See DROPS lesson: How to read knitting diagrams
How do I work according to a crochet diagram?
The diagram depicts all rows/rounds, and every stitch seen from the right side. It is worked from bottom to top, from right to left.
When working back and forth every other row is worked from the right side: from right to left and every other row is worked from the wrong side: from left to right.
When working in the round, every row in the diagram are worked from the right side, from right to left.
When working a circular diagram you start in the middle and work your way outwards, counter clockwise, row by row.
The rows usually start with a given number of chain stitches (equivalent to the height of the following stitch), this will either be depicted in the diagram or explained in the pattern.
See DROPS lesson: How to read crochet diagrams
How do I work several diagrams simultaneously on the same row/round?
Instructions for working several diagrams after each other on the same row/round, will often be written like so: “work A.1, A.2, A.3 a total of 0-0-2-3-4 times". This means you work A.1 once, then A.2 is worked once, and A.3 is repeated (in width) the number of times provided for your size – in this case like so: S = 0 times, M = 0 times, L=2 times, XL= 3 times and XXL = 4 times.
The diagrams are worked as usual: begin with the first row in A.1, then work the first row in A.2 etc.
See DROPS lesson: How to read knitting diagrams
See DROPS lesson: How to read crochet diagrams
Why are the sleeves shorter in larger sizes?
The total width of the garment (from wrist-to-wrist) will be larger in the larger sizes, despite the actual sleeves being shorter. The larger sizes have longer sleeve caps and wider shoulders, so there will be a good fit in all sizes.
Where on the garment is the length measured?
The measurement sketch/schematic drawing provides information regarding the full length of the garment. If it’s a jumper or a jacket the length is measured from the highest point on the shoulder closest to the neckline, and straight down to the bottom of the garment. It is NOT measured from the tip of shoulder. Similarly, the length of yoke is measured from the highest point on the shoulder and down to where yoke is split into body and sleeves.
On a jacket measures are never taken along bands, unless specifically stated. Always measure inside band stitches when measuring the length.
See DROPS lesson: How to read a schematic drawing
What is a repeat?
Diagrams are often repeated on the round or in height. 1 repeat is the diagram the way it appears in the pattern. If it says to work 5 repeats of A.1 in the round, then you work A.1 a total of 5 times after/next to each other in the round. If it says to work 2 repeats of A.1 vertically/in height you work the entire diagram once, then begin again at the start and work the entire diagram one more time.
Why does the piece start with more chain stitches than it’s worked with?
Chain stitches are slightly narrower than other stitches and to avoid working the cast-on edge too tight, we simply chain more stitches to begin with. The stitch count will be adjusted on the following row to fit the pattern and measurement sketch.
Why increase before the rib edge when the piece is worked top-down?
The rib edge is more elastic and will contract slightly compared to, for example, stocking stitch. By increasing before the rib edge, you avoid a visible difference in width between the rib edge and the rest of the body.
Why increase in the cast-off edge?
It’s very easy to cast off too tightly, and by making yarn overs while casting off (and simultaneously casting these off) you avoid a too tight cast off edge.
See DROPS video: How to bind off with yarn overs (yo)
How do I increase/decrease on every 3rd and 4th row/round alternately?
To achieve an even increase (or decrease) you can increase on, for example: every 3rd and 4th row alternately, like so: work 2 rows and increase on the 3rd row, work 3 rows and increase on the 4th. Repeat this until the increase is complete.
See DROPS lesson: Increase or decrease 1 st on every 3rd and 4th row alternately
How can I work a jacket in the round instead of back and forth?
Should you prefer to work in the round instead of back and forth, you may of course adjust the pattern. You’ll need to add steeks mid-front (usually 5 stitches), and follow the instructions. When you would normally turn and work from the wrong side, simply work across the steek and continue in the round. At the end you’ll cut the piece open, pick up stitches to work bands, and cover the cut edges.
See DROPS video: How to knit steeks and cut open
Can I work a jumper back and forth instead of in the round?
Should you prefer to work back and forth instead of in the round, you may of course adjust the pattern so you work the pieces separately and then assemble them at the end. Divide the stitches for the body in 2, add 1 edge stitch in each side (for sewing) and work the front and back pieces separately.
See DROPS lesson: Can I adapt a pattern for circular needles into straight needles?
Why is the pattern slightly different than what I see in the photo?
Pattern repeats can vary slightly in the different sizes, in order to get the correct proportions. If you’re not working the exact same size as the garment in the photo, yours might deviate slightly. This has been carefully developed and adjusted so that the complete impression of the garment is the same in all sizes.
Make sure to follow instructions and diagrams for your size!
How do I make a women’s size garment into a men’s size one?
If you have found a pattern you like which is available in women’s size it’s not very difficult to convert it to men’s size. The biggest difference will be the length of sleeves and body. Start working on the women size that you think would fit across the chest. The additional length will be worked right before you cast off for the armhole/sleeve cap. If the pattern is worked top-down you can add the length right after the armhole or before the first decrease on sleeve.
Regarding additional yarn amount, this will depend on how much length you add, but it is better with a skein too many than too few.
How do I prevent a hairy garment from shedding?
All yarns will have excess fibres (from production) that might come off as lint or shedding. Brushed yarns (ie hairier yarns) have more of these loose, excess fibres, causing more shedding.
Shedding also depends on what is worn under or over the garment, and whether this pulls at the yarn fibres. It’s therefore not possible to guarantee that there will be no shedding
Below are some tips on how to get the best result when working with hairier yarns:
1. When the garment is finished (before you wash it) shake it vigorously so the looser hairs come off. NOTE: do NOT use a lint roller, brush or any method that pulls at the yarn.
2. Place the garment in a plastic bag and put it in your freezer - the temperature will cause the fibres to become less attached to each other, and excess fibres will come off easier.
3. Leave in the freezer for a few hours before taking it out and shaking it again.
4. Wash the garment according to the instructions on the yarn label.
Why does my garment pill?
Pilling is a natural process that happens to even the most exclusive of fibers. It's a natural sign of wear and tear that is hard to avoid, and that is most visible in high friction areas of your garment like a sweater's arms and cuffs.
You can make your garment look as new by removing the pilling, using a fabric comb or a pill/lint remover.
Reykjavik Kids |
|||||||
|
|
||||||
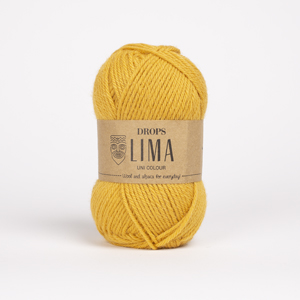
Knitted jumper for babies and children in DROPS Lima. The piece is worked bottom up with Nordic pattern and raglan. Sizes 6 months - 4 years.
DROPS Children 34-30 |
|||||||
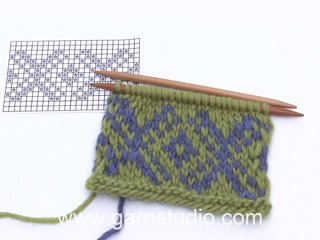
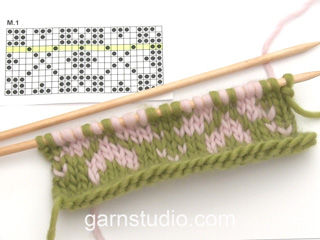
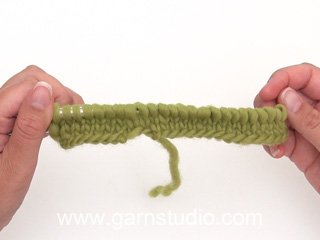
------------------------------------------------------- EXPLANATIONS FOR THE PATTERN: ------------------------------------------------------- KNITTING TIP (for bottom up/top down): This garment is worked bottom up. If you wish to work top down this is possible, but you must adjust the pattern yourself. You do this by starting at the bottom of the pattern, casting on stitches for the neck then working decreases as increases and increases as decreases. By working top down, the length of the body and sleeves can be adjusted to the desired measurements. RIB-1 (bottom of body and sleeves): Work rib with knit 1/ purl 1 as follows: 3 rounds dark grey, 2 rounds off-white, 2 rounds dark grey, 2 rounds off-white, 2 rounds dark grey, 2 rounds off-white. RIB-2 (for neck): Work rib with knit 1/ purl 1 as follows: 2 rounds dark grey, 2 rounds off-white, 2 rounds dark grey, 2 rounds off-white, 2 rounds dark grey. DECREASE/INCREASE TIP (evenly spaced): To work out how to decrease/increase evenly, count the total number of stitches on needle (e.g. 118 stitches), and divide by number of decreases/increases to be made (e.g. 10) = 11.8. In this example, decrease by knitting together approx. each 11th and 12th stitch. When increasing make 1 yarn over after approx. each 12th stitch. On the next row knit the yarn overs twisted to avoid holes. PATTERN: See diagram A.1. The whole pattern is worked in stocking stitch. INCREASE TIP (for mid under sleeves): Start 1 stitch before the marker thread, make 1 yarn over, knit 2 stitches of A.1 as before, make 1 yarn over (2 stitches increased). On the next round knit the yarn overs twisted to avoid holes. Then work the new stitches into A.1 as you go. RAGLAN: Decrease to raglan on each side of the 4 marker threads in each transition between front/back pieces and sleeves as follows: Start 2 stitches before the marker thread, knit 2 together with off-white, marker thread, knit 2 twisted together with off-white (= 2 stitches decreased at the marker thread and a total of 8 stitches decreased on each decrease-round). CASTING-OFF TIP: To avoid the cast-off edge being tight you can cast off with a larger size needle; and/or make 1 yarn over after approx. each 4th stitch at the same time as casting off (yarn overs cast off as normal stitches). ------------------------------------------------------- START THE PIECE HERE: ------------------------------------------------------- JUMPER – SHORT OVERVIEW OF THE PIECE: The body is worked in the round with circular needle, bottom up as far as the armholes. The sleeves are worked in the round with double pointed needles, bottom up. The body and sleeves are placed on the same circular needle and continued in the round with circular needle/double pointed needles to finished length - read KNITTING TIP! BODY: Cast on 118-132 (146-158) stitches with circular needle size 3 mm and dark grey. Work RIB-1 in the round – read description above. After the rib, knit 1 round with off-white where you decrease 10-12 (14-14) stitches evenly spaced – read INCREASE/DECREASE TIP = 108-120 (132-144) stitches. Change to circular needle size 4 mm and insert 1 marker thread at the beginning of the round and 1 marker thread after 54-60 (66-72) stitches; allow the threads to follow your work onwards, they mark the sides of the body. Work A.1 in the round (= 18-20 (22-24) repeats of 6 stitches, start with first stitch in diagram so that there is a stitch with dark grey from A.1 on each side of the body). REMEMBER THE KNITTING TENSION! When the piece measures 16-18 (20-23) cm, cast off for the armholes as follows: Start at the beginning of the round and cast off 3 stitches, work 48-54 (60-66) stitches with pattern as before (= front piece), cast off 6 stitches (3 stitches on each side of the marker thread), work 48-54 (60-66) stitches with pattern as before (= back piece) and cast off the last 3 stitches. Cut the strand, lay the piece to one side and work the sleeves. SLEEVE: Cast on 32-34 (36-36) stitches with double pointed needles size 3 mm and dark grey. Work RIB-1 in the round. After the rib, knit 1 round with off-white where you increase 4-2 (6-6) stitches evenly spaced – remember INCREASE/DECREASE TIP = 36-36 (42-42) stitches. Change to double pointed needles size 4 mm. Insert 1 marker thread at the beginning of the round and allow the thread to follow your work onwards; it will be used when increasing mid-under sleeve. Work A.1 in the round (= 6-6 (7-7) repeats of 6 stitches, start with first stitch in diagram so that there is a stitch with dark grey from A.1 mid-under sleeve). When the sleeve measures 6-6 (7-7) cm, increase 2 stitches mid-under sleeve – read INCREASE TIP. Increase like this every 1½-2 (2½-3) cm a total of 6 times in all sizes = 48-48 (54-54) stitches. Work until the sleeve measures approx. 16-18 (22-26) cm but adjust so you finish on the same round as on the body before the stitches were cast off for the armholes – this is important so the patterns match when the sleeves and body are worked together. The next round is worked as follows: Cast off 3 stitches, work 42-42 (48-48) stitches with pattern as before and cast off the last 3 stitches. Cut the strand, lay the piece to one side and work the other sleeve in the same way. Then work the yoke as described below. YOKE: Place the sleeves on the same circular needle size 4 mm as the body, where stitches were cast off for the armholes (without working the stitches) = 180-192 (216-228) stitches on the needle. Insert 1 marker thread in each transition between front/back pieces and sleeves = 4 marker threads; allow the threads to follow your work onwards, they are used when decreasing to raglan. Start the round on the back piece in the transition between sleeve and body and work A.1 in the round as before, but 1 stitch on each side of the 4 marker threads is always worked in off-white. When you have worked 2-4 (2-4) rounds after the sleeves and body were placed together, decrease to RAGLAN – read description above. Decrease to raglan every 2nd round a total of 14-15 (17-18) times in height. After the last decrease there are 68-72 (80-84) stitches left on the needle (20-24 (26-30) stitches between the marker threads on the front/back pieces and 14-12 (14-12) stitches between the marker threads on the sleeves). The piece measures approx. 11-12 (13-14) cm from where the body and sleeves were placed together. Now work the neck as described below. NECK: Knit 1 round with off-white where you decrease 2-2 (6-6) stitches evenly spaced = 66-70 (74-78) stitches on the needle. Change to double pointed needles/short circular needle size 3mm and work RIB-2 in the round – read description above. When the rib is finished, cast off with dark grey and knit over knit and purl over purl – read CASTING-OFF TIP! The jumper measures approx. 30-33 (36-40) cm from the shoulder down. ASSEMBLY: Sew openings under the sleeves. |
|||||||
Diagram explanations |
|||||||
|
|||||||
Have you made this or any other of our designs? Tag your pictures in social media with #dropsdesign so we can see them! Do you need help with this pattern?You'll find tutorial videos, a Comments/Questions area and more by visiting the pattern on garnstudio.com. © 1982-2024 DROPS Design A/S. We reserve all rights. This document, including all its sub-sections, has copyrights. Read more about what you can do with our patterns at the bottom of each pattern on our site. |
With over 40 years in knitting and crochet design, DROPS Design offers one of the most extensive collections of free patterns on the internet - translated to 17 languages. As of today we count 304 catalogues and 11422 patterns - 11422 of which are translated into English (UK/cm).
We work hard to bring you the best knitting and crochet have to offer, inspiration and advice as well as great quality yarns at incredible prices! Would you like to use our patterns for other than personal use? You can read what you are allowed to do in the Copyright text at the bottom of all our patterns. Happy crafting!
Comments / Questions (16)
Suzanne Tynelius wrote:
Jag vill sticka i storlek 4 månader, hur gör jag?
01.03.2024 - 20:02DROPS Design answered:
Hei Suzanne. Den minste skrevne størrelsen på denne er 6/9 mnd. Design avd. har ikke mulighet til å skrive mindre størresler på denne. mvh DROPS Design
04.03.2024 - 13:45Johan wrote:
Hej!\r\nNär jag stickar ärmen, ska ökningarna börja när arbetet mäter 6 från där resåren slutar eller med resåren medräknad?
11.02.2024 - 19:13DROPS Design answered:
Hej Johan. Resåren är medräknad. Mvh DROPS Design
15.02.2024 - 13:48Idun Dalby Andersen wrote:
Hei! Har noe karisma garn jeg skulle ha brukt opp. Kan jeg bytte ut Lima garnet med det i denne oppskriften? :)
26.01.2024 - 20:40DROPS Design answered:
Hej Idun, ja det kan du :)
02.02.2024 - 12:27Viveka Karlsson wrote:
Hej! Jag vill gärna sticka tröjan till 6-åring. Hur räknar jag om mönstret, eller finns det ett mönster för större storlekar?
06.05.2023 - 17:00DROPS Design answered:
Hei Viveka Ta en titt på oppskrift 37-9, Favourite Catch. Der finner du lignende genser i oppskrift 5-14 år. mvh DROPS Design
08.05.2023 - 13:21Susanne Nørgaard wrote:
Hej. Garnmængden til str. 2-3 /4 år er 550g i naturfarvet. Det er samme mængde som til voksen str. XXL-XXXL. Jeg går ud fra, at det er her fejlen er? Vh Susanne Nørgaard
16.10.2022 - 18:17DROPS Design answered:
Hei Susanne. Ja, her var det en tastefeil på den danske siden. I str. 3/4 år skal det være 250 gram farge 100, natur. Takk for at du gjorde oss oppmerksom på dette. mvh DROPS Design
24.10.2022 - 13:35Neuloja wrote:
Miten hihaa neuloessa saa neuleen kuvion jatkumaan samanlaisena ja samassa kohti silmukoiden lisäysten jälkeen?
28.08.2022 - 14:45DROPS Design answered:
Kun teet hihojen lisäykset, neulo aina lisätyllä silmukalla mallineuletta piirroksen mukaisesti siten, että kuvio jatkuu keskellä hihan alla olevien 2 silmukan kummallakin puolella rikkoutumatta.
04.10.2022 - 16:53Ruth Gunnvor Molvær wrote:
Jeg strikket i str.12/18 mnd, og felte av etter vrangborden 12 m slik mønsteret sier. Etter å ha strikket et godt stykke på bolen, målte jeg bredden. Den skulle være 29, men var 26cm. Min strikkefasthet er normal. Gikk til butikken hvor garnet ble kjøpt med strikketøyet. Hun målte, så på min strikkefasthet, og sa at her burde jeg enten bytte til pinne 4 1/2 eller la vær å felle etter vrangborden for å få rette mål. Jeg valgte det siste. Håper dere kan rette opp dette.
25.07.2022 - 16:25Lena wrote:
Ohjeen mukaan raglan kavennuksia on 15 kertaa, jolloin 15 x4 =60 vähenee silmukat jää 72 silmukkaa. Eikö tässä ole virhe???? Mulla on vielä 132 silmukkaa!!
14.02.2022 - 23:37DROPS Design answered:
Raglankavennusten kavennuskerroksella kavennetaan aina 8 silmukkaa (= yhteensä 120 silmukkaa). Eli työhön jää 72 silmukkaa.
04.05.2022 - 17:10Connie Stausgaard wrote:
Kommentar til garnmængden: Jeg strikker str. 12/18 måneder, og skal bruge 150 g. natur og 100 g. grå. Jeg holder alle mål og masketal. Trøjen er bare rigtig flot😍.
09.02.2022 - 17:07Anne Lise Norderhaug Svensen wrote:
Hei, finnes det mønster i str 8 år?
27.11.2021 - 14:29DROPS Design answered:
Hei Anne Lise, Mønster me-061-bn er samme genser i barnestørrelsene. God fornøyelse!
29.11.2021 - 07:09