
Popular categories
Looking for a yarn?


|
|||||||||||||||||||
Heim |
|||||||||||||||||||
 |
 |
||||||||||||||||||
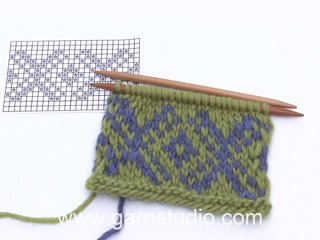
Knitted jumper in DROPS Alpaca. The piece is worked top down with round yoke and Nordic pattern on the yoke. Sizes S - XXXL. Knitted hat with Nordic pattern in DROPS Alpaca.
DROPS 207-1 |
|||||||||||||||||||
|
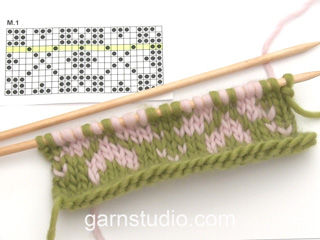
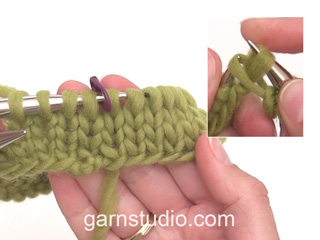
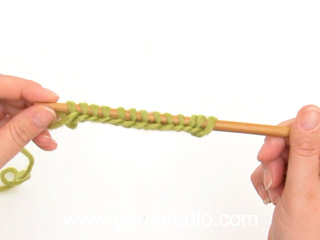
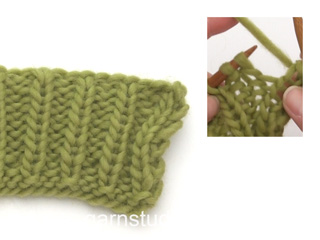
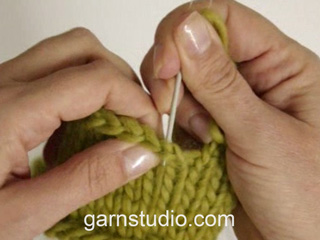
------------------------------------------------------- EXPLANATIONS FOR THE PATTERN: ------------------------------------------------------- INCREASE/DECREASE TIP (evenly spaced): To work out how to increase/decrease evenly, count the total number of stitches on needle (e.g. 104 stitches) and divide by the number of increases/decreases to be made (e.g. 34) = 3.1. In this example, increase by making 1 yarn over after approx. each 3rd stitch. On the next round knit the yarn overs twisted to avoid holes. When decreasing knit together approx. each 2nd and 3rd stitch. ELEVATION (back of neck): To make the jumper slightly higher at the back of the neck when working yoke you can work an elevation as described here. Skip this section if you do not want an elevation. Insert 1 marker at the beginning of the round (mid back). Start from the right side with medium petrol and knit 11-12-12-13-13-14 stitches, turn, tighten strand and purl 22-24-24-26-26-28 stitches back. Turn, tighten strand and knit 33-36-36-39-39-42 stitches, turn, tighten strand and purl 44-48-48-52-52-56 stitches back. Turn, tighten strand and knit 55-60-60-65-65-70 stitches, turn, tighten strand and purl 66-72-72-78-78-84 stitches. Turn, tighten the strand and knit 77-84-84-91-91-98 stitches, turn tighten the strand and purl 88-96-96-104-104-112 stitches. Turn tighten the strand and knit back to mid back. Then work YOKE as described in the text. PATTERN: Jumper: See diagram A.1. Choose diagram for your size. Hat: See diagram A.2. The whole pattern is worked in stocking stitch. KNITTING TIP: To avoid the knitting tension becoming tighter when working pattern it is important that the strands at the back are not tight. Use a size larger needle when working pattern if this is a problem. INCREASE TIP-1 (for sides of body): Work until there are 3 stitches left before the marker thread, make 1 yarn over, knit 6 (marker thread sits between these 6 stitches) make 1 yarn over (= 2 stitches increased at each marker thread; 4 stitches increased on round). On the next round knit the yarn overs twisted to avoid holes. Then work the new stitches in stocking stitch. DECREASE TIP (for mid under sleeve): Work until there are 3 stitches left before the marker thread, knit 2 together, knit 2 (marker thread sits between these 2 stitches), slip 1 stitch as if to knit, knit 1 and pass the slipped stitch over the knitted stitch. CASTING-OFF TIP: To avoid the cast-off edge being tight you can cast off with a larger size needle, or make 1 yarn over after approx. each 8th stitch at the same time as casting off (yarn overs cast off as normal stitches). ------------------------------------------------------- START THE PIECE HERE: ------------------------------------------------------- JUMPER – SHORT OVERVIEW OF THE PIECE: The neck and yoke are worked in the round with circular needle, top down. The yoke is divided for body and sleeves. The body is continued in the round with circular needle. The sleeves are worked in the round with short circular needle/double pointed needles, top down. NECK: Cast on 104-108-112-116-120-124 stitches with short circular needle size 3 mm and medium petrol. Knit 1 round and then work rib in the round (= knit 2 /purl 2) for 3-3-3-4-4-4 cm. When the rib is finished knit 1 round where you increase 34-36-38-40-42-44 stitches evenly spaced – read INCREASE/DECREASE TIP = 138-144-150-156-162-168 stitches. Knit 1 round (yarn overs knitted twisted). Change to circular needle size 3.5 mm. Insert 1 marker in the middle of the round (= mid front) – the yoke will be measured from this marker! Now you can work an ELEVATION in the back of the neck – read description above. If you do not want an elevation, go straight to YOKE. YOKE: Work stocking stitch in the round with medium petrol. When the piece measures 1½-1½-2-2-2-2 cm from the marker mid front, increase 34-36-40-46-48-52 stitches evenly spaced = 172-180-190-202-210-220 stitches. When the piece measures 2½-2½-3-3-3-3 cm from the marker mid front, increase 28-36-38-42-46-48 stitches evenly spaced = 200-216-228-244-256-268 stitches. When the piece measures 3-3-4-4-4-4 cm from the marker mid front, start working A.1 in the round (= 50-54-57-61-64-67 repeats of 4 stitches). Continue this pattern. Read KNITTING TIP and REMEMBER THE KNITTING TENSION! AT THE SAME TIME on each round marked with an arrow in A.1, increase stitches evenly as described below: Arrow-1: Increase 36-36-40-44-44-52 stitches evenly spaced = 236-252-268-288-300-320 stitches (there is now room for 59-63-67-72-75-80 repeats of A.1 with 4 stitches). Arrow-2: Increase 40-42-50-54-60-64 stitches evenly spaced = 276-294-318-342-360-384 stitches (there is now room for 46-49-53-57-60-64 repeats of A.1 with 6 stitches). Arrow-3: Increase 20-26-30-34-44-48 stitches evenly spaced = 296-320-348-376-404-432 stitches (there is now room for 74-80-87-94-101-108 repeats of A.1 with 4 stitches). Arrow-4: Increase 12-20-24-24-28-32 stitches evenly spaced = 308-340-372-400-432-464 stitches (there is now room for 77-85-93-100-108-116 repeats of A.1 with 4 stitches). When A.1 has been completed continue with stocking stitch and olive. AT THE SAME TIME on the first round after A.1, increase 2-6-6-10-6-14 stitches evenly spaced = 310-346-378-410-438-478 stitches. Work until the piece measures 20-22-24-25-27-29 cm from the marker on the neck. Divide the yoke for body and sleeves, working the next round with olive as follows: Work 46-51-54-60-66-73 stitches in stocking stitch (= ½ back piece), place the next 62-70-80-84-86-92 stitches on 1 thread for sleeve, cast on 8-8-10-10-12-12 new stitches on the needle (= in side under sleeve), work 93-103-109-121-133-147 stitches in stocking stitch (= front piece), place the next 62-70-80-84-86-92 stitches on 1 thread for sleeve, cast on 8-8-10-10-12-12 new stitches on the needle (= in side under sleeve) and work the remaining 47-52-55-61-67-74 stitches in stocking stitch (= ½ back piece). Body and sleeves are finished separately. THE PIECE IS NOW MEASURED FROM HERE! BODY: = 202-222-238-262-290-318 stitches. Insert 1 marker thread on each side of the body in the middle of the 8-8-10-10-12-12 stitches cast on under the sleeve. Allow the threads to follow your work onwards; they will be used when increasing in the sides. Start the round at one of the marker threads and work stocking stitch in the round with olive. When the piece measures 5 cm from the division in all sizes increase 1 stitch on each side of both marker threads – read INCREASE TIP (= 4 stitches increased). Increase like this every 5-5-5-4-4-4 cm a total of 5-5-5-6-6-6 times on each side = 222-242-258-286-314-342 stitches. Continue working until the piece measures 30 cm from the division (there is approx. 3 cm to finished length; you can try the jumper on and continue working to desired length). Knit 1 round where you increase 74-82-86-98-106-114 stitches evenly spaced = 296-324-344-384-420-456 stitches (this is done so the rib is not tight). Change to circular needle size 3 mm and work rib (= knit 2 / purl 2) for 3 cm. Cast off with knit over knit and purl over purl – read CASTING OFF TIP! The jumper measures approx. 56-58-60-62-64-66 cm from the shoulder down. SLEEVE: Place the 62-70-80-84-86-92 stitches from the thread on the one side of the piece on short circular needle/double pointed needles size 3.5 mm and knit up 1 stitch in each of the 8-8-10-10-12-12 stitches cast on under the sleeve = 70-78-90-94-98-104 stitches. Insert 1 marker thread in the middle of the 8-8-10-10-12-12 stitches and allow it to follow your work onwards; it will be used when decreasing mid under sleeve. Start the round at the marker thread and work stocking stitch in the round with olive. When the piece measures 3 cm from the division in all sizes decrease 2 stitches mid under sleeve – read DECREASE TIP. Decrease like this every 3½-2½-1½-1½-1½-1 cm a total of 10-13-19-19-19-22 times = 50-52-52-56-60-60 stitches. Continue working until the sleeve measures 37-36-35-33-32-30 cm from the division (there is approx. 7 cm to finished length; you can try the jumper on and continue working to desired length). NOTE: Shorter measurements in larger sizes due to wider neck and longer yoke. Knit 1 round where you increase 18-20-20-20-20-20 stitches evenly spaced = 68-72-72-76-80-80 stitches. Change to double pointed needles size 3 mm and work rib (= knit 2 / purl 2) for 7 cm. Cast off with knit over knit and purl over purl – remember CASTING OFF TIP. The sleeve measures approx. 44-43-42-40-39-37 cm from the division. Work the other sleeve in the same way. ------------------------------------------------------- HAT – SHORT OVERVIEW OF THE PIECE: The piece is worked in the round with short circular needle, bottom up. Change to double pointed needles when necessary. HAT: Cast on 116-120-124 stitches with circular needle size 2.5 mm and medium petrol. Knit 1 round. Then work rib in the round (= knit 2 / purl 2) for 3-4-4 cm. Change to circular needle size 3.5 mm and knit 1 round where you increase 24 stitches evenly spaced in all sizes – read INCREASE/DECREASE TIP = 140-144-148 stitches. Work A.2 in the round (= 35-36-37 repeats of 4 stitches). Continue this pattern. REMEMBER THE KNITTING TENSION! AT THE SAME TIME on each round marked with an arrow in A.2, decrease stitches evenly spaced as described below: Arrow-1: Decrease 8-6-4 stitches evenly spaced = 132-138-144 stitches. Continue the pattern (there is now room for 22-23-24 repeats of 6 stitches). Arrow-2: Decrease 24-26-28 stitches evenly spaced = 108-112-116 stitches. Continue the pattern (there is now room for 27-28-29 repeats of 4 stitches). Arrow-3: Decrease 24-24-24 stitches evenly spaced = 84-88-92 stitches. Continue the pattern (there is now room for 21-22-23 repeats of 4 stitches). When A.2 has been completed continue with olive as follows: Knit 3-3-4 rounds, * knit 1 round where all the stitches are knitted together 2 and 2, knit 5-5-6 rounds *, work from *-* 1 more time. Then knit 1 round where all the stitches are knitted together 2 and 2 = 11-11-12 stitches left. Cut the strand, pull it through the remaining stitches, tighten and fasten well. The hat measures approx. 23-24-25 cm from the top down. |
|||||||||||||||||||
Diagram explanations |
|||||||||||||||||||
|
|||||||||||||||||||

|
|||||||||||||||||||

|
|||||||||||||||||||

|
|||||||||||||||||||

|
|||||||||||||||||||
|
Have you made this or any other of our designs? Tag your pictures in social media with #dropsdesign so we can see them! Do you need help with this pattern?You'll find tutorial videos, a Comments/Questions area and more by visiting the pattern on garnstudio.com. © 1982-2024 DROPS Design A/S. We reserve all rights. This document, including all its sub-sections, has copyrights. Read more about what you can do with our patterns at the bottom of each pattern on our site. |
|||||||||||||||||||


With over 40 years in knitting and crochet design, DROPS Design offers one of the most extensive collections of free patterns on the internet - translated to 17 languages. As of today we count 304 catalogues and 11422 patterns - 11422 of which are translated into English (UK/cm).
We work hard to bring you the best knitting and crochet have to offer, inspiration and advice as well as great quality yarns at incredible prices! Would you like to use our patterns for other than personal use? You can read what you are allowed to do in the Copyright text at the bottom of all our patterns. Happy crafting!
Comments / Questions (63)
Arno est un prénom masculin. je ne suis pas une dame ;-))
07.05.2024 - 20:26Bonjour, ds les coloris proposés, le numéro 7139 ne correspond pas au vert gris foncé mais au bleu mineral. Est ce quand même le bon numéro ? ce qui semble effectivement être plus du bleu que du vert, mais je voudrais avoir confirmation avant ma commande. merci
24.04.2024 - 14:01DROPS Design answered:
Bonjour Mme Arno, il arrive que le nom des couleurs soit ajusté en fonction de différents critères, toutefois, vous pouvez faire confiance à la référence de la couleur qui reste la même. Bon tricot!
24.04.2024 - 15:33Bonjour, le diagramme A1 ( et les autres ) n'est il pas montré à l'envers sur le schéma? Si c'est le cas, cela change t il la position des flèches d'augmentation? Merci de votre réponse.
24.04.2024 - 13:57DROPS Design answered:
Bonjour Mme Arno, les diagrammes se lisent de bas en haut, et tous les tours de droite à gauche. Le pull se tricotant de haut en bas, le motif sera alors inversé quand on porte le pull. Augmentez bien aux rangs indiqués par les flèches. Bon tricot!
24.04.2024 - 15:37Ich möchte gerne diesen Pullover mit Rollkragen stricken. Können sie mir eine passende Anleitung geben? Das wäre toll!
12.03.2024 - 13:10DROPS Design answered:
Liebe Frau Wüst, von diesen Modellen können Sie sich inspirieren = selbe Maschenprobe sowie Rundpasse, um einen Rollkragen zu stricken. Viel Spaß beim Stricken!
12.03.2024 - 15:43Jag vill sticka denna modell i färger enligt alt. C. När jag skall beställa garnet står det färg 601 - men den finns inte i ert sortement. Vad skall man då ta för färg som passar? Har stickat den i ursprungsfärgerna - den blev jättefin. Vill nu sticka en till i annan färg Bästa hälsningar Birgitta Holmstrand
08.02.2024 - 12:15DROPS Design answered:
Hei Birgitta. Ja, dessverre er farge 601 utgått fra vårt sortiment. Men ta en titt på farge 607, brun mix. Den er noe lysere, men en flott farge som vil passe fint. Eller kanskje en av de mørke grønne fargene vi har DROPS Alpaca eller hva med en dyp rødtone farge (9025, 3650, 5565). Veldig mange farger å velge i og vanskelig å gi råd da farger er ganske personlig :) mvh DROPS Design
16.02.2024 - 11:04Is het ook mogelijk om de patronen van beneden naar boven te breien?
23.01.2024 - 17:50DROPS Design answered:
Dag Patricia,
Dit patroon is geschreven om van boven naar beneden te breien en het is voor ons helaas niet mogelijk om patronen aan te passen naar persoonlijke wensen. Als je hem andersom wilt breien, zou je alles a.h.w. omgekeerd moeten doen, dus minderen waar je moet meerderen, opzetten waar je afkant, etc. Ook het telpatroon zou dan andersom moeten.
24.01.2024 - 09:41Hi. I just finished knitting this sweater in Drops alpaca wool and am wondering if I should wet block it to help with some uneven stitches. The wool product I have (Eucalan) says I should let it soak for 15 minutes but the washing instructions on the wool say not to soak it. Would you recommend wet blocking this garment and should I soak it or not? Thanks
30.11.2023 - 22:26DROPS Design answered:
Dear Jo, you can either wash it or wet block it, just follow in all cases the washing instructions; your DROPS store can give you more tips.& advices, even per mail or telephone. Happy knitting!
01.12.2023 - 08:31Hej Jag funderar över diagrammet när man ska öka rad 4 vid pilen 1 ...om jag ökar jämt fördelat så får jag inte diagrammet o stämma längre ?
06.10.2023 - 22:23DROPS Design answered:
Hei Anette. Det skal det heller ikke. Dette er øverst i halsen og mønstret/halskanten vi strekke seg utover, så det spiller ingen rolle at det du ser på diagrammet ikke stemmer overens lengre. Bare følg diagrammet og økningen som er forklart i oppskriften, så blir det riktig. mvh DROPS Design
16.10.2023 - 13:28Rebonjour, Je me rends compte que ma première question n'a pas été enregistrée. Pour le modèle Heim avec d'autres couleurs : A) DROPS ALPACA 607, 2923, 2020, 2915, 5565. B) DROPS ALPACA 517, 3900, 9020, 3770, 3969. Avez-vous d'autres propositions avec un ecouleur prépondérante plus vive ? Je vous remercie !
07.04.2023 - 15:50DROPS Design answered:
Re- cf réponse ci-dessous, votre magasin pourra vous proposer différentes associations en fonction de vos goûts et de ce que vous recherchez. Bon tricot!
11.04.2023 - 12:10Bonjour, Pour le modèle B), la couleur 3969 n'existe plus. Pouvez-vous indiquer une couleur de remplacement ? J'ai posé une autre question à propos des couleurs mais je n'ai pas reçu de réponse. Bon week-end !
07.04.2023 - 14:38DROPS Design answered:
Bonjour Mme Norks, pour toute assistance au choix d'une couleur, merci de bien vouloir contacter directement votre magasin, on pourra ainsi vous aider, même par mail ou téléphone. Bon tricot!
11.04.2023 - 12:09