
Popular categories
Looking for a yarn?


|
||||||||||||||||
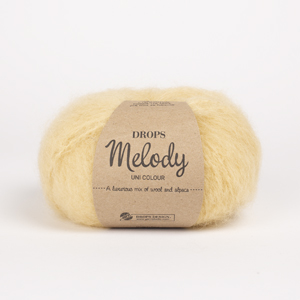
Miss Lemon |
||||||||||||||||
 |
 |
|||||||||||||||
Knitted jumper with raglan in DROPS Melody. Piece is knitted top down with lace pattern. Size XS – XXL.
DROPS 200-28 |
||||||||||||||||
|
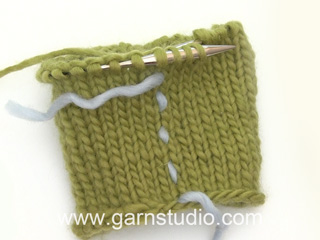
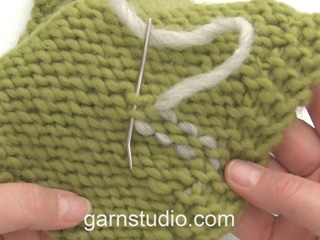
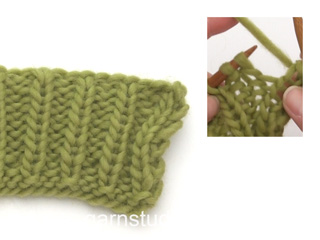
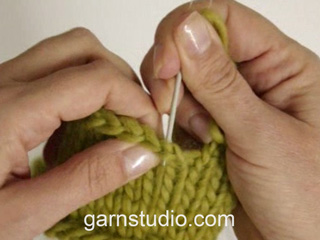
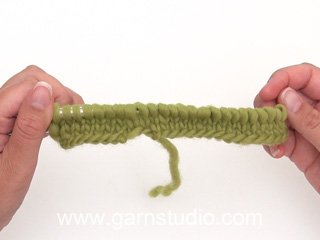
---------------------------------------------------------- EXPLANATION FOR THE PATTERN: ------------------------------------------------------- INCREASE/DECREASE TIP (evenly): To calculate how to increase/decrease evenly, use the total number of stitches on row (e.g. 50 stitches) and divide stitches by number of increases/decreases to be done (e.g. 6) = 8.3. In this example increase by making 1 yarn over after approx. every 8th stitch. On next round work yarn over twisted to avoid hole. To decrease in this example knit approx. every 7th and 8th stitch together. PATTERN: See diagrams A.1 and A.2. Choose diagram for your size. RAGLAN: Increase 1 stitch in each side of 2 knit stitches in every transition between body and sleeves (= 8 stitches increased on round). Increase 1 stitch by making 1 yarn over, on next round knit yarns over to make holes. Then work the new stitches in pattern (in stocking stitch on sleeve, stocking stitch on back piece and in pattern/stocking stitch on front piece). DECREASE TIP (applies to sleeves): Decrease 1 stitch on each side of marker thread as follows: Work until 1 stitch remains before marker thread, knit 3 stitches together = 1 stitch (move the marker thread to before this stitch after every decrease). ------------------------------------------------------- START THE PIECE HERE: ------------------------------------------------------- JUMPER - SHORT OVERVIEW OF THE PIECE: Worked in the round on circular needle, top down. After yoke work body in the round on circular needle. Work sleeves in the round on double pointed needles/a short circular needle. NECK EDGE: Cast on 50-50-52-56-58-60 stitches on circular needle size 7 mm. Work rib = knit 1/purl 1, for 3 cm, then knit 1 round while increasing 6-6-8-4-6-0 stitches evenly - read INCREASE/DECREASE TIP = 56-56-60-60-64-60 stitches. Switch to circular needle size 8 mm. YOKE: Insert 1 marker here - NOW MEASURE PIECE FROM HERE! Now insert 4 marker threads in the piece WITHOUT working - insert markers as follows: Insert 1 marker thread at beginning of round (= in transition between sleeve and back piece), insert 1 marker thread after another 19 stitches (= back piece), insert 1 marker thread after another 9-9-11-11-13-11 stitches (= sleeve), insert 1 marker thread after another 19 stitches (= front piece), 9-9-11-11-13-11 stitches now remain until first marker thread (= sleeve). Work next round as follows: Begin round at first marker thread, i.e. on back piece. Knit 1, make 1 yarn over, work 17 stitches in stocking stitch (= back piece), make 1 yarn over, knit 2 (marker thread is between these 2 stitches), make 1 yarn over, work 7-7-9-9-11-9 stitches in stocking stitch (= sleeve), make 1 yarn over, knit 2 (marker thread is between these 2 stitches), make 1 yarn over, work A.1 (= 17 stitches front piece – choose diagram for your size), make 1 yarn over, knit 2 (marker thread is between these 2 stitches), make 1 yarn over, work 7-7-9-9-11-9 stitches in stocking stitch (= sleeve), make 1 yarn over, knit 1. This was first increase for RAGLAN - read explanation above. Continue A.1 and stocking stitch while increasing every other round 15-17-18-19-20-22 times in total (including first increase explained above). After A.1 work A.2 over the same stitches as for A.1, and work the last increases in stocking stitch on each side of A.2. Repeat diagram A.2 vertically until finished measurements. REMEMBER THE KNITTING TENSION! When all increases for raglan are done the piece should measure approx. 21-24-26-27-29-31 cm from marker at the beginning of yoke. If necessary, work in pattern as before without increasing until finished measurements. After yoke work next round as follows: Work 50-54-57-60-63-68 stitches in stocking stitch (= on back piece), slip the next 37-41-43-43-45-45 stitches on 1 stitch holder for sleeve, cast on 4-4-4-6-8-10 new stitches on needle (= in the side under sleeve), work 4-6-8-10-8-11 stitches in stocking stitch, continue A.2 (= 43-43-43-43-51-51 stitches) and work 4-6-8-10-8-11 stitches in stocking stitch (= front piece), slip the next 37-41-43-43-45-45 stitches on 1 stitch holder for sleeve, cast on 4-4-4-6-8-10 new stitch on needle (= in the side under sleeve), work the last 1-1-2-3-4-5 stitches (= on back piece). Finish body and sleeves separately. NOW MEASURE PIECE FROM HERE! BODY: = 110-118-126-138-150-166 stitches. Insert 1 marker thread in the middle of the 4-4-4-6-8-10 new stitches that were cast on under sleeve in each side. Begin round at one of the marker thread and move the marker threads when working. Continue with stocking stitch and pattern A.2. When piece measures 25-24-24-25-25-25 cm from division (approx. 49-51-53-55-57-59 cm from shoulder), knit 1 round while increasing 16-18-18-20-22-24 stitches evenly = 126-136-144-158-172-190 stitches. Switch to circular needle size 7 mm and work rib = knit 1/purl 1 for 3 cm. Cast off with knit over knit and purl over purl (to avoid a tight cast-off edge use needle size 8 mm). Jumper measures approx. 52-54-56-58-60-62 cm from shoulder. SLEEVE: Slip the 37-41-43-43-45-45 stitches from stitch holder in one side of piece on circular needle/double pointed needles size 8 mm and pick in addition up 1 stitch in each of the 4-4-4-6-8-10 new stitches cast on under sleeve = 41-45-47-49-53-55 stitches. Insert 1 marker thread in the middle of the 4-4-4-6-8-10 stitches and begin round here. Work in stocking stitch. When piece measures 2 cm from division, decrease 2 stitches mid under sleeve - read DECREASE TIP. Decrease like this every 4-3½-2½-2½-2-2 cm 7-8-9-9-11-11 times in total = 27-29-29-31-31-33 stitches. Continue until sleeve measures 36-33-32-31-30-28 cm from division (shorter measurements in the larger sizes because of longer yoke). Knit 1 round while increasing 5 stitches evenly = 32-34-34-36-36-38 stitches. Switch to double pointed needles size 7 mm and work rib = knit 1/purl 1 for 5 cm. Sleeve measures approx. 41-38-37-36-35-33 cm from division. Cast off with knit over knit and purl over purl (to avoid a tight cast-off edge use needle size 8 mm). Work the other sleeve the same way. |
||||||||||||||||
Diagram explanations |
||||||||||||||||
|
||||||||||||||||

|
||||||||||||||||

|
||||||||||||||||

|
||||||||||||||||

|
||||||||||||||||

|
||||||||||||||||
|
Have you made this or any other of our designs? Tag your pictures in social media with #dropsdesign so we can see them! Do you need help with this pattern?You'll find tutorial videos, a Comments/Questions area and more by visiting the pattern on garnstudio.com. © 1982-2024 DROPS Design A/S. We reserve all rights. This document, including all its sub-sections, has copyrights. Read more about what you can do with our patterns at the bottom of each pattern on our site. |
||||||||||||||||


With over 40 years in knitting and crochet design, DROPS Design offers one of the most extensive collections of free patterns on the internet - translated to 17 languages. As of today we count 304 catalogues and 11422 patterns - 11422 of which are translated into English (UK/cm).
We work hard to bring you the best knitting and crochet have to offer, inspiration and advice as well as great quality yarns at incredible prices! Would you like to use our patterns for other than personal use? You can read what you are allowed to do in the Copyright text at the bottom of all our patterns. Happy crafting!
Comments / Questions (26)
Hola, acabo de empezar pero tengo una duda, el dibujo del raglan A1 solo se hace en el delantero y la espalda es punto Jersey derecho con lazadas? Muchas gracias
22.03.2024 - 21:34Hola! Me encanta este jersey y la lana Melody! Lo estoy tejiendo en la talla L. Tengo una duda con el canesú: en el canesú comienzan los aumentos ranglan desde la primera vuelta, es decir: lazada, punto derecho, deslizar marcador, p derecho, lazada y después los puntos de espalda, mangas, etc. Cuando comienza el delantero, pone “trabajar 9 p jersey (=manga), hacer una lazada y trabajar A.1 (=17 puntos), .. “ pero entonces no se hace aquí el aumento ranglan? Gracias!
23.05.2023 - 16:45DROPS Design answered:
Hola María, se trataba de un fallo en el patrón, ya está corregido. Muchas gracias.
28.05.2023 - 18:24How am I supposed to make two yarn overs right next to each other? Is this supposed to make two holes side by side? If not, won’t my stitch count be off?
05.09.2022 - 20:46DROPS Design answered:
Hi Lotekky, The 2 yarn overs are separated by 1 knitted stitch. Happy knitting!
06.09.2022 - 06:56Hello. I read Elaine's question, and your answer, but I am still confused regarding making the last increases in stockinette stitch on either side of A2. I am making size Medium. When I finish A1, I will still need to make more increases. Where do I put them in the pattern? Do the last increases refer to the last rows of A2 after I have made all of my increases? Thank you
31.10.2021 - 06:40DROPS Design answered:
Dear Debra, the increases for the front and back are included in A.1. For the sleeves, the increases are worked in stocking stitch and are worked independently of A.1. These increases are on each side of the stitches of the raglan (= 2 stitches). Happy knitting!
01.11.2021 - 13:30Bonjour, Que signifie "commencez le tour à un fil marqueur et faites suivre les fils marqueurs" ? Merci
30.10.2021 - 12:01DROPS Design answered:
Bonjour Joan, lorsque vous avez divisé les mailles de l'empiècement et monté les mailles sous la manche, vous tricotez jusqu'au milieu des premières mailles montées sous la 1ère manche, autrement dit à l'un des fils marqueurs; les tours commencent désormais ici. Faites suivre vos fils marqueurs au fur et à mesure que vous tricotez pour bien conserver leur emplacement (cf vidéo). Bon tricot!
02.11.2021 - 13:47Merci pour votre réponse. Petite précision : A1 n'est à tricoter que sur le devant ou sur le dos également ? Merci... Bonne après midi C
21.10.2021 - 14:49DROPS Design answered:
Bonjour Claire, on ne tricote A.1 que sur le devant - (le paragraphe RAGLAN a été corrigé, consultez la correction en rouge en bas de page si besoin); le dos se tricote en jersey. Bon tricot!
21.10.2021 - 16:05Bonjour, Pouvez vous me confirmer qu\'il devrait y avoir un jeté et une maille de chaque côté de A.1 tout le long ? Je suis au tour 8 de A.1 et j\'ai, depuis le marqueur : 1maille, 1 jeté que je tricote avec le brin arrière, puis A.1, sauf que sur l\'ouverture la fin de A.1 se termine au marqueur suivant (c\'est à que la maille torse et la maille d\'avant le marqueur sont intégrés dans A.1) Y a t'il une erreur ? J'espère avoir été assez claire, merci pour votre aide
21.10.2021 - 11:59DROPS Design answered:
Bonjour Claire, vous devez effectivement avoir 1 jeté de chaque côté de A.1 car vous augmentez pour le raglan - cf RAGLAN, ces jetés se tricotent à l'endroit au tour suivant, pas torse, pour qu'ils forment un trou. Autrement dit, vous augmentez de chaque côté des 2 mailles jersey à chaque transition dos/devant et manches, donc avant A.1 et après A.1 sur le devant/le dos. Bon tricot!
21.10.2021 - 13:17Bonjour, Quand vous mentionnez des aiguilles no8, voulez-vous dire 8 mm ou 4mm? Merci beaucoup, Diane
29.01.2021 - 14:13DROPS Design answered:
Bonjour Diane, la taille des aiguilles dans les modèles français est toujours indiquée en mm, autrement dit, il faut ici des aiguilles 8 mm et 7 mm. Bon tricot!
29.01.2021 - 14:59I am making size L. I do not understand this section, "Continue A.1 and stockinette stitch while increasing every other round 15-17-18=19-20-22 times in total." Does this mean I start working on A.2 after finishing row 19 or do I work Chart A.1 until there are 43 stitches and then start Chart A.2? Also, what are the "last increases in stockinette stitch on each side of A.2"?
25.01.2021 - 02:35DROPS Design answered:
Dear Elaine, you have already worked the first increase for raglan (yarn overs explained on previous section). You now continue working with established pattern (diagrams and stocking stitch) increasing for raglan 18 more times on every other round. see RAGLAN. when A.1 is done in height, work A.2 over A.1 and work now the new stitches in stocking stitch (the last increases on raglan will be worked in stocking stitch, not in lace pattern). Happy knitting!
25.01.2021 - 11:39Please confirm diagram A2 for XL-XXL on line 8, one pattern "k2 tog yo k1 yo sks" is missing. Thank you for your help.
06.03.2020 - 05:49DROPS Design answered:
Dear Catherine, it looks like yes, our design team will check and edit diagram. Thanks for your feedback. Happy knitting!
06.03.2020 - 09:18