Clicking the ORDER button will redirect you to Wool Warehouse Direct Ltd website
The yarn cost is calculated from the pattern’s smallest size and the yarn’s cheapest product type. Looking for an even better price? You might find it on the DROPS Deals!
-------------------------------------------------------
Alternative Yarn – See how to change yarns here
Yarn Groups A to F – Use the same pattern and change the yarn here
Yarn usage using an alternative yarn – Use our yarn converter here
-------------------------------------------------------
Clicking the ORDER button will redirect you to Wool Warehouse Direct Ltd website
The yarn cost is calculated from the pattern’s smallest size and the yarn’s cheapest product type. Looking for an even better price? You might find it on the DROPS Deals!
= knit from the right side, purl from the wrong side | |
= purl from the right side, knit from the wrong side | |
= knit 2 together | |
= slip 1 stitch knitwise, knit 1, pass slipped stitch over stitch worked | |
= between 2 stitches make 1 yarn over, do NOT work yarn over twisted on next round/row - it should make a hole | |
= between 2 stitches make 1 yarn over, work yarn over twisted in pattern on next round/row - it should NOT make a hole | |
= slip 1 stitch knitwise, knit 2 stitches together, pass slipped stitch over stitches worked | |
= no stitch, skip this square | |
= begin on this round - see arrow for correct size |
Each of our patterns has specific tutorial videos to help you.
These step-by-step tutorials might also help you:
Why is the knitting/crochet tension so important?
Knitting tension is what determines the final measurements of your work, and is usually measured per 10 x 10 cm. It is provided like so: number of stitches in width x number of rows in height - eg: 19 stitches x 26 rows = 10 x 10 cm.
The knitting tension is very individual; some people knit/crochet loosely while others work tightly. You adjust the knitting tension with the needle size, which is why the suggested needle size is only meant as a guide! You need to adjust this (up or down) to ensure that YOUR knitting tension matches the knitting tension provided in the pattern. If you work with a different knitting tension than provided you will have a different yarn consumption, and your work will have different measurements than what the pattern suggests.
The knitting tension also determines which yarns can replace each other. As long as you achieve the same knitting tension you can replace one yarn with another.
See DROPS lesson: How to measure your tension/gauge
See DROPS video: How to make a gauge tension swatch
How do I know how many balls of yarn I need?
The required amount of yarn is provided in grams, eg: 450 g. To calculate how many balls you’ll need you first need to know how many grams are in 1 ball (25g, 50g or 100g). This information is available if you click on the individual yarn quality on our pages. Divide the amount required with the amount of each ball. For example, if each ball is 50g (the most common amount), the calculation will be as follows: 450 / 50 = 9 balls.
Can I use a different yarn than what the pattern suggests?
The important thing when changing from one yarn to another is that the knitting/crochet tension remains the same. This is so that the measurements of the finished piece will be the same as on the sketch provided. It is easier to achieve the same knitting tension using yarns from the same yarn group. It is also possible to work with multiple strands of a thinner yarn to achieve the knitting tension of a thicker one. Please try our yarn converter. We recommend you to always work a test swatch.
Please NOTE: when changing yarn the garment might have a different look and feel to the garment in the photo, due to individual properties and qualities of each yarn.
See DROPS lesson: Can I use a different yarn than the one mentioned in the pattern?
What are the yarn groups?
All our yarns are categorised into yarn groups (from A to F) according to thickness and knitting tension – group A contains the thinnest yarns and group F the thickest. This makes it easier for you to find alternative yarns to our patterns, should you wish to switch yarn. All yarns within the same group have a similar knitting tension and can easily replace each other. However, different yarn qualities have different structures and properties which will give the finished work a unique look and feel.
How do I use the yarn calculator?
At the top of all our patterns you’ll find a link to our yarn calculator, which is a helpful tool should you wish to use a different yarn than suggested. By filling in the yarn quality you wish to replace, the amount (in your size) and number of strands, the calculator will present good alternative yarns with the same knitting tension. Additionally it will tell you how much you’ll require in the new qualities and whether you’ll need to work with multiple strands. Most skeins are 50g (some are 25g or 100g).
If the pattern is worked with multiple colours, every colour will have to be calculated separately. Similarly, if the pattern is worked with several strands of different yarns (for example 1 strand Alpaca and 1 strand Kid-Silk) you will have to find alternatives for each, individually.
Why do you show discontinued yarns in the patterns?
Since different yarns have different qualities and textures we have chosen to keep the original yarn in our patterns. However, you can easily find options among our available qualities by using our yarn calculator, or simply pick a yarn from the same yarn group.
It is possible that some retailers still have discontinued yarns in stock, or that someone has a few skeins at home that they would like to find patterns for.
The yarn calculator will provide both alternative yarn as well as required amount in the new quality.
What size should I knit?
If you think it's hard to decide what size to make, it can be a good idea to measure a garment you own already and like the size of. Then you can pick the size by comparing those measures with the ones available in the pattern's size chart.
You'll find the size chart at the bottom of the pattern.
See DROPS lesson: How to read size chart
Why do I get the wrong knitting tension with the suggested needle size?
The needle size provided in the pattern serves only as a guide, the important thing is to follow the knitting tension. And since knitting tension is very individual, you will have to adjust the needle size to ensure that YOUR tension is the same as in the pattern – maybe you’ll have to adjust 1, or even 2 needle sizes, up or down to achieve the correct tension. For this, we recommend that you work test swatches.
Should you work with a different knitting tension than the one provided, the measurements of the finished garment might deviate from the measurement sketch.
See DROPS lesson: How to measure your tension/gauge
See DROPS video: How to make a tension/gauge swatch
Why is the pattern worked top-down?
Working a garment top-down provides more flexibility and room for personal adjustment. For example it is easier to try the garment on while working, as well as making adjustments to length of yoke and shoulder caps.
The instructions are carefully explaining every step, in the correct order. Diagrams are adjusted to the knitting direction and are worked as usual.
How do I work according to a knitting diagram?
The diagram depicts all rows/rounds, and every stitch seen from the right side. It is read from bottom to top, from right to left. 1 square = 1 stitch.
When working back and forth, every other row is worked from the right side and every other row is worked from the wrong side. When working from the wrong side, the diagram will have to be worked reversed: from left to right, knit stitches are purled, purl stitches are knit etc.
When working in the round every round is worked from the right side and the diagram are worked from right to left on all rounds.
See DROPS lesson: How to read knitting diagrams
How do I work according to a crochet diagram?
The diagram depicts all rows/rounds, and every stitch seen from the right side. It is worked from bottom to top, from right to left.
When working back and forth every other row is worked from the right side: from right to left and every other row is worked from the wrong side: from left to right.
When working in the round, every row in the diagram are worked from the right side, from right to left.
When working a circular diagram you start in the middle and work your way outwards, counter clockwise, row by row.
The rows usually start with a given number of chain stitches (equivalent to the height of the following stitch), this will either be depicted in the diagram or explained in the pattern.
See DROPS lesson: How to read crochet diagrams
How do I work several diagrams simultaneously on the same row/round?
Instructions for working several diagrams after each other on the same row/round, will often be written like so: “work A.1, A.2, A.3 a total of 0-0-2-3-4 times". This means you work A.1 once, then A.2 is worked once, and A.3 is repeated (in width) the number of times provided for your size – in this case like so: S = 0 times, M = 0 times, L=2 times, XL= 3 times and XXL = 4 times.
The diagrams are worked as usual: begin with the first row in A.1, then work the first row in A.2 etc.
See DROPS lesson: How to read knitting diagrams
See DROPS lesson: How to read crochet diagrams
Why are the sleeves shorter in larger sizes?
The total width of the garment (from wrist-to-wrist) will be larger in the larger sizes, despite the actual sleeves being shorter. The larger sizes have longer sleeve caps and wider shoulders, so there will be a good fit in all sizes.
Where on the garment is the length measured?
The measurement sketch/schematic drawing provides information regarding the full length of the garment. If it’s a jumper or a jacket the length is measured from the highest point on the shoulder closest to the neckline, and straight down to the bottom of the garment. It is NOT measured from the tip of shoulder. Similarly, the length of yoke is measured from the highest point on the shoulder and down to where yoke is split into body and sleeves.
On a jacket measures are never taken along bands, unless specifically stated. Always measure inside band stitches when measuring the length.
See DROPS lesson: How to read a schematic drawing
What is a repeat?
Diagrams are often repeated on the round or in height. 1 repeat is the diagram the way it appears in the pattern. If it says to work 5 repeats of A.1 in the round, then you work A.1 a total of 5 times after/next to each other in the round. If it says to work 2 repeats of A.1 vertically/in height you work the entire diagram once, then begin again at the start and work the entire diagram one more time.
Why does the piece start with more chain stitches than it’s worked with?
Chain stitches are slightly narrower than other stitches and to avoid working the cast-on edge too tight, we simply chain more stitches to begin with. The stitch count will be adjusted on the following row to fit the pattern and measurement sketch.
Why increase before the rib edge when the piece is worked top-down?
The rib edge is more elastic and will contract slightly compared to, for example, stocking stitch. By increasing before the rib edge, you avoid a visible difference in width between the rib edge and the rest of the body.
Why increase in the cast-off edge?
It’s very easy to cast off too tightly, and by making yarn overs while casting off (and simultaneously casting these off) you avoid a too tight cast off edge.
See DROPS video: How to bind off with yarn overs (yo)
How do I increase/decrease on every 3rd and 4th row/round alternately?
To achieve an even increase (or decrease) you can increase on, for example: every 3rd and 4th row alternately, like so: work 2 rows and increase on the 3rd row, work 3 rows and increase on the 4th. Repeat this until the increase is complete.
See DROPS lesson: Increase or decrease 1 st on every 3rd and 4th row alternately
How can I work a jacket in the round instead of back and forth?
Should you prefer to work in the round instead of back and forth, you may of course adjust the pattern. You’ll need to add steeks mid-front (usually 5 stitches), and follow the instructions. When you would normally turn and work from the wrong side, simply work across the steek and continue in the round. At the end you’ll cut the piece open, pick up stitches to work bands, and cover the cut edges.
See DROPS video: How to knit steeks and cut open
Can I work a jumper back and forth instead of in the round?
Should you prefer to work back and forth instead of in the round, you may of course adjust the pattern so you work the pieces separately and then assemble them at the end. Divide the stitches for the body in 2, add 1 edge stitch in each side (for sewing) and work the front and back pieces separately.
See DROPS lesson: Can I adapt a pattern for circular needles into straight needles?
Why is the pattern slightly different than what I see in the photo?
Pattern repeats can vary slightly in the different sizes, in order to get the correct proportions. If you’re not working the exact same size as the garment in the photo, yours might deviate slightly. This has been carefully developed and adjusted so that the complete impression of the garment is the same in all sizes.
Make sure to follow instructions and diagrams for your size!
How do I make a women’s size garment into a men’s size one?
If you have found a pattern you like which is available in women’s size it’s not very difficult to convert it to men’s size. The biggest difference will be the length of sleeves and body. Start working on the women size that you think would fit across the chest. The additional length will be worked right before you cast off for the armhole/sleeve cap. If the pattern is worked top-down you can add the length right after the armhole or before the first decrease on sleeve.
Regarding additional yarn amount, this will depend on how much length you add, but it is better with a skein too many than too few.
How do I prevent a hairy garment from shedding?
All yarns will have excess fibres (from production) that might come off as lint or shedding. Brushed yarns (ie hairier yarns) have more of these loose, excess fibres, causing more shedding.
Shedding also depends on what is worn under or over the garment, and whether this pulls at the yarn fibres. It’s therefore not possible to guarantee that there will be no shedding
Below are some tips on how to get the best result when working with hairier yarns:
1. When the garment is finished (before you wash it) shake it vigorously so the looser hairs come off. NOTE: do NOT use a lint roller, brush or any method that pulls at the yarn.
2. Place the garment in a plastic bag and put it in your freezer - the temperature will cause the fibres to become less attached to each other, and excess fibres will come off easier.
3. Leave in the freezer for a few hours before taking it out and shaking it again.
4. Wash the garment according to the instructions on the yarn label.
Why does my garment pill?
Pilling is a natural process that happens to even the most exclusive of fibers. It's a natural sign of wear and tear that is hard to avoid, and that is most visible in high friction areas of your garment like a sweater's arms and cuffs.
You can make your garment look as new by removing the pilling, using a fabric comb or a pill/lint remover.
Peach Ballet |
||||||||||||||||||||||||||||
|
||||||||||||||||||||||||||||
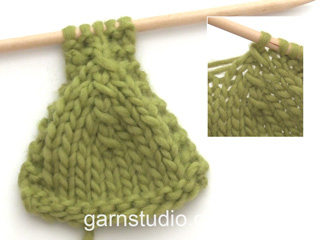
Knitted tunic with lace pattern, worked top down in DROPS Paris. Size: S - XXXL
DROPS 175-6 |
||||||||||||||||||||||||||||
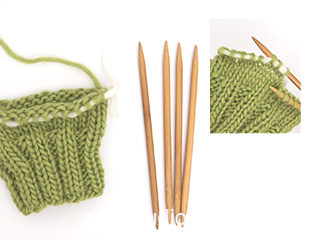
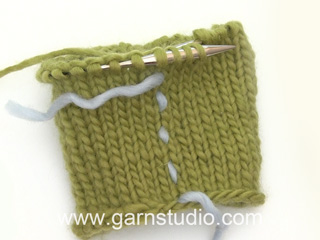
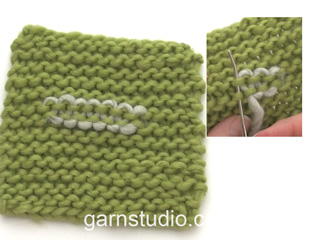
GARTER STITCH (worked in the round): 1 ridge = 2 rounds. Knit 1 round and purl 1 round. GARTER STITCH (back and forth): K all rows. 1 ridge = 2 rows K. RAGLAN: On sleeves increase for raglan with yarn over. Knit yarn overs twisted on next round to avoid holes. Increase as follows: Increase with 1 yarn over after 1st and 3rd marker and before 2nd and 4th marker as follows: Increase every round 0-2-4-0-0-0 times in total. Increase every other round 22-23-23-27-24-26 times in total. Increase every 4th round 0-0-0-0-2-2 times in total (= 22-25-27-27-26-28 times in total) = 48-54-60-60-62-66 stitches in total on each sleeve. PATTERN: See diagrams A.1 to A.8. Choose diagram for your size. DECREASE TIP-1: When working in the round, decrease as follows: Decrease as follows at each marker: Work until 3-3-3-5-6-6 stitches remain before marker, knit 2 together (= 1 stitch decreased), 2-2-2-6-8-8 stitches in garter stitch (marker is in the middle of these stitches), slip 1 stitch knitwise, knit 1, pass slipped stitch over (= 1 stitch decreased). When working back and forth, decrease as follows: All decreases are done from the right side. Work 3-3-3-3-4-4 stitches in garter stitch, slip 1 stitch knitwise, knit 1, pass slipped stitch over (= 1 stitch decreased), work pattern as before until 5-5-5-5-6-6 stitches remain, knit 2 together (= 1 stitch decreased), finish with 3-3-3-3-4-4 stitches in garter stitch. DECREASE TIP-2 (applies to sleeve): Decrease as follows at marker: Work until 3 stitches remain before marker, knit 2 together (= 1 stitch decreased), knit 2 (marker is in the middle of these stitches), slip 1 stitch knitwise, knit 1, pass slipped stitch over stitch worked (= 1 stitch decreased). CAST-OFF TIP: To avoid a tight cast-off edge you may use a needle ½-1 needle size larger. ---------------------------------------------------------- TUNIC: Worked in the round, top down. Cast on 80-84-86-92-96-102 stitches on circular needle size 4.5 mm with Paris. Work 2 ridges in GARTER STITCH - see explanation above. Switch to circular needle size 5.5 mm. Knit 1 round while AT THE SAME TIME increasing 22-18-20-22-26-28 stitches evenly = 102-102-106-114-122-130 stitches. On next round work pattern and increase for RAGLAN - see explanation above, as follows: Work A.1a over the first 21-21-21-23-23-25 stitches, A.2a over next stitch, purl 1, knit 1 (= mid back), purl 1, A.3a over next stitch, A.4a over the next 21-21-21-23-23-25 stitches (= back piece), insert 1st marker, knit 4-4-6-6-10-10, insert 2nd marker (= sleeve), A.1a over the next 21-21-21-23-23-25 stitches, A.2a over next stitch, purl 1, knit 1 (= mid front), purl 1, A.3a over next stitch, A.4a over the next 21-21-21-23-23-25 stitches (= front piece), insert 3rd marker, knit 4-4-6-6-10-10, insert 4th marker (= sleeve). Continue pattern like this. REMEMBER THE KNITTING TENSION When A.1a and A.4a have been worked 1 time vertically, repeat A.1b and A.4b vertically. When A.2a and A.3a have been worked 1 time vertically, there are 298-318-362-378-402-430 stitches on needle. Piece measures approx. 22-24-25-27-28-30 cm on the shortest. Work next round as follows: Continue with A.1b over the first 22-22-22-24-24-26 stitches as before, A.2b over the next 27-29-37-39-44-47 stitches, 1 yarn over, purl 1, knit 1 (= mid back), purl 1, 1 yarn over, A.3b over the next 27-29-37-39-44-47 stitches, A.4b over the next 22-22-22-24-24-26 stitches, slip the next 48-54-60-60-62-66 stitches on a stitch holder for sleeve, cast on 6-6-6-10-12-12 stitches under sleeve, insert 1 marker in the middle of the new stitches (= side marker), A.1b over the next 22-22-22-24-24-26 stitches as before, A.2b over the next 27-29-37-39-44-47 stitches, 1 yarn over, purl 1, knit 1 (= mid front), purl 1, 1 yarn over, A.3b over the next 27-29-37-39-44-47 stitches, A.4b over the next 22-22-22-24-24-26 stitches, slip the next 48-54-60-60-62-66 stitches on a stitch holder for sleeve, cast on 6-6-6-10-12-12 stitches under sleeve, insert 1 marker in the middle of the new stitches (= side marker) = 218-226-258-282-306-326 stitches. Work 1 round pattern, knit yarn over mid front and mid back, they should make holes. Work next round as follows: Continue with * A.1b over the first 22-22-22-24-24-26 stitches as before, A.2b over the next 27-29-37-39-44-47 stitches, A.5a over next stitch (increase 1 stitch in A.5a), purl 1, knit 1 (= mid back/front), purl 1, A.6a over next stitch (increase 1 stitch in A.6a), A.3b over the next 27-29-37-39-44-47 stitches, A.4b over the next 22-22-22-24-24-26 stitches as before, knit 2 together (= 1 stitch decreased), 2-2-2-6-8-8 stitches in garter stitch, slip 1 stitch knitwise, knit 1, pass slipped stitch over (= 1 stitch decreased) *, repeat from *-* 2 times in total. On this round increase 2 stitches mid front and mid back and decrease 2 stitches in each side of piece, i.e. number of stitches is the same. Insert 1 marker thread in piece, NOW MEASURE PIECE FROM HERE. Continue in the round as follows: ROUND/ROW 1: Work 1 round/row with pattern as before (= 1 round/row without yarn over in diagram). ROUND/ROW 2: Work pattern as before and decrease 1 stitch on each side of each side marker – READ DECREASE TIP-1. On this round/row increase 2 stitches mid front and mid back and decrease 2 stitches in each side of piece, i.e. number of stitches is the same. ROUND/ROW 3: Work as 1st round/row. ROUND/ROW 4: Work as 2nd round/row. ROUND/ROW 5: Work as 1st round/row. ROUND/ROW 6: Work as 2nd round/row. ROUND/ROW 7: Work as 1st round/row. ROUND/ROW 8: Work pattern as before. On this round/row increase 2 stitches mid front and mid back = 4 stitches increased in total. Do not decrease before and after side markers. Repeat 1st to 8th round/row until finished measurements. When A.5a and A.6a have been worked 1 time vertically, work A.5b and A.6b vertically. Now work A.7 after A.5b and A.8 before A.6a mid front and mid back until finished measurements, i.e. work increased stitches mid front/back in stocking stitch. When piece measures 18 cm from marker thread under sleeve, adjust so that last round is 1 round with yarn overs, divide piece at side markers, work front piece and back piece separately until finished measurements. FRONT PIECE: (Begin at left side marker. First row = from wrong side). Work pattern and repeat 1st to 8th round/row as before, but work the outermost 3-3-3-3-4-4 stitches in each side of piece in GARTER STITCH – see explanation above. When piece measures 30 cm from marker thread under sleeve, switch to circular needle size 4.5 mm. Work 2 ridges over all stitches. Cast off - READ CAST-OFF TIP. BACK PIECE: Work as front piece. SLEEVE: = 48-54-60-60-62-66 stitches. Work sleeve in the round in stocking stitch on double pointed needles. Slip stitches from stitch holder back on double pointed needles size 5.5 mm and cast on 6-6-6-10-12-12 stitches under sleeve = 54-60-66-70-74-78 stitches. Work in stocking stitch in the round and insert a marker in the middle of the new stitches under sleeve (i.e. 3-3-3-5-6-6 new stitches on each side of marker). NOW MEASURE PIECE FROM HERE! When piece measures 4 cm, decrease 1 stitch on each side of marker - READ DECREASE TIP-2. Decrease like this approx. every 3½-2½-2-2-2-1½ cm 9-12-14-15-16-17 times in total = 36-36-38-40-42-44 stitches. When sleeve measures 43-42-42-41-41-40 cm (NOTE: Shorter measurements in the larger sizes because of longer yoke) switch to double pointed needles size 4.5 mm. Work 2 ridges. Cast off. Work the other sleeve the same way. ASSEMBLY: Sew the opening under the sleeve. |
||||||||||||||||||||||||||||
Diagram explanations |
||||||||||||||||||||||||||||
|
||||||||||||||||||||||||||||
Have you made this or any other of our designs? Tag your pictures in social media with #dropsdesign so we can see them! Do you need help with this pattern?You'll find tutorial videos, a Comments/Questions area and more by visiting the pattern on garnstudio.com. © 1982-2024 DROPS Design A/S. We reserve all rights. This document, including all its sub-sections, has copyrights. Read more about what you can do with our patterns at the bottom of each pattern on our site. |
With over 40 years in knitting and crochet design, DROPS Design offers one of the most extensive collections of free patterns on the internet - translated to 17 languages. As of today we count 304 catalogues and 11422 patterns - 11422 of which are translated into English (UK/cm).
We work hard to bring you the best knitting and crochet have to offer, inspiration and advice as well as great quality yarns at incredible prices! Would you like to use our patterns for other than personal use? You can read what you are allowed to do in the Copyright text at the bottom of all our patterns. Happy crafting!
Comments / Questions (13)
Christiane G wrote:
Bonjour. Je n arrive pas à avoir le bon échantillon. Avec les aiguilles indiquees j ai un demi centimetre de moins. Avec des aiguilles 6 j ai un demi centimetre de plus. Quelles aiguilles choisir pour etre la plus precise possible pourla taille XL? Merci
12.04.2022 - 16:46DROPS Design answered:
Bonjour Christiane, essayez de bloquer votre échantillon (avec les aiguilles 5,5) pour voir si la hauteur s'en trouve ajustée - un blocage (ou même un simple lavage/séchage) aide à donner un air plus régulier aux mailles et peut vous permettre d'obtenir la bonne hauteur (tout en conservant la bonne largeur). Bon tricot!
19.04.2022 - 08:51Kasia wrote:
Mam pytanie może trochę dziwne czy w schematach są pokazane rzędy parzyste i nieparzyste Z góry dziękuje za odpowiedz
18.05.2021 - 21:13DROPS Design answered:
Witaj Kasiu, pytaj zawsze kiedy musisz, nie ma dziwnych pytań :) Schemat przedstawia wszystkie rzędy (parzyste i nieparzyste), widok jest taki jak na prawej stronie robótki. Szczegółowo ten temat jest opisany w kursie TUTAJ. Pozdrawiamy!
19.05.2021 - 18:09Majbritt Teglgaard wrote:
Jeg har problemer med antallet af masker i diagrammetA1a. Jeg vil strikke str xxl. Af diagrammet fremgår det, at der er 23 masker . Af teksten fremgår det, at jeg skal strikke diagrammet over 25 masker. Hvordan gør jeg? Hvis det er over 25 går det op med omgangens samlede antal masker, men hvordan får jeg det til at passe med diagrammet?
27.01.2021 - 00:21DROPS Design answered:
Hei Majbritt. Du strikker A.1a over 23 masker og så strikker du 2 masker av begynnelsen av A.1a = 25 masker av A.1a. God Fornøyelse!
01.02.2021 - 11:09Marita Sløgedal wrote:
Det er nødt til å være feil i forklaringen på økning med raglan. Det står at det skal økes etter merke 1 og 3 og før 2 og 4. Da blir det jo bare 4 masker til erme.....
29.05.2020 - 14:25DROPS Design answered:
Hei Marita. Nei, det er ikke feil. Det økes også i diagrammene på for- og bakstykket, se diagrammene. God Fornøyelse!
03.06.2020 - 10:46Stef wrote:
Bonjour quand vous dites TOUR/RANG 1 : Tricoter 1 tour/rang comme avant (=1 tour/rang sans les jetés dans les diagrammes) cela veut dire ne pas faire de jetés dans tous les diagrammes du rang ou seulement dans les diagrammes A.5a et A.6a. merci
23.06.2017 - 23:44DROPS Design answered:
Bonjour Stef, seulement dans A.5a et A.6a pour conserver le point fantaisie ajouré. Bon tricot!
26.06.2017 - 09:25Lisa-Sophia wrote:
Liebes Drops-Team, vielen Dank für dieses wunderschöne Strickmuster! Ich habe eine Frage zum Aufnehmen ganz am Anfang nach den 2 Krausrippen: Welche Technik sollte ich hierfür verwenden. Bei den Videos ist nur Aufnehmen 5 mit Umschlag. Was hierfür nehme ich an ungeeignet ist. Vielen Dank und herzliche Grüße!
20.06.2017 - 17:06DROPS Design answered:
Liebe Lisa-Sophia, hier können Sie mit Ihrem Lieblingstechnick zunehmen. Viel Spaß beim stricken!
21.06.2017 - 10:01Anne Marie Frolunde wrote:
Jeg har problemer med moensteret. Det er blokken A1 og A4 i str XL. Det er den del af moensteret, hvor der skal laves huller. jeg har ikke masker nok til at lave moensteret. I anden pind fra neden strikker jeg i A1 r,v,r,v,r,v,4r,v,slå om,r,sla om,r loes af, r, den loese over retten,2 r sammen,sla om,og så skulle det være 2r men der er kun 1 maske tilbage inden den gennemgaende retmaske. Hvad goer jeg forkert? Hilsen Anne Marie
09.06.2017 - 11:47DROPS Design answered:
Hej Anne Marie, hvis du sætter en mærketråd på hver side af diagrammet, så du er sikker på at du har 23 masker til at strikke A.1 og A.4 og husk at du ikke skal strikke den rude som er helt sort, den tager du først ud til på 2.pind. God fornøjelse!
09.06.2017 - 15:43LAGUNA wrote:
Bonjour, Comment avez-vous réussi à aller au delà des 2 premiers rangs du point fantaisie? Je suis coincée, je n'arrive pas à savoir quoi faire de mes jetés qui ont créer des mailles, ce qui fait que je n'ai pas du tout de même rendu dans la constitution des diagrammes, je suis sans arrêt décalée. Je désire faire cette tunique pour cet été. Merci d'avance. MINA
19.05.2017 - 15:23DROPS Design answered:
Voir réponse ci-dessous :)
19.05.2017 - 15:32Elizabeth Frost wrote:
Hej Hvor finder jeg mål på størrelsen i opskriften f.eks hvad er målene i omkreds på XL i opskriften Tunika med hulmønster, som jeg har fået mail på str går fra S til XXXL men jeg kan ikke finde cm mål på de forskellige størrelser. Vil jo hverken have den for lille eller foe stor. Hilsen Elizabeth
19.03.2017 - 12:48DROPS Design answered:
Hej Elizabeth. Se nederst paa opskriften, her finder du alle maal i cm per störrelse. Laes ogsaa her nogle tips hvordan du vaelger den rette störrelse
20.03.2017 - 13:22Martha wrote:
Beautiful, can't wait to make it
06.01.2017 - 18:37