
Popular categories
Looking for a yarn?


|
|||||||||||||
Enjoy |
|||||||||||||
|
|
|||||||||||||
DROPS long sleeves less cardigan with wide shoulders crochet in “Muskat”. Sizes XS - XXL
DROPS 99-2 |
|||||||||||||
|
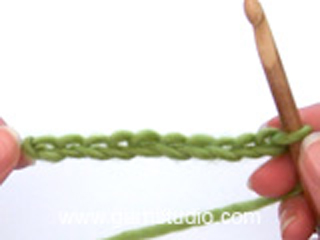
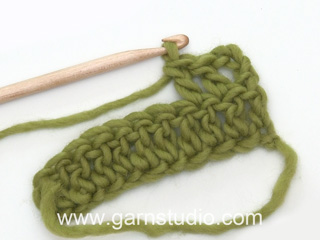
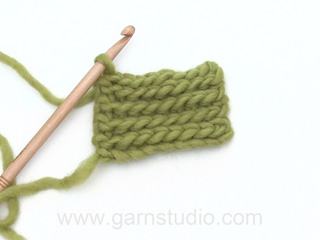
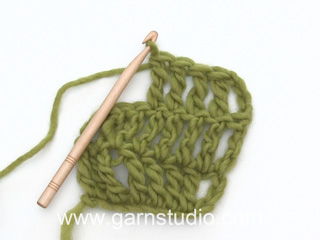
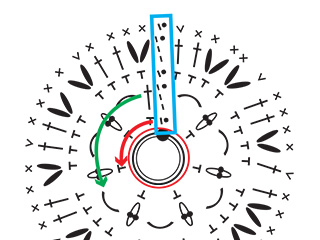
Crochet tension: 16 tr x 10 rows using hook size 4 mm and Muskat =10 x 10 cm. Crochet info: At the beg. of row substitute the tr with 3 ch. Pattern info: See diagram M.1, M.2 and M.3. M.2 is crochet only in size XL and XXL - one time after M.1 Size XS/S–M-L: 1 repeat = M.1 Size XL-XXL: 1 repeat = M.1 + M.2 The diagrams are seen from the RS. English Translations for the wording in the diagrams are given at the bottom of this pattern, and they are given in the vertical order in which they appear in the diagram. Increasing tips: For inc. crochet 1 extra ch-loop at the end of a row with ch-loops. Crochet until finish, then crochet 8 ch, 1 dc in the last dc. Turn and crochet the first dc in the new ch-loop. Cast off tips: For rows with dtr: Cast off as follows at beg. of row: Substitute 3 dtr with 3 sl sts. Cast off as follows at the end of row: Turn when there are 3 dtr left to cast off. For rows with ch-loops: Cast off as follows from beg. of row: Crochet sl sts over the the last ch-loop from previous row. Cast off as follows at the end of row: Turn when 1 ch-loop is left. Crochet squares: 1 crochet square measures approx. 13 x 13 cm. Crochet squares: Crochet 5 ch and make a ring with a sl st. Read crochet info! 1st round: crochet 16 tr in the ring. 2nd round: 1 dc in the first tr, *3 ch, skip 1 tr, 1 dc in the next tr*, repeat from *-* and finish with 3 ch and a sl st in the first dc = 8 ch-loops. 3rd round: *1 tr in each dc, 3 tr in each ch-loop*, repeat from *-* and finish with a sl st in the first tr = 32 tr 4th round: 1 dc in the first tr, *3 ch, skip 1 tr, 1 dc in the next tr*, repeat from *-* and finish with 3 ch and a sl st in the first dc = 16 ch-loops 5th round: *1 tr in each dc and 2 tr in each ch-loop*, repeat from *-* until finish round and finish with a sl st in the first tr = 48 tr 6th round: *1 dc in the first tr, 5 ch, skip 2 tr, 1 dc in the next tr*, repeat from *-* and finish with 5 ch and a sl st in the first dc = 16 ch-loops 7th round: Crochet sl sts until the middle of the first ch-loop *(7 ch, 1 dc in the next ch-loop), repeat from (-)a total of 3 times, 10 ch (=corner), 1 dc in the next ch-loop*, repeat from *-* until finish round. Cut and sew the thread. Crochet a total of 6-7-8-9-10 squares. Put the squares on top of each other 2 by 2 and crochet as follows: 1 dc in the outer most ch-loop of both squares, * 5 ch, 1 dc in the next ch-loop of both squares*, repeat from *-* until the squares are crochet tog. as a long string. Continue to crochet the sleeves less cardigan from the squares and down in one piece, and then the top part. Bottom piece: Crochet the first row from the WS. Crochet 120-144-168-192-216 dc in the bottom edge of the string of crochet squares (crochet approx. 20-20-21-21-22 dc in each square) Turn and crochet according to M.1A over the first 3 dc, repeat M.1B over the next 114-138-162-186-210 dc and finish with M.1C. Work M.1 (M.1 + M.2 for size XL and XXL) – read pattern info, 2 times in total. AT THE SAME TIME when M.1 is worked for the 2nd time, on 1st row inc 6 dtr evenly distributed = 126-150-174-198-222 dtr. Them work according to M.3, AT THE SAME TIME on 1st row inc 6 dtr evenly distributed = 132-156-180-204-228 dtr. Cut and sew the thread tight. The piece measures approx. 30-30-30-34-34 cm. Top piece: Crochet the first row from the WS. Crochet 120-144-168-192-216 dc in the top edge of the string of squares. Split the work and finish front and back pieces separately. All measures are done from the top edge of the string of squares. Right front: 1st row = RS. Crochet M.1 (M.1 + M.2 for size XL and XXL) – read pattern info over 30-36-42-48-54 dc at the right side of the piece. (crochet M.1A over the first 3 dc then repeat M.1B over the next 24-30-36-42-48 dc and finish with M.1C). At the same time at the end of the 6th, 8th and 10th row of M.1 inc. for wide shoulder – read increasing tips above. At the same time cast off 3 dtr/ 1 ch-loop for the neck shaping on every 2.5 cm a total of 4-4-4-5-5 times – read casting off tips. After a total of 2 vertical repeats of M.1 (M.1 + M.2 for size XL and XXL) are completed crochet M.3. After all dec. and inc. are completed there are 27-33-39-42-48 dtr left for each shoulder. Cut and sew the thread tight when the piece measures approx. 30-30-30-34-34 cm. The total length of the cardigan is approx. 73-73-73-81-81 cm Left from piece: Crochet as right front but reverse. NB: To get the cast off edges look the same each side, beg. the left front piece at the mid front. 1st row is the WS. Back piece: 1st row =RS. Crochet M.1 (M.1 + M.2 for size XL and XXL) – read pattern info over the mid 60-72-84-96-108 dc. (Crochet M.1A over the first 3 dc, repeat M.1B over the next 54-66-78-90-102 dc and finish with M.1C). At the same time at the end of the 6th to 11th row inc. for wide shoulder as done for the front pieces. Crochet a total of 2 repeats of M.1 (M.1 + M.2 for size XL and XXL) then crochet M.3 (after all inc. for the wide shoulder there are 78-90-102-114-126 dtr) At the same time on the 3rd row of M.3 crochet 1 row but only over the outer most 27-33-39-42-48 dtr/ch each side (do not crochet over the mid 24-24-24-30-30 dtr/ch= neck line). Crochet the last row of M.3, cut and sew the thread, the piece measures approx. 330-30-30-34-34 cm. Assembly: Sew the shoulder seams with small neat stitches. Sew approx. 4 cm tog. under neath the armhole, i.e. up to where the inc. for the shoulder beg. Crochet edge: Crochet and edge around the armholes and up along the opening of the sleeve less cardigan as follows: Crochet up along one side of the front piece around the neck opening and down along the other front piece: 1st row: Crochet 1 dc, *3 ch, skip over approx. 1-1.5 cm, 1 dc*, repeat from *-* until finish. 2nd row: 1 dc in each dc and 2 dc in each ch-loop (in the transitions between the neck and front pieces crochet 4 dc in each ch-loop). 3rd row: 1 tr in each dc. Twisted string: Cut 4 threads Muskat of approx 3 meters. Twist them tog until they resist, double thread and let it twist tog. Tie knot approx 5 cm from each end of the string. Pull thread up and down through the 2nd round of dtr above the crochet squares. Make a tassel for each end: cut 25 threads Muskat of approx. 25 cm each. Split the string above the knot and pull the threads through the split. Knot the threads tog. and twist 1 of them around the top of the tassel to keep it tog. Cut and sew the thread. |
|||||||||||||
Diagram explanations |
|||||||||||||
|
|||||||||||||

|
|||||||||||||
|
Have you made this or any other of our designs? Tag your pictures in social media with #dropsdesign so we can see them! Do you need help with this pattern?You'll find tutorial videos, a Comments/Questions area and more by visiting the pattern on garnstudio.com. © 1982-2024 DROPS Design A/S. We reserve all rights. This document, including all its sub-sections, has copyrights. Read more about what you can do with our patterns at the bottom of each pattern on our site. |
|||||||||||||


With over 40 years in knitting and crochet design, DROPS Design offers one of the most extensive collections of free patterns on the internet - translated to 17 languages. As of today we count 304 catalogues and 11422 patterns - 11422 of which are translated into English (UK/cm).
We work hard to bring you the best knitting and crochet have to offer, inspiration and advice as well as great quality yarns at incredible prices! Would you like to use our patterns for other than personal use? You can read what you are allowed to do in the Copyright text at the bottom of all our patterns. Happy crafting!
Comments / Questions (66)
Proszę o weryfikację tłumaczenia - po polsku wszędzie są oczka ścisłe, natomiast w wersji angielskiej (i na diagramie!) półsłupki/single crochet. Zdanie "przerabiać w tę i z powrotem od środka przodu" (po połączeniu kwadratów) też mnie zastanawia, chodzi o to, żeby zacząć od brzegu?
22.05.2024 - 21:25DROPS Design answered:
Witaj Beato, w polskim nazewnictwie używa się obydwu pojęć. Proszę zapoznaj się z filmikiem TUTAJ. Co do drugiego pytania - od środka przodu oznacza po prostu od brzegu. Pozdrawiamy!
23.05.2024 - 08:25Hello. Thank you for this lovely pattern! Please can you confirm, for the top piece, do you decrease every 2.5 cm straight away or do the decreases begin on the 6th row (where the increases start)?
16.05.2023 - 00:24DROPS Design answered:
Dear Mrs Bailey, start decreasing after the first 2,5 cm. Happy crocheting !
16.05.2023 - 09:19Hello! This is a beautiful pattern. I have a question about how to do the increases on rows 6-11? Where does the extra loop go? I tried watching your video but it is for something very different. Thank you!
08.07.2022 - 07:44DROPS Design answered:
Dear Halle, crochet to the end of the row to the last chain space (= as before), and now crochet 8 chain stitches, 1 sc in the last sc = you have increased one extra ch-space towards armhole. Happy crocheting!
08.07.2022 - 10:04Coulc you please kindly confirm whether the present shade of Muskat 01 Lavender is the same colour as the "01 Light blue lilac" used in the original pattern (99-2), or which colour is most similar to the original pattern? Thank you!
26.05.2021 - 14:53DROPS Design answered:
Dear Juanita, yes always check the colour number, since colour names might be adjusted. Happy crocheting!
26.05.2021 - 15:48Beginn 1. Vorderteil, da steht, über feste Maschen, aber ich habe doch das Teil mit Doppelstäbchen beendet! Welche festen Maschen sind denn gemeint bitte????
28.03.2021 - 08:17DROPS Design answered:
Liebe Frau Heistermann, den oberen Teil ("Oberteil", d.h. der Teil. der ab den Vierecken nach oben gehäkelt wird) vor dem rechten Vorderteil beenden Sie mit festen Maschen, nicht mit Doppelstäbchen. Das Unterteil wird mit Doppelstäbchen beendet. Gutes Gelingen weiterhin!
04.04.2021 - 23:57Por favor, como se unen los cuadrados?
16.02.2021 - 00:09DROPS Design answered:
Hola, como se unen los cuadrados se encuentra AQUI. Buen trabajo!
16.02.2021 - 10:27Hoe krijg ik 21 vasten per vierkantje netjes gehaakt op de rij met vierkantjes? Wat ik ook doe het blijft trekken....
14.02.2021 - 17:54DROPS Design answered:
Dag Jolanda,
Verdeel de vasten zo goed mogelijk, na verloop van tijd gaat, als het goed is, dit trekken wel weg, wanneer je verder haakt met de daaropvolgende toeren.
15.02.2021 - 09:37Hoe krijg ik 21 vasten/vierkantje netjes gehaakt? Het blijft bij mij trekken% vind 21 vasten ook wel weinig om te verdelen over de boogjes van de laatste ronde in de cirkel.
14.02.2021 - 17:51Guten tag \r\nIch sehe keine anleitung diesr schritte \r\nM1A über ersten 3 fM häkeln, über die nächsten 114-138-162-186-210 fM M1B wiederholen und mit M1C abschliessen. Wo ist das geschrieben
27.12.2020 - 10:05DROPS Design answered:
Liebe Frau Reisen, jetzt sollen Sie das Diagram folgen: M.1A wie im Diagram gezeigt über die 3 ersten Maschen (bei den Hinreihen, bei den Rückreihen enden Sie mit diesen 3 Maschen), dann wiederholen Sie die 6 Maschen in M.1B bis 3 Maschen bleiben und enden Sie mit M.1C. Hier lesen Sie mehr über Diagramme. Viel Spaß beim häkeln!
04.01.2021 - 09:33Bonjour, j en suis en haut du gilet, pouvez vous m expliquer à propos des diminutions , j ai pas compris le procédé, je vous remercie .
12.03.2020 - 17:01DROPS Design answered:
Bonjour Lisa, vous trouverez comment diminuer sous DIMINUTIONS, par ex si vous devez diminuez 3 brides en début de rang, crochetez 1 mc dans chacune des 3 premières mailles (= 3 diminutions), puis 1 mc dans la suivante, 4 ml (= 1ère DB) et continuez le rang jusqu'à ce qu'il reste 3 mailles, tournez sans crocheter ces 3 mailles. Bon crochet!
12.03.2020 - 17:11