
Popular categories
Looking for a yarn?


|
||||||||||||||||||||||
Yesterday |
||||||||||||||||||||||
|
|
||||||||||||||||||||||
Crochet DROPS jumper with lace pattern, round yoke and detachable collar, worked top down in ”Merino Extra Fine”. Size: S - XXXL.
DROPS 156-18 |
||||||||||||||||||||||
|
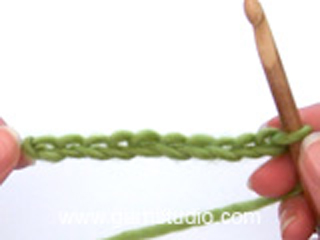
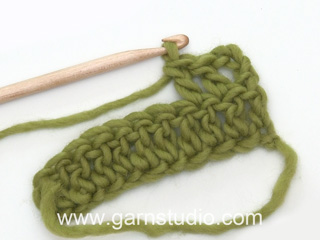
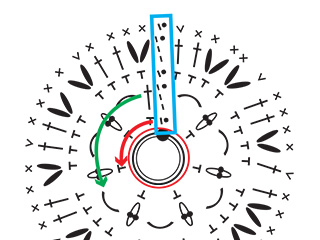
PATTERN: See diagrams A.1-A.4. CROCHET INFO: Replace first dc on every round with 3 ch. Finish every dc round with 1 sl st in 3rd ch from beg of round. Replace first sc on every round with 1 ch. Finish every sc round with 1 sl st in 1st ch on round. INCREASE TIP: Inc 1 st by working 2 dc in 1 dc, first on one side of all markers on round, next time on the other side of all markers on round, continue inc like this. DECREASE TIP: Work 1 dc but wait with last pull through (= 2 sts on hook), then work next dc but on last pull through, pull yarn through all sts on hook = 1 dc dec. ---------------------------------------------------------- BODY: The piece is worked top down. Worked in the round from mid back. Work 93-98-103-113-118-128 ch on hook size 4.5 mm/US 7 with Merino Extra Fine and form a ring with 1 sl st in first ch. Work next round as follows: ch 1, 1 sc in first ch, 1 sc in each of the next ch 2, * skip ch 1, 1 sc in each of the next 4 ch *, repeat from *-* = 76-80-84-92-96-104 sc – READ CROCHET INFO. Then work an elevation in the back of neck as follows: ROUND 1 (= RS): Beg mid back, work ch 1, 1 sc in 1st sc, * ch 1, skip 1 sc, 1 sc in next sc *, repeat from *-* around the neck AT THE SAME TIME insert 1 marker after 38-40-42-46-48-52 sts (= mid front), turn piece. ROW 2 (= WS): Work 1 sc in every ch and 1 ch over every sc around the neck until 28-30-32-36-38-42 sts remain until marker, turn piece. ROW 3: Work 1 sc in every ch and 1 ch over every sc until 28-30-32-36-38-42 sts remain until marker, turn piece. ROW 4: Work 1 sc in every ch and 1 ch over every sc around the neck until 22-24-26-30-32-36 sts remain until marker, turn piece. ROW 5: Work 1 sc in every ch and 1 ch over every sc around the neck until 22-24-26-30-32-36 sts remain until marker, turn piece. ROW 6: Work 1 sc in every ch and 1 ch over every sc around the neck until 16-18-20-24-26-30 sts remain until marker, turn piece. ROW 7: Work 1 sc in every ch and 1 ch over every sc until 16-18-20-24-26-30 sts remain until marker, turn and work back to mid back. Then work in the round with dc AT THE SAME TIME on 1st round insert 19-20-21-23-24-26 markers in piece as follows: Insert 1st marker at beg of round (= mid back), then insert 18-19-20-22-23-25 markers 4 dc apart, after last marker there are 4 dc. Work in the round with dc AT THE SAME TIME inc 1 dc at all markers as follows: Inc every other round 5-6-6-5-5-6 times, and every 4th round 2-2-2-3-3-3 times - READ INCREASE TIP = 209-240-252-276-288-338 dc. Work a round while at the same time inc 14-7-7-7-19-5 dc evenly = 223-247-259-283-307-343 dc. REMEMBER THE CROCHET GAUGE! On next round work as follows from mid back: 30-34-37-41-45-52 dc, 8 ch (under sleeve), skip 52-56-56-60-64-68 dc from previous round (to be used for sleeve later), 60-68-74-82-90-104 dc (front piece), 8 ch (under sleeve), skip 52-56-56-60-64-68 dc from previous round (to be used for sleeve later) and 29-33-36-40-44-51 dc = 135-151-163-179-195-223 dc/ch. Insert a marker, now measure piece from here! Work 1 dc in every dc/ch AT THE SAME TIME dec 8-8-8-12-12-12 sts evenly – READ DECREASE TIP = 127-143-155-167-183-211 dc. Continue to work as follows: Work A.1, A.2 30-34-37-40-44-51 repetitions in total in width, finish with A.3. Continue pattern like this. When A.1-A.3 have been worked 1 time vertically, repeat A.4 vertically until finished measurements. When piece measures 14-14-14-15-15-15 cm / 5½"-5½"-5½"-6"-6"-6" from marker, adjust so that next round is last round in A.4, inc 1 repetition of A.2 in 8th-9th-9th-10th-11th-13th repetition in ch-space as follows: Work ch 2, 1 sc in ch-space, ch 2, 1 dc in same ch-space, ch 2, 1 sc in same ch-space. Work 14-16-19-20-22-25 repetitions of A.2, in next repetition of A.2 inc the same way. Then continue as before = 32-36-39-42-46-53 repetitions of A.2 in width. Fasten off when piece measures 34-34-36-35-37-37 cm / 13½"-13½"-14¼"-13¾"-14½"-14½" from marker, adjust to finish with next to last round in A.4, piece measures 56-58-60-62-64-66 cm / 22"-22¾"-23⅝"-24⅜"-25¼"-26" in total. SLEEVE: Sleeve is worked in the round, top down. Insert a marker, now measure piece from here! Beg by working mid under sleeve as follows: Work 1 sc in 5th ch of the 8 ch work in armhole on body, 3 ch (= 1 dc), work 1 dc in each of the next ch 3, 1 dc in every dc over sleeve, then work 1 dc in each of the remaining 4 ch under sleeve = 60-64-64-68-72-76 dc. Insert 1 marker mid under sleeve. Continue to work as follows: 1 dc in each of the first 11-11-11-13-13-15 dc AT THE SAME TIME dec 1 dc (= 10-10-10-12-12-14 dc), A.1, A.2 8-9-9-9-10-10 times in width, A.3, work 1 dc in each of the last 10-10-10-12-12-14 dc. Continue with 1 dc in each of the 20-20-20-24-24-28 dc mid under sleeve and A.1-A.3 over sleeve. When A.1-A.3 have been worked 1 time vertically, repeat A.4 vertically until finished measurements. Continue this pattern AT THE SAME TIME when piece measures 4 cm / 1½", dec 1 dc on each side of marker - Remember DECREASE TIP. Repeat dec every 3½-3½-3½-2½-2½-2 cm / 1¼"-1¼"-1¼"-⅞"-⅞"-¾" 9-9-9-11-11-13 more times. Now work only A.1-A.3 over sleeve. Fasten off when sleeve measures 43½-42½-42½-39½-40-38 cm / 17"-16¾"-16¾"-15½"-15¾"-15", adjust to finish with next to last round in A.4 – NOTE – shorter measurements in the larger sizes because of wider neck and shoulders. Work the other the same way. DETACHABLE COLLAR: Worked in the round. Work 99 ch on hook size 4.5 mm/US 7 with Merino Extra Fine and form a ring with 1 sl st in 1st ch. Work 3rd row in A.1, 3rd row in A.2 23 times and 3rd row in A.3. Repeat A.4 vertically until finished measurements. When piece measures 8 cm / 3⅛", adjust so that next round is last round in A.4, inc 1 repetition of A.2 in each side of piece as follows: Work A.1, then work first A.2 as follows: Work ch 2, 1 sc in ch-space, ch 2, 1 dc in same ch-space, ch 2, 1 sc in same ch-space. Work as before until 1 repetition of A.2 remains before A.3, in next repetition of A.2 inc the same way. Then work as before (= 25 repetitions of A.2 in width) until piece measures approx. 20 cm / 8", adjust to finish with next to last row in A.4. Fasten off. |
||||||||||||||||||||||
Diagram explanations |
||||||||||||||||||||||
|
||||||||||||||||||||||

|
||||||||||||||||||||||

|
||||||||||||||||||||||
|
Have you made this or any other of our designs? Tag your pictures in social media with #dropsdesign so we can see them! Do you need help with this pattern?You'll find tutorial videos, a Comments/Questions area and more by visiting the pattern on garnstudio.com. © 1982-2024 DROPS Design A/S. We reserve all rights. This document, including all its sub-sections, has copyrights. Read more about what you can do with our patterns at the bottom of each pattern on our site. |
||||||||||||||||||||||


With over 40 years in knitting and crochet design, DROPS Design offers one of the most extensive collections of free patterns on the internet - translated to 17 languages. As of today we count 304 catalogs and 11422 patterns - 11417 of which are translated into English (US/in).
We work hard to bring you the best knitting and crochet have to offer, inspiration and advice as well as great quality yarns at incredible prices! Would you like to use our patterns for other than personal use? You can read what you are allowed to do in the Copyright text at the bottom of all our patterns. Happy crafting!
Comments / Questions (68)
Gracias por la ayuda! Ahora sí lo entiendo! Solo una pregunta... La primera vuelta del diagrama, la de los puntos altos... Esa no se teje no? Es la base de la que partes para hacerlo y ya está tejida de antes verdad? Gracias!
21.02.2024 - 11:35DROPS Design answered:
Hola Natalia, sí, la vuelta con la estrella se explica en el patrón escrito, no hay que repetirla; empiezas a trabajar el diagrama sobre esta vuelta.
26.02.2024 - 21:14Buenos días. Perdón pero es mi primer patrón y tengo dudas en esta parte: Trabajar A.1, A.2 34repeticiones en el ancho, finalizar con A.3. Continuar con el patrón de la misma manera. Cuando y A.1-A.3 se han trabajado 1 vez en vertical, repetir A.4 en vertical ..que significa cuando A1 - A3 se hayan trabajado en vertical? Luego lo que sigue de aumentar con A2 tampoco lo entiendo bien. Gracias!
17.02.2024 - 17:40DROPS Design answered:
Hola Natalia, se trabaja A.1, A.2 34 veces y A.3 en una fila. Cuando hayas trabajado todas las filas, de abajo arriba, de los diagramas A.1, A.2 y A.3, se dice que es una repetición en vertical de los diagramas. Ahora repites A.4 (una sección de los diagramas A.1, A.2 y A.3, como se ve en el diagrama, quitando la 1ª fila) trabajando todas las filas (cuando trabajas la fila superior vuelves a la 1ª fila, abajo, de A.4) hasta alcanzar las medidas finales. Los aumentos de A.2 se hacen en una de las 34 repeticiones de A.2; en tu talla es en la 9ª repetición.
18.02.2024 - 23:32Thanks for help with the diagram. My next question is, the collar. Is it completely separate or do you attach it to the neck line?
25.05.2023 - 23:40DROPS Design answered:
Hi Adele, The neck is not attached, but you can attach it if you wish. Happy crafting!
26.05.2023 - 06:40Is the collar completely separate or does it get attach to the neck somehow?
25.05.2023 - 23:38DROPS Design answered:
Dear Mrs Grobler, collar is completely separate and will not be attached. Happy crocheting!
26.05.2023 - 10:13I need help when the pattern starts with the diagram, continue work: A1, A2 30-34-37 repetions in total finish with A3 ? I have to do 37 repetitions but don't understand the diagram I can only do 21? Please explain the start of the lace pattern of the body
23.05.2023 - 09:23DROPS Design answered:
Dear Mrs Grobler, you have 155 sts in 3rd size, and work now as follows: A.1 over the first 4 sts, then repeat the 4 sts in A.2 a total of 37 times (= over the next 148 sts), and finish the round with the 3 sts in A.3 => 4+148+3= 155 sts. Happy crocheting!
23.05.2023 - 13:55Ik kom er ook niet uit met de hals (maat m): moet ik toer 1 eerst afmaken en dan keren en dus maar 10 steken in de 2e toer haken of keer ik bij de 40 steken en haak ik middenachter een toer lager verder tot 30 steken voor de markeerder? Alvast bedankt voor jullie reactie!
30.01.2023 - 21:09DROPS Design answered:
Dag Ria,
Het is inderdaad niet heel duidelijk omschreven, maar je haakt inderdaad de eerste toer helemaal in de rondte en je zet halverwege (midden voor) een markeerder. Daarna beginnen de verkorte toeren voor de verhoging aan de achterkant van de hals.
01.02.2023 - 20:39Hoe voorkom ik dat de naad achter op de rug scheef wegloopt? Ik heb dat iedere keer als ik rondhaak met stokjes. Met vriendelijke groet, Josine Leeuwerink
16.08.2022 - 15:11DROPS Design answered:
Dag Leeuwarink,
Bij het in de rondte haken heeft het werk inderdaad vaak de neiging om scheef te trekken. De beste manier om dit te voorkomen is door heen en weer te haken. Dus je sluit dan wel de toer, maar keert het werk en haakt terug. Zo ga je steeds heen en weer.
16.08.2022 - 21:15Hoe haak ik 1 vaste in elke losse en 1 losse bóven elke vaste??? (Toer 2-7)
18.05.2022 - 17:14DROPS Design answered:
Dag Aiga,
Je steekt de naald in de losse en hier haak je een vaste in, vervolgens haak je een losse en sla je een vaste van de vorige toer over. Vervolgens haak je weer een vaste in de volgende losse van de vorige toer en zo verder.
19.05.2022 - 21:03Hvis halsen starter med 99 lm, vil den vel ikke passe til de 103 lm (str. M) som er i blusens halshul? Kan man hækle halsen direkte fra halshullet i blusen, hvis man laver en ekstra rapport af A2 i f.t. opskriften (99+4 =103 masker)? Eller skal halsen hækles for sig selv og derefter fæstnes på blusen? Hvordan fæstnes den i så fald? - skal den sys fast eller hækles fast? Og hvordan får man halsens 99 masker til at passe i halshullets 103?
28.03.2022 - 13:09DROPS Design answered:
Hej Sarah, nej det er ikke tanken at den skulle hæftes til blusen. MEN naturligvis kan du hækle de 2 stykker sammen - God fornøjelse!
30.03.2022 - 15:05Ik ben nu aangekomen bij het lijf waar de meerderingen worden gemaakt. Er staat haak tot 14cm vanaf de marker en pas dan aan zodat de volgende toer de laatste is in A4. betekent dat dat je vanaf de 14cm verder haqkt totdat je de laatste toer in A4 bereikt en dan de meerderingen doet? Bedankt voor jullie hulp!
15.01.2022 - 23:44DROPS Design answered:
Dag Alice,
Nee, het betekent dat je ervoor zorgt dat je 14 cm hebt gehaakt én dat de volgende toer die je moet haken de laatste toer in A.4 is.
16.01.2022 - 14:05