
Popular categories
Looking for a yarn?


|
|
Sweet Buttercup Vest |
|
|
|
|
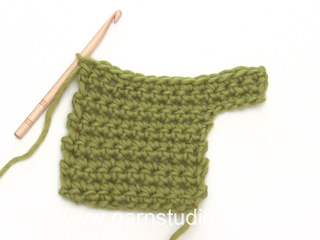
Crochet waistcoat with fan pattern for baby and children in DROPS BabyMerino
DROPS Baby 19-7 |
|
|
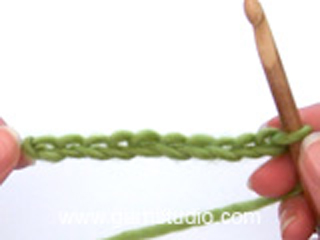
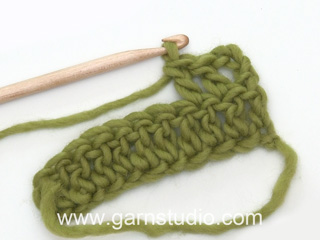
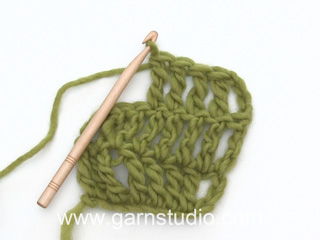
WAISTCOAT: CROCHET INFO: Replace first dc on each row with ch 3. Finish each row with 1 dc in 3rd ch from beg of previous row. INCREASING TIP-1 (applies to armhole and neckline): When inc more than 1 dc crochet the same number of ch as dc to be inc + 2 extra ch at the end of the row, turn piece and crochet 1 dc in 4th ch from hook (= 2 dc), then crochet 1 dc in each of the remaining ch. Continue as before. INCREASING TIP-2: Inc 1 dc by working 2 dc in the same dc. BUTTONHOLES: Make buttonholes on right front band. 1 BUTTONHOLE = replace 3rd dc from mid front with ch 1. On next row crochet 1 dc in this ch. Make buttonholes when piece measures (measured from shoulder, the first buttonhole should be approx 1 cm / ⅜" after the last inc for neck): SIZE 1/3 MONTHS: 8, 11 and 14 cm / 3⅛", 4⅜" and 5½". SIZE 6/9 MONTHS: 9, 12 and 15 cm / 3½", 4¾" and 6". SIZE 12/18 MONTHS: 9, 13 and 17 cm / 3½", 5⅛" and 6¾". SIZE 2 YEARS: 10, 14 and 18 cm / 4", 5½" and 7". SIZE 3/4 YEARS: 11, 15 and 19 cm / 4½", 6" and 7½". --------------------------------------------------------- --------------------------------------------------------- Back piece and both front pieces are crochet separately from shoulder and down to below the armholes. Now pieces are sewn tog and the body piece is worked in one piece back and forth from mid front in fan pattern. RIGHT SHOULDER BACK PIECE: With hook size 3.5 mm/E/4 and Baby Merino ch 10-12-14 (16-18) LOOSELY. ROW 1: Crochet 1 dc in 4th ch from hook, then 1 dc in each ch = 8-10-12 (14-16) dc on row, turn piece. ROW 2: See CROCHET INFO! Now crochet 1 dc in each dc, AT THE SAME TIME inc 2 dc towards neckline – See INCREASING TIP-1 = 10-12-14 (16-18) dc, turn piece. Put piece aside and crochet left shoulder in the same way, turn piece. ROW 3: Crochet 1 dc in each dc on left shoulder, then ch 10-12-14 (16-18) (= neckline back), then 1 dc in each dc on right shoulder, turn piece. ROW 4: Crochet 1 dc in each dc and 1 dc in each ch on neckline = 30-36-42 (48-54) dc on row. Continue with dc on back piece. AT THE SAME TIME when piece measures 5-6-7 (8-9) cm / 2"-2⅜"-2¾" (3⅛"-3½") inc for armhole each side at the end of every row as follows – See INCREASING TIP-1: 1 dc 1 time, 2 dc 1 time and 4 dc 1 time = 44-50-56 (62-68) dc on row. When back piece measures 11-12-13 (14-15) cm / 4⅜"-4¾"-5⅛" (5½"-6") (= 1 cm / ⅜" after the last inc), put piece aside and crochet the front pieces. RIGHT FRONT PIECE: With hook size 3.5 mm/E/4 and Baby Merino ch 10-12-14 (16-18) LOOSELY. ROW 1: Crochet 1 dc in 4th ch from hook, then 1 dc in each ch = 8-10-12 (14-16) dc, turn piece. Now crochet 1 dc in each dc. When piece measures 2-3-2 (3-3) cm / ¾"-1⅛"-¾" (1⅛"-1⅛") inc 1 dc towards mid front for neckline – See INCREASING TIP-2. Repeat the inc on every row a total of 5-5-6 (6-7) times, then inc 6-7-7 (8-8) dc 1 time. AT THE SAME TIME when piece measures 5-6-7 (8-9) cm / 2"-2⅜"-2¾" (3⅛"-3½") inc for armhole at the side as described for back piece – remember buttonholes on front band – SEE ABOVE. When all inc are complete there are 26-29-32 (35-38) dc on row. When piece measures 11-12-13 (14-15) cm / 4⅜"-4¾"-5⅛" (5½"-6") – adjust length to back piece - put piece aside and crochet left front piece. LEFT FRONT PIECE: Crochet like right front piece but mirrored – NOTE: Do not make buttonholes! ASSEMBLY: Sew shoulder seams edge to edge with neat sts. Sew side seams edge to edge – there are now 96-108-120 (132-144) dc on row. FAN PATTERN: Continue back and forth for body piece from mid front as follows: ROW 1: Crochet 1 dc in each dc, AT THE SAME TIME inc 8 dc evenly (do not inc on 4 dc each side towards mid front = front bands) = 104-116-128 (140-152) dc on row. ROW 2: ch 3, 1 dc in each of the next 3 dc (= front band), * ch 2, skip approx 2 dc, 1 sc in next dc *, repeat from *-* so that you will have 30-34-38 (42-46) ch-loops and 6 or 7 dc remain, ch 2 and finish with 1 dc in each of the last 4 dc on row (= front band), turn piece. There are now 31-35-39 (43-47) ch-loops with 4 dc each side for front band. ROW 3: ch 3, 1 dc in each of the next 3 dc, skip first ch-loop, * 4 dc + ch 2 + 4 dc in next ch-loop, 1 dc in next ch-loop *, repeat from *-* until 2 ch-loops remain, crochet 4 dc + ch 2 + 4 dc in next ch-loop, skip last ch-loop and finish with 1 dc in each of the 4 dc on front band = 15-17-19 (21-23) fans with 4 dc each side towards mid front, turn piece. ROW 4: ch 3, 1 dc in each of the next 3 dc, * 4 dc + ch 2 + 4 dc in the middle of the next dc-group (i.e. in ch-loop in the dc-group), 1 dc in dc from previous row *, repeat from *-* until 1 dc-group remain, 4 dc + ch 2 + 4 dc in the middle of this dc-group and finish with 1 dc in each of the 4 dc on front band, turn piece. Now repeat row 4 until piece measures approx 18-20-23 (23-25) cm / 7"-8"-9" (9"-9¾") from shoulder. CROCHET NEXT ROW AS FOLLOWS: ch 4, 1 tr in each of the next 3 dc, * 4 tr + ch 2 + 4 tr in the middle of next dc-group, 1 tr in dc from previous row *, repeat from *-* until 1 dc-group remain, 4 tr + ch 2 + 4 tr in the middle of this dc-group and finish with 1 tr in each of the 4 dc on front band, turn piece. Repeat this row until piece measures approx 23-25-28 (30-32) cm / 9"-9¾"-11" (11¾"-12½") from shoulder. Cut and fasten threads. CROCHET BORDER: Crochet a border along the opening with hook size 3.5 mm/E/4 and Baby Merino as follows – beg at the bottom of right front piece and crochet up along front piece and neckline on front piece: * ch 3, skip approx 1 cm / ⅜", 1 sc in next st *, repeat from *-* up to the shoulder seam, * skip approx 2 cm / ¾", 3 dc + ch 2 + 3 dc in next st, skip approx 2 cm / ¾", 1 sc in next st *, repeat from *-* along neckline on back piece to the other shoulder seam, * ch 3, skip approx 1 cm / ⅜", 1 sc in next st *, repeat from *-* along neckline and front band on left front piece. ARMHOLE: Crochet 1 sc in first st, * skip approx 2 cm / ¾", 3 dc + ch 2 + 3 dc in next st, skip approx 2 cm / ¾", 1 sc in next st *, repeat from *-* and finish with 1 sl st in first st from beg of round. ASSEMBLY: Sew on buttons. |
|

|
|
|
Have you made this or any other of our designs? Tag your pictures in social media with #dropsdesign so we can see them! Do you need help with this pattern?You'll find tutorial videos, a Comments/Questions area and more by visiting the pattern on garnstudio.com. © 1982-2024 DROPS Design A/S. We reserve all rights. This document, including all its sub-sections, has copyrights. Read more about what you can do with our patterns at the bottom of each pattern on our site. |


With over 40 years in knitting and crochet design, DROPS Design offers one of the most extensive collections of free patterns on the internet - translated to 17 languages. As of today we count 304 catalogs and 11422 patterns - 11417 of which are translated into English (US/in).
We work hard to bring you the best knitting and crochet have to offer, inspiration and advice as well as great quality yarns at incredible prices! Would you like to use our patterns for other than personal use? You can read what you are allowed to do in the Copyright text at the bottom of all our patterns. Happy crafting!
Comments / Questions (35)
När jag virkar ena framstycket går det bra, men när jag försöker virka det andra åt motsatt håll, så blir det ett dera ett varv mindre för att jag ska kunna öka ut i slutet på varvet annars blir det liksom avigt... vad gör jag för fel...?
18.08.2023 - 15:05DROPS Design answered:
Hei Ingegerd Litt vanskelig gå vite hva du gjør feil, men vi skal hjelpe deg så godt vi kan. Hvilken str. hekler du / hvor mange masker har du etter etter 1. rad. mvh DROPS Design
21.08.2023 - 09:01When crocheting the shell pattern down from the double-crochet bodice, the pattern says to start with treble crochet and then change to double crochet lower down, but the picture looks like it should be the other way round. Please confirm which way round it should be.
20.06.2023 - 12:38DROPS Design answered:
Dear Rachel, you are reading the US-pattern correct? This means you work top part with double crochet (US-English terminology), then work the fan pattern over all stitches on body, first with double crochets then with treble crochets instead of double crochets to get the fan higher/longer. Happy crocheting!
20.06.2023 - 15:32Ik ben een paar x opnieuw begonnen en heb nu alle panden aan elkaar gemaakt en met de meerderingen nu 116 stokjes. Nu moet ik met de lossenbogen beginnen. Maar ik kom met geen mogelijkheid aan 34 bogen als ik doe wat in het patroon staat. Aleen maar meer. Kloppen de aantallen steken wel?
29.01.2023 - 16:59Hoeveel toeren meoet je het achterpand in stokjes haken nadat je de schoyderdelen aaneen hebt gesloten middels de lossenketting?
25.01.2023 - 11:58DROPS Design answered:
Dag Antoinette,
Dit is heel afhankelijk van de maat die je haakt. Na toer 4 haak je verder in de hoogte tot het werk 11-12-13 (14-15) cm meet.
01.02.2023 - 21:06Ik ben met achterpand bedonnen. Klopt het dat de kant van de opgezette lossenstreng de bovenkant van de schouders is?
25.01.2023 - 11:41DROPS Design answered:
Dag Antoinette,
Ja, inderdaad, dat is de bovenkant van een schouder. Je haakt vanaf de schouder naar beneden.
01.02.2023 - 21:07Vraagje. Ik snap echt niet hoe ik de meerdering moet haken bij de armsgaten. De ene kant lukt wel maar als ik de andere kant haak dan meerder ik de toer erboven en niet in dezelfde toer. Ik heb het filmpje bekeken maar daar wordt ook maar een kant getoond
10.06.2020 - 11:49DROPS Design answered:
Dag Esther,
Aan de andere kant meerder je inderdaad in de toer erboven. Er komt dus een verspring in de meerderingen.
11.06.2020 - 13:33Hi! When increasing for the arm hole, I understand how to add stitches at the beginning of the row using a chain. When I get to the other end, how do I add stitches? Thanks!
03.03.2020 - 07:13DROPS Design answered:
Dear Donna, the increase on armholes and neck are worked the same way at the end of the rows (both from RS and from WS), ie to increase 1 dc, crochet at the end of the row: 1 ch + 2 ch to turn with, turn and work 1 dc in the 3rd ch from hook, work to the end of the row and repeat the inc. Happy crocheting!
03.03.2020 - 10:04This pattern is adorable! Could you please tell me how many yards or meters are needed for each size? Thanks!
01.03.2020 - 22:44DROPS Design answered:
Dear Donna, you will find the required amount of yarn for each size under header - read more here. Happy knitting!
02.03.2020 - 10:57Bonjour, au 4ème rang du point d'éventail, 4B+2ml+4B au milieu du groupe de B suiv... Il est écrit dans l'arceau d'1 ml du groupe de B qui est en réalité un arceau de 2 ml, me semble-t-il....? L'éventail étant constitué de 4B,2ml,4B...? Merci d'avance
09.02.2020 - 23:53DROPS Design answered:
Bonjour Martine, il s'agit bien de l'arceau du groupe de brides précédent (= 2 mailles en l'air effectivement, la correction a été faite, merci). Bon crochet!
10.02.2020 - 10:02Det går inte att skriva ut era mönster. Det kommer endast upp en bild på flera garnnystan.
18.01.2020 - 17:29DROPS Design answered:
Hei Karin. Når det kommer opp et bilde av flere garnnøster må du klikke på teksten der det står "Skriv ut mönster →" øverst til høyre. God Fornøyelse!
20.01.2020 - 15:00